SkinMesh
SkinMesh is a customizable 3d object supporting bone-based animation, frame-by-frame animation, multiple animation sets, animation blending and various rendering techniques and visual effects.
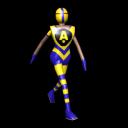
With the SkinMesh object you can render your own 3d models in an interactive 3d world. Please see this tutorial for details.
If you link the SkinMesh object to another object supporting physics (like for example a RigidBody based object), then the mesh will stay with the body while it moves around in virtual space.
In this case, please note that the mesh will follow the parent object by keeping the relative position you set in the Virtual Editor.
If the SkinMesh object isn't linked to anything, then, run-time, it will keep its location (performing any bone-based or 'frame-based' animation 'in place'), unless it is following a path (see below).
After adding the SkinMesh object to your project, you can configure it by double-clicking it in the Object List.
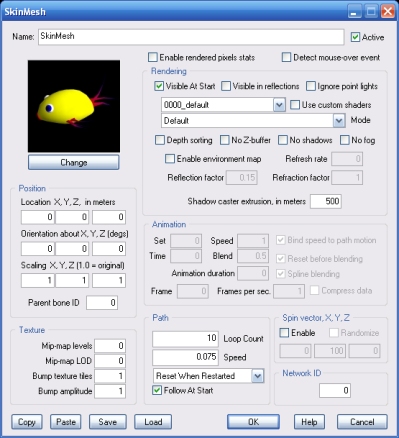
You can select the visual aspect for the SkinMesh object by clicking this button. You can add your own 3d models to the library by using Google SketchUp. Please see this tutorial for details.
When this value is non-zero, and the SkinMesh object is linked to another SkinMesh which is bone-animated, the first SkinMesh will be attached to the second SkinMesh's bone defined by the specified bone ID.
This feature can be used, for example, to attach a sword to the hand of a walking character. See the example project called SkinMeshBoneDemo.3dr.
The bone ID must be a positive, non-zero integer. The first bone in the model is 1, the second 2 and so on. What bone corresponds to a certain ID depends on how the animated model was originally designed.
Note: the position of the attached SkinMesh is relative to the bone position when the animated model is in its initial pose. This may not be the default pose you see in the Virtual Editor. To see the initial pose of all animated SkinMesh objects in the scene, hold the [F] key pressed.
Setting this value to 1, sometimes improves frame-rate because one single mip-map level uses less video memory. Frame-rate improves dramatically if all textures in the scene fit into the available video memory.
In practice, the bigger the factor, the more blurred the textures will be. Negative values (sharper textures) are allowed.
NOTE: sharper texture rendering uses more video memory, which tends to affect rendering performance. Use the highest mipmap level of detail possible, to optimize performance and improve frame rate.
However, because rendering surfaces that are illuminated by multiple lights require much more processing power, you may want to disable this feature for specific SkinMesh objects to optimize frame-rate.
Note that, for each SkinMesh, there is a maximum limit of point lights that can affect its surface at any given time. Please see the PointLight object's help file for details.
IMPORTANT: point lights with a small range may fail to illuminate SkinMesh surfaces that are made of big polygons.
Note that 'bumpy' techniques are only rendered if a normal map image file is present in the data folder for the currently selected model.
By checking the Use custom shaders option you can disable pre-defined shaders, which allows you to write custom shaders for the SkinMesh by using HLSL code in your scripts.
For more information about writing custom shaders, please click here.
For example, if you render your flat, partially transparent SkinMeshes as billboards, enabling Depth sorting is the only way to avoid visual artifacts where they overlap.
When making your 3d models to be used as billboards, keep in mind that they will be rendered with their local Z axis facing away from the camera.
If it is any positive value instead (below 450.0) then the surface will dynamically reflect/refract the actual environment surrounding the object.
Setting it to the special value 0.01 will create a static image of the actual environment surrounding the object. This feature can be used where you don't have a cubic image matching the environment and dynamic updating of the reflected image is too slow. Note that the reflected image may not be updated in the editor. Updating only occurs when the project is launched or the SkinMesh object is reset by an Event object or a Script object, run-time.
NOTE: an object is reflected/refracted only if the Visible in reflections option is available and checked on its property dialog.
NOTE: Dynamic environment-maps can be very slow to render. The greater the refresh rate factor, the slower the rendering.
NOTE: actual reflections/refractions are not performed if the video-card doesn't provide so called render-to-texture functionality.
NOTE: the intensity is rounded to 0.5 on some older video-cards.
NOTE: this parameter is only supported by glass and water shaders.
Note that, when the specified length is zero, the shadow volume is identical to the shadow caster mesh. In this case, the shadow effect renders a bit faster.
The SkinMesh object supports two types of animation: bone-based (mesh skinning) and frame-based (a sequence of 3d models rendered one after the other).
If you attach the SkinMesh object to a path by linking it to a Path object, then it will follow the pre-defined course, while also performing its bone-based or frame-based animation, if defined.
Note that the relative speed along a specific portion of the path depends on the number of nodes defined along the segment. In particular, the more nodes are defined, the slower the speed. This property allows you to accurately program speed variations.
If this option is enabled, you can specify an axis of rotation for the mesh by providing its vector components. Run-time, the mesh will ignore path or parent object orientation, spinning about the axis you specified instead.
The vector length will determine the rotation speed, in degrees per second.
For example, you can achieve a rotation about the X axis at 360 degrees per second with (360.0f,0.0f,0.0f). A rotation about the vertical (Y) axis can be achieved with (0.0f,360.0f,0.0f) instead. And (0.0f,0.0f,360.0f) will cause a rotation about the Z axis.
If the Random option is checked, the axis you provide is only used as a reference to perform rotations about random axes.
If this option is enabled, the number of pixels rendered for the SkinMesh object is available as an internal parameter. Please see the INTERNAL PARAMETERS section below for details.
This feature can be used to determine if a Skinmesh object is visible, because the number of rendered pixels will be zero if the SkinMesh is completely behind another object in the scene.
Note: if the hardware doesn't support rendering statistics, the number of rendered pixels will be returned as -1, even if this option is enabled.
Note: when this option is enabled, the SkinMesh object will always disappear behind transparent objects and it will not receive shadows.
Note: if multiple SkinMesh objects have this option enabled, results are not guaranteed to be accurate when these objects overlap.
Note: if multiple cameras are active in the scene, you must specify what camera will be used for the statistics, by making it the only camera with the 'Rendering statistics' option enabled. Please see CamChase. Note that the Cam1StPerson object is set to support statistics by default and this setting cannot be changed.
If this option is enabled, the SkinMesh object is checked 60 times per second to see if it is under the mouse.
If it is, an internal parameter for the SkinMesh object is set to 1.
Please see the INTERNAL PARAMETERS section below for details.
Note: because this function uses the original, un-morphed SkinMesh geometry as a reference, mouse-over results may not be accurate for animated SkinMeshes.
Warning! This option can be very slow to process for SkinMeshes made of many polygons.
In a multiplayer game, when the project is running on the server, SkinMesh objects that have the same Network ID and are in a project which is running on a connected client PC, are automatically placed at the same location as the SkinMesh on the server.
So, for example, if you have a racing game running on the server, and all the SkinMesh objects for the cars (body, wheels etc) synchronized with identical SkinMesh objects in a project running on a client, the user in front of the client PC screen will see the race that is happening on the server.
Note that the project running on the client will only need to include SkinMesh objects (visuals). The Car object for example, will not be needed there. Nor will be any car physics simulation.
The Network ID can be any value between 1 and 65535. Setting the ID to zero will disable synchronization.
For more information about creating multiplayer projects with 3D Rad, please click here.
For information about the remaining controls, please click here.
The following internal parameters can be accessed run-time by using objects like EventOnValue or Script: