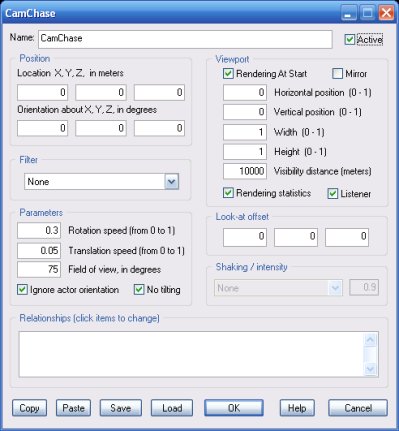
CamChase

This camera takes and chases any object you specify as target.
By positioning the camera and its target in the Virtual Editor, you specify the relative location (offset) the camera will try to keep while the target moves around.
All active objects that are linked to the camera in the List Editor are considered as targets, but only one of them is actually used runtime.
If no target is defined the camera holds the position you set in the Virtual Editor.
Please see this tutorial for examples of usage.
Camera filters apply special post-processing effects to the rendered scene. Each effect comes with default parameters. You can alter these parameters run-time by using a script. Please see the INTERNAL PARAMETERS section below for details.
Rotation Speed (from 0 to 1). Quickness of camera rotation, when taking a moving object. Zero will cause the camera to not rotate at all, and 1.0 will cause the camera to align with the target immediately.
Translation Speed (from 0 to 1). Quickness of camera translation, when chasing an object. Zero will set a still camera, and 1.0 will cause the camera to reach its offset location immediately.
Field of view, in degrees. The lower the value, the more zoomed the scene.
A negative value switches the camera to orthogonal projection mode. In this case, view width (zooming) is defined by the absolute value of FOV. For example, -5.0 sets a 5.0 meter wide view.
Note that orthogonal projection cannot render SkyBox objects. Make sure the orthogonal camera is properly located as objects too far or too close or behind the camera are not rendered!
Ignore actor orientation. If not checked, the camera will consider its relative Virtual Editor position from the target object as a rigid offset. It means that the camera will try to keep its relative position while the target object rotates. This feature can be used to implement on-board cameras, for example.
No tilting. If checked, the camera will never tilt. Make sure this setting is not selected when the CamChase object is used as an on-board camera for example.
Rendering At Start. If not checked, the camera will not display the scene when the project is launched. Run-time, you can enable/disable rendering by 'showing/hiding' the camera object by using event objects like EventOnInput.
Mirror. If checked, the camera will render a mirror view of the scene. This can be used to implement rear-view mirrors in a racing game for example.
Horizontal position (0-1). The screen position of the viewport's top/left corner, between 0.0 (left margin) and 1.0 (right margin).
Vertical position (0-1). The screen position of the viewport's top/left corner. Zero is the left margin of the screen, 1 is the right margin.
Width/Height (0-1). Viewport size, between 0.0 and 1.0 (full width/height, as big as the screen).
Visibility distance (meters). Objects beyond the specified distance will not be rendered. Excluding from rendering the distant features of a large scene can improve frame-rate on slower systems.
Rendering statistics. If checked, the camera will allow tracking of the number of rendered pixels for SkinMesh objects. Please SkinMesh object's help file for details.
Listener. By default, if multiple cameras are active on screen at the same time (split-screen, rear-mirrors etc) the foremost camera is automatically used as listener (the reference point for all 3d sounds in the scene). Un-checking the Listener option will prevent the CamChase object from being used as listener.
The camera takes a specific point on the object. This point is defined as an offset relative to the natural object's model center.
For example, assuming the offset from the model's center (look-at offset) is a point on the front bumper of a car, this point on the car bumper will still be the camera target when the car moves or rotates.
If the camera is linked to another object in the Object List, then it supports several shaking effects you can use to boost realism for your projects by simulating camera human handling, quakes, dinosaur steps, vibrations caused by high speed and so on.
The intensity factor sets the shaking amplitude, frequency, or both, depending on the selected effect.
Note that the intensity factor can also be controlled run-time by using event objects or a script (see Internal Parameters section, below).
This list defines how the CamChase object relates to the objects linked to it. The following relationship types are supported:
NOTE: specifying more than one single object as target is not recommended. Resulting behavior is undefined.
NOTE: the avoidance algorithm is only guaranteed to work when the Translation Speed parameter (see above) is below 1.0.
This can be used for example to implement virtual monitors (like the screen of a CCTV in a 3d scene). For an example of usage, please see the CameraTextureDemo project (in 3D Rad press Ctrl+O to access available demo projects).
If multiple objects are marked as 'LOOK-AT', the camera will look at the closest.
Example of usage is a camera following a walking character (CHASE) but looking at a monster (LOOK-AT).
If the 'LOOK-AT' object is a 'dummy' invisible SkinMesh, you can dynamically place the dummy SkinMesh anywhere in the scene to change camera target, while still following the actor.
For information about the remaining controls, please click here..
The following internal parameters can be modified by using the Script object:
Set this parameter to 1 to activate Blur effect, 2 for Bloom etc.
Blur intensity or
Bloom luminance.
Bloom mid-gray.
Bloom white-cutoff.
Bloom intensity.