HaploPainter Online Manual
Version 1.0
Index
Algorithms, best practice and limitations
Run from source files – Windows
Installing mandatory missing Perl modules
Installing optional missing Perl modules for database support
Some tips for interpreting haplotypes
Data export and publishing tips
Building and extending pedigrees with the graphical user interface
Storing and restoring defaults
How to start
A good way to start is to prepare a pedigree file in linkage format. This format is very simple and can easily be generated by any text editor. Alternatively you may prepare data in a HaploPainter’s specific input format (CSV) or query a database. They allow you to import further individual specific details. After you imported one or more pedigrees, HaploPainter will draw them – randomly placing individuals while minimizing line crossings.
During the process of pedigree calculation HaploPainter not accepts key input. In the right part of the window some information about the current calculation status is displayed. The example figure below tells you that HaploPainter has finished the calculation No.12, found 5 crossings there and that the best pedigree contains 1 crossing.

If you don’t like the result, you always can ask HaploPainter to redraw the pedigree by pressing F5. Most changes in the pedigree will be retained until you press this button.
In order to attach haplotype data from other linkage programs (Merlin, Simwalk2, Genehunter, Allegro) you can import those files after you have been loaded pedigree data. Again the haplotype file can consist of data of more then one family. The last step would be the import of mapping data – replacing marker names and coordinates.
Since version 1.0, HaploPainter changed the way in which imported data are handled. If you choose to import pedigree data, HaploPainter will attach new pedigrees to existing one and replace pedigrees with the same family identifier. Haplotype data are scanned for family identifiers and will be imported only if they match existing pedigrees. Mapping data can be imported for specific families or for all families depending on the setting of the “Global map import” checkbox.
HaploPainter will give you plenty of options to modify the drawing style. You can change it in the “Configuration” menu, available form the “Option” menu or context menu (right mouse bottom). One of the interesting options with respect to haplotype drawing is the ability to manually select which marker should be drawn or not. This is very useful for “long” haplotypes, such as obtained from genome scans with high-density marker panels of many thousands of single nucleotide polymorphisms (SNPs), which thus can be reduced to a human readable size. Any part of the haplotype can be annotated for any individual by using one or more text boxes, for instance if you wish to draw attention to regions of interest like recombination events.
If you choose “Save” or “Save as” from the File menu, HaploPainter saves the complete current drawing status of all families and all modifications you made after import of data. You can restore this state by choosing “Open” from the “File” menu. The “Save” function overlaps with other export functions which produce ether images (PS, PDF, PNG, SVG) or LINKAGE like text files (CSV).
Algorithms, best practice and limitations
The problem with crossing free node placement is that even if you find an intelligent way to build the pedigree from scratch, the calculation time for all possible combinations increases rapidly with the number of nodes. HaploPainter is programmed in Perl – a computer language which is not known to be the fastest, but even if you would do it in other languages, big families would tax your patience rapidly.
For this reason HaploPainter pursues a heuristic strategy. Instead of trying every possible combination, it places individuals of a sibling group randomly a fixed number of times. The very first step is that HaploPainter looks for founder couples and the generation they occur. Those founder couples again are placed randomly between sibling groups of that generation.
For the most common used pedigrees in the field of linkage this approach works well so far. While large but acyclic pedigrees make no problems, big families with many loops will bring HaploPainter to its knees. Because of this limitation HaploPainter decides to break all loops during import of pedigrees – if your pedigree contains more than three of them. You still can change this behavior later with the “Breaking loop” option allowing you to decide yourself which loop should be broken or not.
However, for the majority of pedigrees HaploPainter can find crossing free solutions or at least good starting points to correct them manually with the graphical user interface. The GUI has almost no limitations in the placement of individual nodes. Connecting lines are still drawn automatically, so you can do it quickly.
Installation
For some systems, HaploPainter is available as perlapp
generated binary. As HaploPainter depends of numerous
libraries (GTK+, Cairo and Glib) and linking of all these
libraries in one file would lead to significant increase in
start time, they are provided as libraries with HaploPainter
binary. The only thing to consider is to keep the libraries
and HaploPainter together or to put the libraries on the
system PATH. If those binaries are not
available from the download page for your system, you still
could start the program from the source code file. This is a
file ending with “.pl” The program
language Perl is available for nearly all computer systems
and with a bit of knowledge, patience and expert help you
can run HaploPainter from source code files on every
computer system. The procedures differ between systems
– the procedure for Windows is described below.
In order to connect HaploPainter to an Oracle database you
also must install the appropriate drivers and the Oracle
client. It also may be necessary to set
the ORACLE_HOME and NLS_LANG
environment variables.
Run from source files – Windows
Installing Perl
Download and install the latest version of Perl for Windows from ActiveState
Installing mandatory missing Perl modules
Perl modules for ActiveState’s Perl are added via Perl Package Manager – ppm. Type the following commands into the console window:
> ppm install Sort-Naturally
> ppm rep add sisyphusion http://www.sisyphusion.tk/ppm
> ppm install Tk
> ppm install Gtk2 --force
Installing optional missing Perl modules for database support
In order to use HaploPainter’s capabilities to query databases you must install more modules. Without these modules HaploPainter will start anyway, but will produce warnings when you try to use this functionality.
> ppm install DBD-PgPP
> ppm install DBD-mysql
> ppm install DBD-Oracle
Other operating systems
For other operating systems it could be necessary to compile libraries yourself. Field reports are welcome!
Data import
For data import there are “Import Pedigree
…”, “Import Haplotypes …”
and “Import Map File …” options available
from the “File” menu. It is the best to follow
this order. Don’t be confused by the
“Open” command! That’s for the
HaploPainter specific data storage. Those files have the
extension ‘.hp’ by default and are
not human readable.
Import pedigrees
There are two kinds of text input files that HaploPainter accepts to define pedigree structures – LINKAGE and CSV. The CSV format is designed so that the first 6 columns have the same meaning as in LINKAGE format. If you start to collect pedigree data in a database table, you must prepare a table or view with the same structure as used by CSV format. By default HaploPainter handles text data as encoded in UTF-8. You can change it via File → Encoding. HaploPainter deals with Unicode by looking for the byte-order mark (BOM) sequence ‘U+FEFF’ at the beginning of documents, and uses settings only if this sequence is not found. In that way it is, for example, possible to read Excel sheets, which are saved as Unicode Text format (UTF-16LE) although the setting in HaploPainter is different. The encoding is very important for saving/exporting pedigrees in CSV format. In this case HaploPainter takes care of adding the BOM. (See also the chapter Encoding and Unicode support.)
LINKAGE
Well, there are actually many different LINKAGE pedigree files used by statistical software. The format used here is also called pre-MAKEPED LINKAGE format.
Example

#FAMILY PERSON     FATHER     MOTHER     GENDER AFF_STATUS
2002    1210708    1210710    1210711    0      0
2002    1210701    1210710    1210711    2      1
2002    1210700    1210710    1210711    1      2
2002    1210709    1210710    1210711    1      3
2002    1210706    1210710    1210711    2      4
2002    1210705    1210710    1210711    1      5
2002    1210704    1210710    1210711    2      6
2002    1210703    1210710    1210711    2      7
2002    1210710          0          0    1      8
2002    1210711          0          0    2      9
HaploPainter is tolerant in the definition of the exact
format. Empty lines and those beginning with the signs
‘#’, ‘!’
‘*’ or ‘\’
are ignored and may be used to for comments. HaploPainter
tries to find out the used column delimiter by first looking
for semicolons, followed by tabulators and finally other
white space. Only lines resulting in 6 or more non-empty
columns are processed, and only first 6 columns will be
taken into account. White space at the beginning and end of
all values is removed.
LINKAGE format
| FAMILY | not NULL |
| PERSON | not NULL |
| FATHER | not NULL |
| MOTHER | not NULL |
| GENDER | not NULL, 0 or x for unknown, 1 or m for male, 2 or f for female |
| AFFECTION | not NULL, 0 or x, 1, 2, 3, 4, 5, 6, 7, 8, 9 |
As you can see, all columns must have defined values! The symbols x/m/f used for gender and affection status also can be in upper case. The affection status field in the originally LINKAGE format only can hold the values 0, 1 and 2. This can be extended in HaploPainter by up to 10 possible values. Every affection status is assigned a different color that fills the symbols.
CSV
The CSV format is influenced by the LINKAGE format but
differs in the number of possible columns and the way it is
parsed. As in LINKAGE format, empty lines and those
beginning with the signs ‘#’,
‘!’ ‘*’ or
‘\’ are ignored and may be used for
comments or header rows. Only a single tabulator sign is
allowed as column separator! The same rules as in LINKAGE
format apply to first 6 columns
(see above). Field values are
case insensitive as well. The figure below shows the same
pedigree from the sample above but extended by HaploPainter
specific columns. It illustrates many of
HaploPainter’s additionally features like Unicode
support, twins, termination of pregnancy symbols, and
deceased, adopted or consanguineous individuals.

CSV format
| FAMILY | not NULL |
| PERSON | not NULL |
| FATHER | not NULL |
| MOTHER | not NULL |
| GENDER | not NULL, 0 or x, 1 or m, 2 or f |
| AFFECTION | not NULL, 0 or x, 1, 2, 3, 4, 5, 6, 7, 8, 9 |
| IS_DECEASED | NULL or 0 or n, 1 or y |
| IS_SAB_OR_TOP | NULL or 0 or n, 1 or y |
| IS_PROBAND | NULL or 0 or n, 1 or y |
| IS_ADOPTED | NULL or 0 or n, 1 or y |
| ARE_TWINS | NULL, [m or d]_text |
| ARE_CONSANGUINEOUS | NULL, text |
| TEXT_INSIDE_SYMBOL | NULL, char(3) |
| TEXT_BESIDE_SYMBOL | NULL, text |
| TEXT1_BELOW_SYMBOL | NULL, text |
| TEXT2_BELOW_SYMBOL | NULL, text |
| TEXT3_BELOW_SYMBOL | NULL, text |
| TEXT4_BELOW_SYMBOL | NULL, text |
Meaning of additional fields
IS_DECEASED: Set to 1, y or Y if the individual is deceased. In that case a diagonal line through the symbol representing that individual is drawn. This line is split into two lines if a text is placed in the center of the symbol.
IS_SAB_OR_TOP: Set to 1, y or Y if the individual deceased by spontaneous abortion or termination of pregnancy. The individual symbol is drawn as a triangle now. Later you can define in configurations if the gender is placed as text below the symbol or not.
IS_PROBAND: Set to 1, y or Y if the individual is declared as proband (the person being reported on in a medical study). This results in a ‘P’ sign attached to an arrow pointing to that individual.
IS_ADOPTED: Set to 1, y or Y if the individual has been adopted. The symbol for this individual is drawn in brackets.
ARE_TWINS: Individuals sharing the same string in
this column are recognized as twins. The first character in
that string tells HaploPainter if the twins are monozygotic
‘m’ or dizygotic ‘d’ followed by an
underscore followed by a unique identifier. Examples for
allowed strings
are: m_1, d_gruppe1. Twins are
drawn according to
Bennett et al. 1995. A
twin group must contain two individuals or more.
ARE_CONSANGUINEOUS: Individuals sharing the same string in this column are recognized as consanguineous (individuals are related to each other). This only makes sense if individuals have offspring. In that case a double line between couples is drawn. Although HaploPainter automatically detects consanguinities, for instance, if it finds loops, you can additionally define any couple as consanguineous. This is good for situations when the real degree of consanguinity is unknown or you want to draw more compact pedigrees. A consanguineous group must contain two individuals. You also can define consanguinity in a menu.
TEXT_INSIDE_SYMBOLS: Place text inside symbols.
TEXT_BESIDE_SYMBOL: Place text to the left and above the symbols.
TEXT<n>_BELOW_SYMBOL: HaploPainter gives you the opportunity to place text below symbols. By default, the individual identifier is one of those text lines, but you can attach up to four additional text lines below. In the configuration menu you can arrange the combination of columns you want to show in your pedigree (see Ped & Case Info).
Database
Import of pedigree data from database tables is supported
– to date for MySQL, PostgreSQL and Oracle. To use
this feature, the corresponding Perl modules must be
installed (only if you run HaploPainter from source file!
HaploPainter will work without DBD modules because they are
loaded at runtime, but will issue warnings). For Oracle, you
also need the Oracle client, NLS_LANG
and ORACLE_HOME environment variables and an
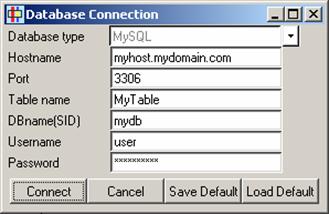
entry in the tnsnames.ora file. You access the
database connection window by pressing F4 or via File →
Import Pedigrees … → Database. For databases
that are located on your computer you also can put
‘localhost’ instead of using the host
name. After you successfully connect to the database, a
“Choose Pedigrees” menu will appear – here
is an example:
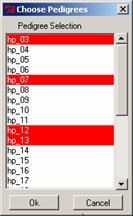
All families are listed inside this window and can be marked by using the left mouse button in combination with the shift and control (Ctrl) keys. All marked pedigrees are imported after pressing ‘Ok’.
The Database Connection window has two other functions to save the connection data as default (Save Default) and reload them (Load Default).
Import haplotypes
A haplotype describes the linear sequence of alleles at multiple loci in the genome that are transmitted on the same chromosome. In diploid cells, a genotype is composed of two alleles. Commonly used methods for measurement of genotypes are not able to distinguish which allele belongs to which chromosome, but in many cases possible haplotypes can be reconstructed through statistical methods. Haplotypes are nice instruments in the interpretation of linkage results. They are able to map a disease-causing gene to a region in the genome. HaploPainter supports four statistical software packages that are popular in the calculation of haplotypes: Genehunter, Allegro, Simwalk2 and Merlin. Specific output files produced by this software can be imported and visualized together with pedigrees. Import haplotype files via File → Import Haplotypes and choose the import format:
| Genehunter | → | haplo.dump |
| SimWalk2 | → | HAPLO.??? (horizontal orientation) |
| Merlin | → | merlin.chr (vertical orientation) |
| Allegro | → | haplo.out, ihaplo.out, founder.out |
SimWalk2 controls the way it outputs haplotype results
through a batch file. In batch number #46 line 1 you can
switch between default horizontal (N) or vertical (Y) output
orientations. HaploPainter expects to use the default value
(N). Merlin also has two possible output modes. By default
Merlin produces files with haplotypes in vertical
orientation – the format that HaploPainter
supports. You control that in Merlin by the command line
parameter ‘--horizontal’.
Supplementary information enclosed in those output files such recombination events are ignored by HaploPainter. It uses the following rules for haplotype coloring.
- Try to find out the first marker beginning from p-telomere from which the phase can be derived and then trace back the haplotype with the color from that phase up to the chromosomal starting point.
- The first marker showing differences is declared as the point of recombination and the color is changed to the recombinant haplotype until the next recombination event occurs.
- Missing genotypes are interpreted as uninformative.
- Other uninformative genotypes are drawn in special thin blocks when set in options.
After you have imported haplotypes, if you are not satisfied with the colors HaploPainter has chosen for you, you can press F6 to choose all colors anew. The configuration menu gives you the opportunity to manually modify colors of haplotypes or fix some colors so that pressing F6 has no effect for those. You also can prevent markers from being shown.
Some tips for interpreting haplotypes
Points of recombination are often surrounded by uninformative markers. Due to the way HaploPainter deals with analysis results, it is possible that your region of interest is shown as too small or shifted. That should be checked and manually corrected! To do this, just double-click on alleles from those individuals. The menu that appears gives you an instrument to change the phase or declare markers as uninformative. You may find uninformative markers by moving the mouse cursor over alleles, which start flashing red in that case. In general, you should order the results of your multipoint linkage. Also be distrustful if you see double recombinations (two neighboring recombinations). They are mostly hints for genotyping errors. Some software packages tend to complete haplotypes for not genotyped individuals. You never should thrust those haplotypes – see them only as a suggestion.
Import marker maps
To replace dummy marker names which are automatically
created after import of haplotype data you need to import a
map file too. There are only two columns of interest: marker
name and marker position. These columns are expected to be
in columns 2 and 3 of the input files. The expected column
separator is white space. As in LINKAGE format, empty lines
and those beginning with the signs
‘#’, ‘!’,
‘*’ or ‘\’
are ignored and may be used for comments or header
rows. There are two options for map files concerning the
column positions:
| Chromosome | Marker Name | Marker Position | (CHR-POS-MARKER) |
| Chromosome | Marker Position | Marker Name | (CHR-MARKER-POS) |
As you can see, the only difference is a switch between columns 2 and 3.
A map file can be loaded as specific for a family or for all families. This depends on the setting of the ‘Global map import’ flag in the File menu. This flag is off by default, in other words, an imported map file only belongs to the currently drawn family.
Data export and publishing tips
Since version 1.0, HaploPainter uses Cairo, Pango and GTK+ internally for rendering exported graphics. If you use the standalone version, you don’t need additional programs to convert images into other formats. Only if you plan to run HaploPainter in your own Perl environment you have to take care of that (see Installation part). Within HaploPainter there are different formats available: vector graphics (PostScript, PDF, SVG), bitmap graphics (to date only PNG) and flat file (CSV). Keep in mind that images produced by HaploPainter will cover the RGB color space. If you plan to use the produced images for the web, this doesn’t matter but otherwise you must be careful. Some journals like to have graphic in CMYK colors, and probably you don’t have much experience with transformations from RGB to CMYK. Unfortunately, this is not as easy as you might think, because you must choose the right color profile that should be used for transformation of color spaces. It is not possible to describe every RGB color in CMYK. Furthermore, the end result and color impressions depend of the calibration of your monitor, the paper used and other printing dependent stuff. So, whenever possible let the journal do this job for you or ask them which profiles give the best results. In case you want to do it yourself, you should take a look at Adobe Acrobat and Adobe Photoshop. It also is helpful to print the image on a CMYK color laser printer to have a rough idea about the color conversion effect. Many journals prefer TIFF images with embedded ICC profiles and color resolution greater 300 dpi. Sending images in other vector graphics formats, which are accepted (like Adobe Illustrator/AI, EPS, PS, PDF, CorelDRAW/CDR, FreeHand/FH) would be an advantage (at least for you) since the layout and printing professionals could transform the drawing to the best resolution and colors themselves.
Vector graphics
Vector graphics describe drawing elements as mathematical formulas. The main advantage is its scalability – you can create every possible image resolution you want! The other advantage is that you can edit images with common desktop publishing software.
SVG
Scalable Vector Graphics is based on XML and has been developed as open standard by the World Wide Web Consortium (W3C) since 1999 with version 1.0 released in 2001. Since then, most modern web browsers integrated native support (Firefox, Opera, Safari, Chrome). It seems that Adobe and Microsoft tried to subvert this standard, because Adobe as most known provider for SVG browser plug-ins lost their interest to give further support after buying Macromedia and Microsoft preferred a proprietary vector graphics format VML (which is ignored by other browsers). However, SVG is a good choice if you plan to integrate images into web pages. Even Microsoft’s Internet Explorer 9+ and mobile OS (Android 4+, iOS 7+) support SVG 1.0 natively, allowing for use of SVG on all websites. You can import SVG into a plenty of desktop publishing software, like the freely available Inkscape.
PostScript
Adobe PostScript is something like a program language for printers. Most printers today are equipped with PostScript interpreters – so you may use PostScript to produce high quality printer jobs. Programs like Ghostview/Ghostscript are able to view them or convert PostScript into PDF, EPS or other formats.
PDF (developed by Adobe, now adopted by ISO) is the standard for platform independent document exchange. The format is very compact and viewers for every platform are freely available – so my recommendation is to use this format whenever possible.
Bitmap graphics
PNG
PNG is a good choice for displaying bitmap graphics, particularly in web browsers. The format is free for use, has better performance then GIF and even Microsoft’s Internet Explorer will show it …
Flat file
CSV
Exported CSV format is identical with the imported counterpart. So you may import files in LINKAGE format, make your modifications within the GUI and export it as extended CSV/tab delimited version. This also would be an easy way to produce templates for other pedigrees.
Encoding and Unicode support
Since HaploPainter version 1.0, reading and writing files in Unicode is supported. There are several Unicode encodings, but UTF-8 and UTF-16LE seem to be the most relevant to date. UTF-8 is the most common type, dominating the web. So why UTF-16LE? The answer is Microsoft Excel. Using Excel to create CSV files ready for import into HaploPainter is a good idea! Although most text editors would do their job well, handling of tables in Excel is quite comfortable. If you plan to work with strange characters (for you, they are surely not strange) you must save data in Excel using Unicode Text format and this is, in fact, UTF-16LE. The encoding type setting is located inside the file menu. There are three kinds available: ASCII, UTF-8 and UTF-16LE – the default being UTF-8.
Maybe you wondered about the checkbox “Write BOM” available from the File menu. This is the special Unicode character ‘U+FEFF’ (byte-order mark) represented by a series of 2-4 bytes used as marker to indicate the encoding type. I don’t want to comment the actual discussion if this is good or not! HaploPainter’s default is to write a BOM sequence for Unicode files – and you can switch it off, if you want! HaploPainter is able to read Unicode files that are encoded in ASCII, UTF-8, UTF-16LE, UTF-16BE, UTF-32LE and UTF-32BE. If a BOM sequence is found, HaploPainter uses it – whatever encoding type is preset.
Working with pedigrees
Navigation
Once you imported the pedigrees, haplotypes and mapping data, some functions to navigate through the pedigrees are available, for instance, in the navigation menu.

The arrow symbol is activated by default. In this mode you can activate symbols either by clicking single symbols or clicking the mouse button while moving. This forces HaploPainter to draw a rectangle with a dashed line. Every symbol inside this rectangle is activated as indicated by a change of its color to red. Now you can move symbols around by drag and drop. Note that you must place symbols at positions that are not occupied by other symbols, otherwise the symbols will not be moved! Zooming in or out the drawing is available in different ways – via plus/minus navigation menu symbol, plus/minus keys, Edit menu and context menu. Use the hand symbol to shift the drawing by clicking the mouse button to have a fixed point while moving the mouse. In case of many imported pedigrees you can change the current pedigree by clicking the green left/right arrows (resulting in a change to next or previous pedigree) or alternatively by using the View → Draw Pedigree menu. This menu also is detachable from the main menu for easy navigation through the pedigrees. Two other useful functions to center or fit the pedigree into the current window – Center View/Fit View are accessible from the context menu and Edit menu.
Redrawing pedigrees
Most modifications you made during a pedigree life will be conserved until you do some of the following things:
- use the Redraw Ped (F5) function
- make changes in the way how loops are broken
- make changes to the Intersymbol distance value from the Configuration/Ped Style menu
- extend pedigrees with the GUI functions
Redrawing a pedigree will force HaploPainter to draw the
pedigree according to the settings of the Options
→ Sort by SID and Sort couples by gender
flag. If the Sort couples by gender flag is not set,
the individuals belonging to a generation are assembled
randomly. If the flag is set, the male individuals are
placed first! That’s the only difference. The
second modifier regarding the drawing order – Sort
by SID – reflects the handling of sibling
groups. By default, the order of siblings is random. If the
flag Sort by SID is set, HaploPainter will change the
drawing order of the members of a sibling group and applies
a special name sorting mechanism (nsort from
the module Sort::Naturally). The algorithm
works in a way human normally would think about sort and is
an intelligent combination of numerical and lexical sort. By
using both flags, you can force HaploPainter to draw
pedigrees in a determined way taking individual naming into
account.
Changing individual settings
If you double-click on a symbol, the following menu will appear that allows you to change individual settings and displays some useful information.
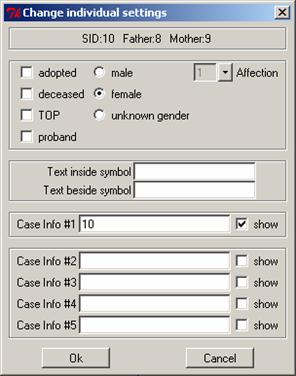

| Affection | A numerical value in range 0-9. Dependent of the settings in Options menu → Ped Color the symbol is filled with that color |
| Male | Males are drawn as squares |
| Female | Females are drawn as circles |
| Unknown | Individuals with unknown gender are drawn as diamonds |
| Adopted | Adopted individuals are drawn with brackets around the symbol |
| Deceased | Deceased individuals are drawn with a diagonal line through the individual. The line is divided in case of text inside symbols |
| TOP | Termination of pregnancy and aborts are drawn as triangle symbol. The gender is displayed as a letter (m/f) below the symbol |
| Proband | Attaches an arrow with the letter P left of the symbol indicating a person that is reported on in a medical study |
| Text inside symbol | Places text in the middle of symbols |
| Text beside symbol | Places text to the left and above the symbols |
| Case Info #1 | This is an individual identifier placed below symbols. It is not allowed to duplicate this name. The Show checkbox to the left of this field controls the display for all individuals |
| Case Info #2-5 | You may put further information text lines below symbols by using these fields. The Show checkbox to the left of this field controls the display for all individuals. You can fine tune the settings for Case Info from the Options menu → Ped & Case Info |
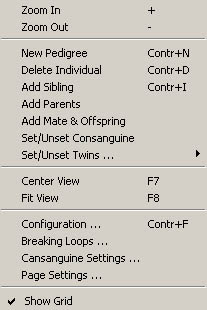
Building and extending pedigrees with the graphical user interface
The functions to create new or modify existing pedigrees are available from the context menu or Edit menu (see example below).
New pedigrees
To create a new pedigree you also can press the key combination “Ctrl+N”. A window will appear that asks for a pedigree name. After the name is saved by clicking “Ok”, HaploPainter draws a core family consisting of a couple and one offspring with predefined individual identifiers. To change the identifiers, gender or other individual settings, double-click on the respective symbol.
Delete individuals
To delete individuals, mark one or more symbols and choose the “Delete Individuals” function. You also can do this by pressing the keys “Ctrl+D” or “Del”. Remaining childless founders will be automatically deleted too!
Add siblings
To add up to 8 siblings, mark an individual and select the “Add Sibling” function. A window will appear that asks for sibling identifiers and gender. After “Ok” is pressed, HaploPainter attaches all siblings for which you entered a valid identifier to the pedigree. To change the identifiers, gender or other individual settings, double-click on the respective symbol.
Add parents
Parents can be added only to founder individuals. Mark the founder and select the “Add Parents” function. A window will appear that asks for the mother and father identifiers. After “Ok” is pressed, HaploPainter attaches a new founder couple to the pedigree. To change the identifiers or other individual settings, double-click on the respective symbol.
Add mate & offspring
You can attach a new mate and offspring to any individual. Mark an individual and select the “Add Mate & Offspring” function. A window will appear that asks for the mate and offspring identifiers. After “Ok” is pressed, HaploPainter attaches a new founder (only if that mate does not already exist) and a new offspring with unknown gender to the pedigree. To change the identifiers, gender or other individual settings, double-click on the respective symbol.
Consanguinity settings
Consanguineous individuals are automatically detected if the pedigree contains loops. However, you can declare any couple as consanguineous, too. The function to change consanguinity for all couples at once can be found in the Options and context menu → Consanguinity Settings. A new window displaying all couples will appear. Here you can mark any combination of entries, preview the changes and permanently change the new setting by pressing “Ok”.
The other way to quickly change the setting is to mark the two symbols of one couple and choose “Set/Unset Consanguinity” from the context menu or Edit menu.
Twin setting
To declare/undeclare two or more individuals as twins mark the symbols of a sibling group and choose “Set/Unset Twins” from the context menu or Edit menu. A new submenu gives you the opportunity to mark twins either to be monozygotic or dizygotic. The differences are shown in the following figure where the individuals 3+4 and 5+6+7 are declared as monozygotic twins and the other twin groups as dizygotic.
In the example above the “Intersibling Y distance” parameter from the Configuration → Ped Style menu was increased to a value of 45 to better separate the twin groups from the horizontal sibling connecting line. This value is set by default to a lower value to have more space for haplotypes and case information.
Loop breaking
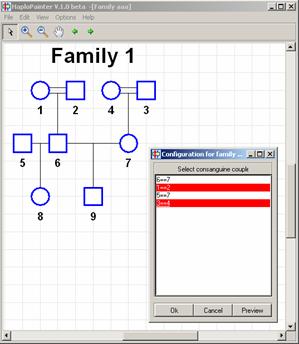
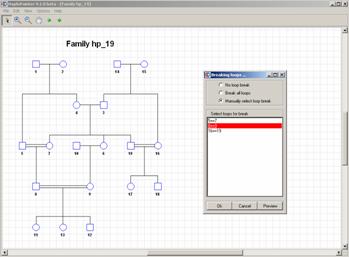
With respect to finding a good drawing solution, loops are the major challenge! Breaking a loop can be the only way to draw the pedigree without line crosses. Loops are broken by duplicating an individual that is located at the “end” node of a loop.
The more loops a pedigree contains, the more time it takes to find a good drawing solution. For this reason HaploPainter breaks loops automatically when it finds more then 3 of them. Later you can decide which loops should be broken or not. To select them, there is a “Breaking loops …” window, available from the Options or context menu. The following figures show the test pedigree hp_19 which contains 3 loops. After you select the “Breaking loops …” function, a new window appears that gives you the possibilities to choose either select breaking no loops, all loops or to manually select loops for breaking. Here it was selected to manually break the loop ending with the individuals 8==9.
Clear families
There are two functions to completely remove the currently drawn (‘Clear current’) and all families (‘Clear all’) from HaploPainter. They are available from the File menu.
The configuration menu
The configuration menu is the most important place to modify the way haplotypes are drawn and the drawing style of pedigrees. To illustrate the effects of all parameters would be a hard job! A practical way to find out what a parameter really does would be to change one parameter and press the preview button to see what happens! You start the menu either from the Options or context menu. The configuration menu consists of 7 tabs.
IMPORTANT: any changes in the settings will only affect the currently drawn pedigree!
Hap style
The settings in this menu will mainly affect the haplotype drawing style. Parameters collected there have numeric values and are changed via sliders.
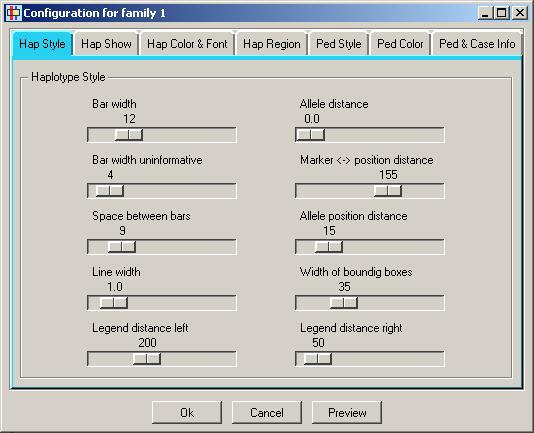
| Bar width | Size of haplotype bars in X-dimension |
| Bar width uninformative | Size of bars from uninformative alleles in X-dimension |
| Space between bars | Space between maternal and paternal haplotype from one person |
| Line width | Bar border line width, makes sense without ‘Fill bars’ option |
| Legend distance left | Distance between left marker legend and pedigree |
| Allele distance | Space between alleles in Y-dimension |
| Marker position distance | Distance between left marker legend and pedigree |
| Allele position distance | Distance between alleles and bars in X-dimension |
| Width of bounding box | Effects bounding boxes of marked haplotype blocks |
| Legend distance right | Distance between right marker legend and pedigree |
Hap show
The settings in this menu also will mainly affect the haplotype and legend drawing style. Parameters collected here are flags changed via checkboxes.
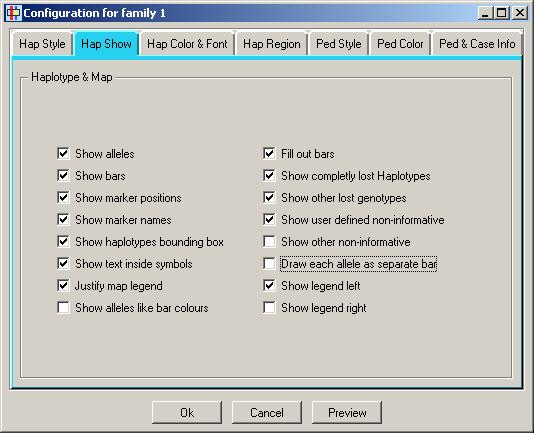
| Show alleles | Set if allele numbers are shown |
| Show Bars | Set if haplotype bars are shown |
| Show marker positions | Show marker coordinates on the left side of each generation |
| Show marker names | Show marker names on the left side of each generation |
| Show question mark | Show question mark inside person symbols for unknown affection status |
| Fill bars | Fill bars with given color |
| Show completely lost haplotypes | Mark haplotypes without information |
| Show other lost genotypes | Mark unique lost genotypes |
| Show user defined non-informative | Mark manually, as not informative declared genotypes |
| Show other non-informative | Mark genotyped but uninformative genotypes |
| Draw each allele as separate bar | Useful only when ‘Fill bars’ option is not set |
| Show legend left | Show the left haplotype marker legend |
| Show legend right | Show the right haplotype marker legend |
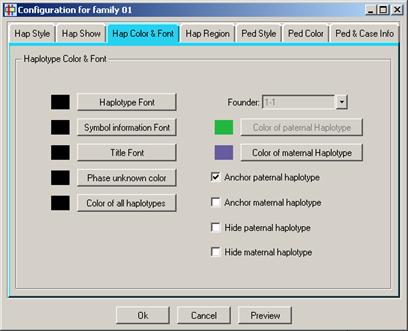
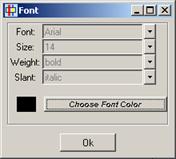
Hap color & font
In this menu, you can change the colors and font attributes of different types of information content like alleles from haplotypes, case information, pedigree header or phase unknown color. If you want to show all haplotypes, except of one in a unique color, press the ‘Color of all haplotypes’ button. Before you do so, you should anchor one or more haplotypes of course! To do that, choose the founder from whom the haplotype derives in the browse entry box and activate ‘Anchor paternal/maternal haplotype’ in the checkbox. You also can fade out haplotypes by activation of ‘Hide paternal/maternal’ checkboxes.
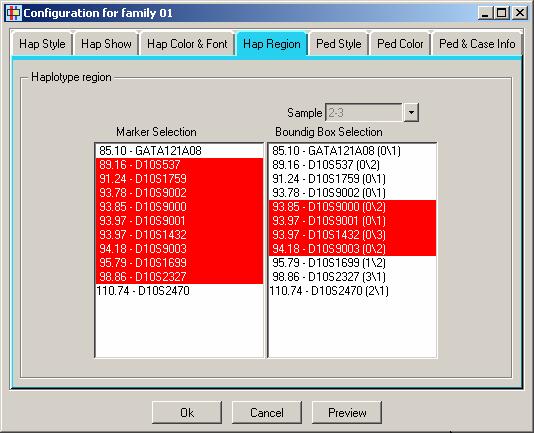
Hap region
The list box on the left side shows marker positions and names. Only red marked markers will be shown. To select/unselect multiple markers keep Ctrl key pressed while clicking with the left mouse button over rows. Press “Ctrl+A” to select all markers.
The list box on the right side allows drawing of black unfilled boxes around markers. You can define as many boxes as you want for any individual, which has to be selected with the browse entry field above.
Ped style
The settings in this menu will mainly affect the pedigree drawing style. Parameters collected there have numerical values and are changed via sliders.
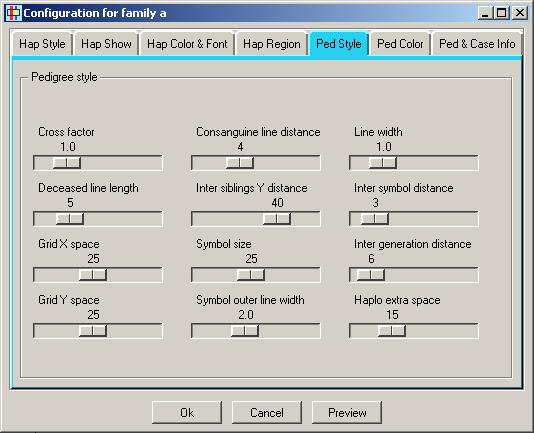
| Cross factor | Affects the lines connecting parents with their offspring group |
| Deceased line length | Size of the diagonal line indicating that individual is deceased |
| Grid X space | Width of grid raster in X-dimension |
| Grid Y space | Width of grid raster in Y-dimension |
| Consanguinity line distance | Distance between the two lines indicating that individuals are consanguineous |
| Intersib Y distance | Affects the lines connecting members of an offspring group with each other |
| Symbol size | Symbol size |
| Symbol outer line width | Width of the outer line of symbols if it is shown |
| Line width | Width of symbols connecting lines |
| Intersymbol distance | Number of grid units that are placed between symbols in X-dimension |
| Intergeneration distance | Number of grid units that are placed between symbols in Y-dimension |
| Haplo extra space | Fine tuning of the length of haplotype bars. It only works for haplotypes that are drawn without alleles and legends when bars are compressed/elongated to the available space according to the intergeneration distance. |
Ped color
The Ped Color submenu allows changes to the most color relevant parameters.
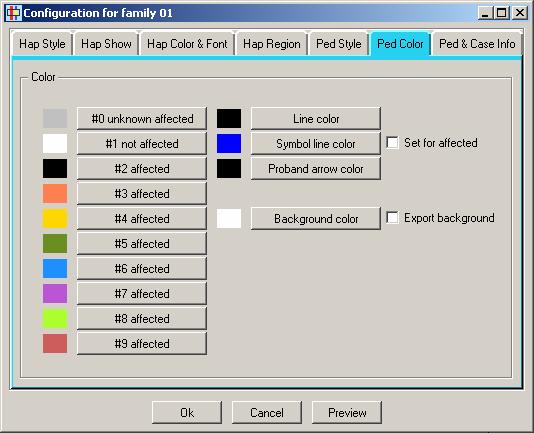
| Affection colors #0-9 | Symbols are filled with colors according to their affection status value in range 0-9 |
| Line color | The color of lines that connect symbols with each other |
| Symbol line color | The color of outer lines of symbols. The checkbox “Set for affected” right hand of the button controls if this line is visible for individuals with affection status other then 1 |
| Proband arrow color | The color of the proband arrow |
| Background color | Set the background color. It is only exported into other graphic formats if the “Export background” checkbox is on |
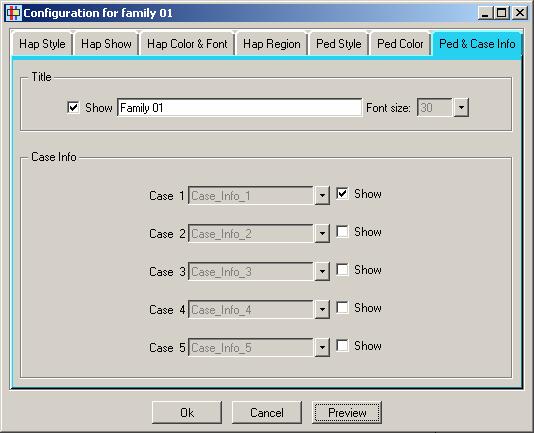
Ped & case info
In this menu, there are settings for the title and case information. Extra rows 1-5 are shown below symbols if the checkbox is on. Furthermore you can choose in which order the fields are drawn.
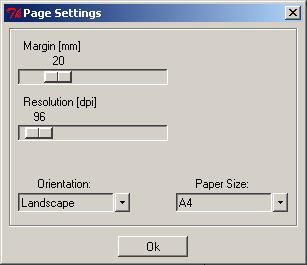
Page settings
The page settings are mostly relevant for exporting pedigrees as images. The graphic resolution is very important for the PNG bitmap format. For vector graphics format, this parameter is handled in different ways. SVG graphics uses it to define the scaling factor to which the graphics should be zoomed. PostScript has a default resolution of 72 dpi. HaploPainter tries to zoom the pedigrees according to the Margin, Paper Size and Paper Orientation settings. This may not be what you want and cutting the image with other software is necessary.
Show grid
The grid is visible only in the graphical user interface. It is never exported into images! The grid (visible or not) is internally used as an anchor point for the positioning of symbols. The configuration parameters “Grid X space” and “Grid Y space” affect the size of it.
You can switch it on/off by using the checkbox in the File menu or context menu.
Storing and restoring defaults
There is no special file format for storing of your favorite default parameters – instead HaploPainter is able to extract drawing style features from every regularly stored file in HAPLOPAINTER format! One way to go is to prepare a HAPLOPAINTER file with some small families and modify/store them. Now you can attach the default parameters from a certain family from that file to others by choosing the “Get Default Values” function from the File menu.
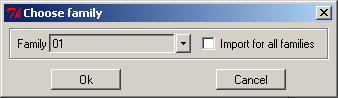
A window will appear asking you for a family and if you want to import the parameters from that family only to the current drawn family or to all families.
Command line mode
HaploPainter can run in a command line mode without using
the graphical interface. The first argument must
be -b to switch HaploPainter to command line
(batch) mode or -h to output a list of
supported parameters.
All following parameters must be provided in a key – value manner. Options, their meaning and allowed values are listed in the following table.
-pedfile |
Name of the imported pedigree file in ASCII or UTF-8 format |
-pedformat |
Format of the imported pedigree file [linkage, csv] |
-outfile |
Name of the exported file |
-outformat |
Format of the exported file [ps, pdf, svg, png] |
-hapfile |
Name of the imported haplotype file |
-hapformat |
Format of the imported haplotype file[allegro, genehunter, merlin, simwalk]
|
-mapfile |
Name of the imported map file |
-mapformat |
Format of the imported map file [1, 2] |
-family |
Name of one family identifier from the pedigree file |
-resolution |
Image resolution in pixels (max 4800) |
-paper |
Paper format[A0-A5, B4, B5, Letter, Ledger, Legal, 11x17] |
-orientation |
Paper orientation [landscape, portrait] |
-border |
Margin around the image in pixels (max 999) |
-bgcolor |
Background color in hex notation (e.g. #ffcc00) |
-dbtype |
Database type [oracle, postgresql, mysql] |
-dbport |
Database port |
-dbsid |
Database name/SID |
-dbhost |
Database server host name (localhost is valid) |
-dbtable |
Database table/relation name |
-dbuname |
Database user/login name |
-dbpasswd |
Database password |
-breakloop |
Controls loop breaking[0=No loop break, 2=Break all loops] |
-sortbyid |
Drawing order of individuals is sorted by ID |
-sortbygender |
Drawing order of couples is sorted by gender |
-h |
Display a list of supported parameters |