Schedula Plugin Documentation
Welcome to Schedula, a versatile WordPress plugin designed to simplify appointment scheduling and reservation management for your business. Whether you run a salon, clinic, or consultancy, Schedula helps you organize services, manage staff, and handle bookings efficiently. This documentation will guide you through setting up and using the plugin to its full potential.
Getting Started
Before diving into Schedula, ensure your WordPress site is ready. You'll need:
- WordPress version 5.0 or higher.
- PHP version 7.4 or later for optimal performance.
- Basic knowledge of WordPress administration.
Download & Install
Getting Schedula up and running is simple. Follow these steps:
- Purchase Schedula from CodeCanyon and download the ZIP file.
- Log in to your WordPress admin dashboard.
- Go to Plugins → Add New → Upload Plugin.
- Upload the Schedula ZIP file and click Install Now.
- Activate the plugin to start using it.
After activation: You'll see Schedula options in your dashboard under Schedula, then a welcome form will appear. This form will help you set up some essential settings before you start using Schedula. Don't worry, you can always skip this and configure everything later in the settings.

Services
Schedula allows you to manage services flexibly, catering to various business needs. Here's how to set it up:
Categories
Group services into categories to offer customers a structured way to choose appointments. Each service must belong to a category. Create at least one default category, and ensure all services are included in it for the plugin to work correctly.

Categories Management
Edit, or remove categories via "Manage categories".

Services
Add services via "Add new services". Assign it to a category. Specify details like duration, price, you can also select the service image.

On the main page you can edit or delete a service.

Staff
The Staff feature enables you to manage employee profiles, including their personal information, services, schedules, and holidays. You will need at least one default staff account to make the plugin function properly.

Creating/Editing Staff
Navigate to Add New Staff or edit an existing profile on the Staff page of the main menu:

General Tab
- Personal Information: Enter full name (required), email (required), phone, status (Active/Inactive), and notes.
- Staff Image: Upload a profile image with a preview and removal option.

Services Tab
- Assign services to the staff member from the list of available services.
- Use the "Select All" checkbox for quick assignment.
- Displays "No services available" if none are configured, prompting you to add services first.

Schedule Tab
- Set weekly availability by specifying start and end times for each day.
- Add breaks with start/end times and optional descriptions (e.g., "Lunch break").
- Duplicate schedules across days for efficiency.
- Mark days as "Off" if the staff member is unavailable.

Holidays Tab
- Add holiday periods using a Flowbite date range picker, with start/end dates and optional descriptions (e.g., "Summer vacation").
- View and manage existing holidays, with options to edit or delete.

Appointments
The Appointments feature is the core of Schedula, allowing you to easily manage all bookings for your services and staff. You can view, create, and edit appointments from a centralized dashboard.

Creating a New Appointment
Follow these simple steps to add a new appointment manually:
- Navigate: Click on Appointments from the main menu, then select Create New Appointment.
- Fill in the Details: On the "Create New Appointment" page, select the following information:
- Customer: Choose an existing customer or add a new one.
- Service: Pick the service being booked (e.g., "Haircut," "Consultation").
- Staff Member: Assign the appointment to a specific employee.
- Date & Time: Use the calendar to select the day and a specific time slot.
- Save: Click "Save" to save the booking to your calendar.
Note: The plugin will automatically show you the available time slots based on the staff member's schedule, making it easy to find an open spot.

Managing Existing Appointments
Once created, you can manage all your appointments in one place.
- View: All appointments are displayed in a clear calendar in the Agenda page of the main menu or a sortable list view in the Appointments Page.

- Edit: Click on any appointment to change the customer, service, staff, or time.
- Cancel: Appointments can be easily cancelled with a single click. The plugin will handle updating the schedule and notifying the user.
- Filter & Search: Use the search bar and filter options to quickly find specific appointments by staff member, service type, or a date range.
Conflict Detection
Schedula includes a built-in conflict detection system to prevent scheduling errors.
- No Double Bookings: The system automatically checks a staff member's availability before allowing a booking. If a time slot is already taken, it will not be available for selection.
- Holiday & Time-Off Management: The plugin accounts for any holidays or pre-set staff time-off, so you can be confident that all bookings are for times when your team is available to work.
Clients
The Clients feature allows you to manage a list of all your customers. You can easily create new client profiles, update their information, or delete them as needed.
Managing Your Clients
- Access: In your Schedula dashboard, click on Clients from the main menu to see a list of all your customers.
- View: The main list displays key information for each client, such as their name and contact details.
- Edit: To update a client's information, simply click on their name. You will be able to edit their details and then save the changes.
- Delete: To remove a client from the list, select the client and choose the delete option.

Adding a New Client
To manually add a new client to your list:
- Go to the Clients page and click the Add New Client button.
- Enter the client's information, such as their name, email, and phone number.
- Click "Save" to add them to your client list.

Payments
The Payments page provides a clear record of all completed transactions. You can view a list of all successful payments and download a PDF invoice or receipt for your records.
Viewing Payments
To see a list of all payments:
- Navigate: Go to the Schedula dashboard and click on Payments from the main menu.
- Search & Filter: You can easily find specific payments by using the search bar. You can search by client name, service title, employee name, or a specific date to quickly narrow down the results.
- Review: You will see a list of all payments that have been completed. The list will show important details for each transaction, such as the date, the service booked, the client's name, and the amount paid.
- Each time you set an appointment status to completed or when a payment is received via online transactions the payment record is updated.

Downloading an Invoice
For each payment, you can generate and download a PDF for your records or to send to the client.
- Locate: Find the payment you need in the list.
- Download: Click the Download PDF button or link next to the transaction. A PDF file containing the invoice or receipt will be generated and saved to your computer.

Email Notifications
The Email Notifications feature ensures that you and your clients are kept informed about new appointments, confirmations, and cancellations. This section allows you to customize the content of these messages, configure your email settings, and review a history of all messages sent.
Notification Templates
This is where you can customize the content of each type of notification sent by Schedula.
- Enable Notification: Use the toggle at the top to turn a specific notification on or off.
- Customize Content: You can edit the Email Subject and Email Body to match your business's invoice. You can also change the template, increase the font size or change the font family.
- Dynamic Placeholders: To personalize each message, use placeholders. These are special keywords that the plugin automatically replaces with real information. For example:
{client_name}will be replaced with the client's name.{service_name}will be replaced with the name of the service they booked.{staff_name}will be replaced with the staff member's name.


Settings
This is where you set up the basic information for your emails.
- Sender Name: The name that appears as the sender (e.g., "Your Salon").
- Sender Email: The email address used to send all notifications.
- Email Format: Choose how your messages are formatted (e.g., HTML).
- Admin Recipient Email: The email address that receives copies of important notifications.
- Configure SMTP: For improved email deliverability, you can set up an SMTP service by clicking this button. It is recommended to configure an SMTP service since it is more reliable than using the native WordPress email system.

Email Log
The email log provides a clear history of every notification sent through Schedula.
- View Log: To see a list of all sent emails, click the Email Log tab.
- Search & Filter: You can search the log by recipient or email subject.
- View Details: Click on any email in the list to open a pop-up with a full preview of the message content.

General Settings
The General Settings page allows you to configure the core options and rules for your Schedula plugin. This section controls the global functionality, display, and operational settings of your booking system, including business details, payment integrations, working hours, holidays, and admin appearance customizations.
Navigation Overview
The settings page is organized into multiple tabs, accessible via a sidebar navigation:
- General: Configure core booking rules, time formats, and data management.
- Company: Enter specific information about your business.
- Appointment: Set rules for group and recurring bookings.
- Payments: Configure payment gateways (PayPal, Stripe, and local payments) and pricing adjustments.
- Working Hours: Define default business hours and breaks for staff schedules.
- Holidays: Set default business holidays for staff templates.
- Appearance: Customize the admin panel's look and feel.
- Analytics: View and manage analytics settings for tracking booking performance.
Each tab contains specific settings with input fields, dropdowns, checkboxes, and buttons to customize the plugin's behavior. A Save Settings button at the bottom of each tab saves changes, and a Reset button restores the current tab's settings to their defaults.

General Tab
This section controls the global functionality and display of your booking system.
Time Slot Length
- Description: Set the duration of each bookable time slot in minutes.
- Options: Select from predefined options (e.g., 15, 30, 45, 60 minutes).
- Purpose: Defines how frequently clients can book appointments (e.g., every 30 minutes).
- Example: If set to 30 minutes, clients can book appointments at intervals like 9:00 AM, 9:30 AM, 10:00 AM, etc.
Time Format
- Description: Choose how time is displayed across the booking system.
- Options:
- 12-hour format (e.g., 1:00 PM).
- 24-hour format (e.g., 13:00).
- Purpose: Ensures time displays align with your region or preference for both clients and staff.
- Example: Selecting 12-hour format displays times as "1:00 PM" instead of "13:00."
Minimum Time Before Booking
- Description: Define how far in advance clients must book an appointment.
- Options: Select from predefined intervals (e.g., 1 hour, 24 hours, 48 hours).
- Purpose: Prevents last-minute bookings, giving staff time to prepare.
- Example: If set to 24 hours, clients cannot book an appointment for the next day unless it's at least 24 hours away.
Minimum Time Before Canceling
- Description: Set the minimum time before an appointment that clients can cancel.
- Options: Select from predefined intervals (e.g., 1 hour, 24 hours, 48 hours).
- Purpose: Ensures cancellations are made with sufficient notice to avoid disrupting schedules.
- Example: If set to 24 hours, clients cannot cancel an appointment less than 24 hours before it starts.
Time Buffer Between Bookings
- Description: Add a buffer period after each appointment during which no bookings can be made.
- Options: Select from predefined intervals (e.g., 0, 15, 30, 60 minutes).
- Purpose: Provides staff with breaks or preparation time between appointments.
- Example: A 15-minute buffer ensures a gap between consecutive bookings, e.g., 9:00–9:30 AM, next booking at 9:45 AM.
Display Client's Timezone
- Description: Choose whether to display appointment times in the client's local timezone.
- Purpose: Improves clarity for clients in different timezones by showing times in their local format.
- Example: If checked, a client in New York sees appointment times in EST, while the business operates in PST.
Enable Instant Booking
- Description: Allow bookings to be instantly confirmed without requiring manual approval.
- Options: Checkbox (checked = instant confirmation, unchecked = pending approval).
- Purpose: Streamlines the booking process for clients but may require manual review if unchecked.
- Example: If checked, a client's booking at 10:00 AM is immediately confirmed; if unchecked, it's marked as pending until approved.
Business Timezone
- Description: Set the primary timezone for your business operations and staff schedules.
- Options: Select from a list of timezones (e.g., America/New_York, Europe/London).
- Purpose: Ensures all booking times are based on your business's timezone, especially for staff schedules and availability.
- Example: Setting to "America/Los_Angeles" means all bookings are scheduled in Pacific Time.
Delete Schedula Data on Uninstall
- Description: Decide whether to delete all Schedula data when uninstalling the plugin.
- Options:
- Don't Delete: Retains all data (bookings, settings, etc.) in the database.
- Delete: Permanently removes all Schedula data upon uninstallation.
- Purpose: Provides control over data retention for compliance or cleanup purposes.


Company Tab
This section allows you to enter specific information about your business, which is displayed to clients and used in communications.
Upload or Select Logo
- Description: Upload or select an image from your WordPress media library to use as your company logo.
- Options: Click the upload area to open the media uploader; remove the logo with the trash icon.
- Purpose: Displays your brand logo on booking pages, emails, or invoices for a professional appearance.
Company Name
- Description: Enter the official name of your business.
Address
- Description: Provide your business's physical address.
- Input: Text field.
- Purpose: Displayed to clients for in-person appointments or for legal/compliance purposes.
Phone Number
- Description: Enter your company's main contact phone number.
- Input: Phone input with international format support.
- Purpose: Allows clients to contact your business directly; used in booking confirmations.
Contact Email
- Description: Provide your company's primary contact email address.
- Input: Email field.
Website URL
- Description: Enter your company's official website address.
- Input: URL field.
Industry
- Description: Select the primary industry your business operates in.
- Options: Dropdown with grouped industry categories (e.g., Health & Wellness, Education).
- Purpose: Helps tailor the plugin's behavior or analytics to your industry type.
Services Description
- Description: Provide a brief description of the main services your company offers.
- Input: Textarea.
- Purpose: Displayed in booking interfaces or marketing materials to inform clients about your offerings.
- Example: "We offer haircuts, coloring, and spa treatments for all your beauty needs."
Company Size
- Description: Select the approximate number of employees in your business.
- Options: Dropdown (e.g., 1–10, 11–50, 51–100).
- Purpose: Used for analytics or to tailor features for small vs. large businesses.
- Example: Choosing "1–10 employees" indicates a small business, which may affect scheduling logic.


Appointment Tab
This section configures rules for group and recurring bookings.
Enable Group Booking
- Description: Allow clients to book appointments for multiple people at once.
- Purpose: Supports group bookings for services like classes or events.
Group Booking Settings (Visible if Enabled)
- Maximum Number of Persons:
- Description: Set the maximum number of people allowed in a single group booking.
- Input: Number field (minimum 1).
- Purpose: Limits group sizes to manage capacity.
- Example: Setting to 10 means a group booking can include up to 10 people.
- Group Booking Price Logic:
- Description: Define how prices are calculated for group bookings.
- Options:
- Multiply by number of persons: Total price = base price × number of people.
- Fixed discount per person: Apply a fixed discount per person.
- Percentage discount on total: Apply a percentage discount to the total price.
- Purpose: Customizes pricing for group bookings to incentivize or cover costs.
- Adjustment Amount (Visible for Fixed/Percentage Discounts):
- Description: Specify the discount amount for the selected price logic.
- Input: Number field (e.g., 5 for $5 or 10 for 10%).
- Purpose: Adjusts the final price based on the chosen logic.

Enable Recurring Appointments
- Description: Allow clients to book appointments that repeat regularly (e.g., weekly).
- Purpose: Supports recurring services like weekly therapy sessions.
Recurrence Settings (Visible if Enabled)
- Maximum Number of Recurrences:
- Description: Set the maximum number of times an appointment can recur (0 = no limit).
- Input: Number field.
- Purpose: Limits the duration of recurring bookings to manage schedules.
- Example: Setting to 12 means a weekly appointment can recur for up to 12 weeks.

Enable Multi-Service Booking
- Description: Allow clients to book multiple services in a single transaction.
- Purpose: Enables customers to add multiple services to a cart and book them all together, streamlining the booking process for appointments that require multiple services.
Multi-Service Discount Settings (Visible if Enabled)
- Discount Logic:
- Description: Choose how discounts are applied when customers book multiple services together.
- Input: Dropdown select field with options:
- None: No discount applied
- Fixed discount on total: Apply a fixed amount discount to the total price
- Percentage discount on total: Apply a percentage discount to the total price
- Purpose: Incentivize customers to book multiple services by offering discounts on combined bookings.
- Example: Setting to "Percentage discount on total" with 10% means if a customer books two services totaling $100, they get $10 off.
- Discount Amount:
- Description: Set the discount value based on the selected discount logic type.
- Input: Number field (decimal for percentage, whole number for fixed amount).
- Purpose: Define the exact discount amount or percentage to apply when multiple services are booked together.

Payments Tab
The Payments Settings section allow you to configure payment options for your booking system, ensuring a smooth and secure transaction process for clients. This section includes general payment settings and integrations with payment gateways like PayPal and Stripe, tailored to meet your business needs.
Select Currency
- The currency you select here becomes the primary currency for all services, bookings, and payments in your system.
- Example: United States Dollar (USD), Euro (EUR), etc.
- Important: Ensure your selected currency is supported by your chosen payment gateway (PayPal or Stripe). Some currencies are not universally accepted.
Enable "Pay in Cash" Option
- If enabled, clients can book services and pay later in person (cash or on-site card payment).
- Useful for businesses where local customers frequently pay on-site.

PayPal Settings
PayPal is one of the most popular online payment systems. To use it, you must configure it properly.
Enable PayPal Payments
- Check this option to make PayPal available during checkout.
- Clients will see a "Pay with PayPal" button when booking.
PayPal API Credentials (REST API)
To connect your system with PayPal, you need API credentials from your PayPal Developer Dashboard.
- Client ID: Identifies your PayPal app.
- Client Secret: Private key used for authentication. Keep this secret! Never share it publicly.
- Webhook ID: A unique identifier for PayPal Webhooks you create.
The Importance of Webhooks (PayPal)
Why Webhooks matter:
When a client pays with PayPal, the transaction does not always complete instantly. PayPal uses webhooks to notify your booking system of important events:
- Payment completed
- Payment failed
- Refund processed
- Dispute or chargeback
Without webhooks:
- Your system might show a booking as unpaid even if PayPal received the money.
- Refunds will not synchronize correctly.
- You risk booking conflicts or financial mismatches.
Always configure webhooks to ensure real-time, secure updates.
Sandbox Mode
- Yes: Use PayPal's testing environment (no real money involved).
- No: Use live mode (real transactions).
- Use Sandbox during development to simulate payments safely.
Price Correction
Sometimes you need to adjust the booking price when PayPal is used:
- None: No price adjustment.
- Amount: Add or subtract a fixed amount.
- Example: Add +2.00 to cover PayPal fees.
- Example: Or subtract -5.00 to offer a discount for PayPal payments.
Time to Hold Booking for Payment
- Defines how long a booking slot is held while the client completes payment.
- Example: Set to 15 minutes → the time slot is reserved for the client while PayPal processes the payment.
- OFF: The slot is never held; availability remains open until payment is confirmed.


Stripe Settings
Stripe is a modern payment gateway with strong developer support and wide currency compatibility.
Enable Stripe Payments
- Check this to allow clients to pay with credit/debit cards directly through Stripe.
Stripe API Credentials
Obtain your keys from the Stripe Dashboard:
- Publishable Key: Safe to use in public (client-side).
- Secret Key: Keep confidential; used server-side.
- Webhook Signing Secret: Used to verify that webhook notifications really come from Stripe.
The Importance of Webhooks (Stripe)
Stripe also relies heavily on webhooks to keep your system in sync:
- Successful payments
- Failed or canceled payments
- Refunds
- Subscription updates (if applicable)
Stripe signs every webhook event, and your system verifies it using the Webhook Signing Secret. This prevents fake notifications from malicious actors.
Without webhooks:
- Refunds may not reflect in your booking system.
- Failed payments may still appear as successful.
- You risk incorrect availability and financial records.
Always configure and secure Stripe webhooks for accurate payment handling.
Test Mode
- Yes: Use Stripe test API keys to simulate payments.
- No: Live mode — real transactions.
- Always start in test mode before going live.
Price Correction
- Adjust the booking price when Stripe is selected.
- Options: None or Amount (fixed adjustment).
- Example: Add +1.50 USD to cover Stripe fees, or subtract -5.00 USD as a discount.
Time to Hold Booking for Payment
- Works like PayPal's option.
- Example: Set 10 minutes → booking is temporarily reserved while Stripe processes payment.
- OFF: Slots are never held.
Best Practices for Secure Payment Setup
- Start in Sandbox/Test Mode — Always test thoroughly with fake transactions before enabling real payments.
- Use Webhooks — Never skip this step. Webhooks keep your booking system in sync with payment providers.
- For PayPal: Create a webhook in the PayPal Developer Dashboard, copy the Webhook ID.
- For Stripe: Create a webhook in Stripe Dashboard, copy the Signing Secret.
- Secure Your Credentials — Never share your Client Secret or Stripe Secret Key. Store them safely in your WordPress database.
- Enable HTTPS — Webhooks and API communications require secure HTTPS connections.
- Configure Price Corrections if you need to cover gateway fees or provide discounts.
- Check Currency Compatibility — Confirm that your chosen currency is supported by your gateway.
- Monitor Webhook Logs — Both PayPal and Stripe provide logs to verify that webhooks are firing correctly. Use these for debugging.

WooCommerce Settings
- Description: Use WooCommerce to process payments for your bookings.
- Purpose: Integrates Schedula with WooCommerce, allowing bookings to be processed through WooCommerce's checkout system. When enabled, only WooCommerce and Cash payment methods are available on the booking form. Other payment methods (Stripe, PayPal) are disabled and hidden.
- Requirements: WooCommerce plugin must be installed and activated on the WordPress site.
- Payment Methods: When WooCommerce is activated, customers can only choose between WooCommerce checkout and Cash payment options. Stripe and PayPal options are automatically disabled.


Working Hours Tab
This section defines the default business hours and breaks used as a template for staff schedules.
Enable Default Business Hours as Staff Template
- Description: Use the default business hours as the initial schedule for newly added staff members.
- Purpose: Simplifies staff onboarding by applying a standard schedule; existing staff schedules are unaffected.
- Example: If enabled, new staff inherit the default hours (e.g., 9:00 AM–5:00 PM).
Default Weekly Business Hours
- Description: Set the working hours for each day of the week, including breaks.
- Options: For each day (Monday–Sunday):
- Start Time: Select the opening time (e.g., 9:00 AM) or "Off" for non-working days.
- End Time: Select the closing time (e.g., 5:00 PM) or "Off."
- Add Break: Add break periods within working hours (e.g., 12:00 PM–1:00 PM for lunch).
- Duplicate: Copy a day's schedule to another day or all days for consistency.
- Purpose: Defines the default availability for your business, which can be overridden for individual staff.
- Example: Setting Monday to 9:00 AM–5:00 PM with a 12:00 PM–1:00 PM break ensures no bookings during lunch.

Holidays Tab
This section sets default business holidays used as a template for staff.
Enable Default Business Holidays as Staff Template
- Description: Use the default holidays as the initial unavailable periods for newly added staff members.
- Purpose: Automatically applies holidays to new staff; existing staff holidays are unaffected.
- Example: If enabled, new staff inherit holidays like "December 25, 2025."
Default Business Holidays
- Description: Add specific dates or date ranges when the business is closed.
- Options:
- Add Holiday: Open a modal to select a date range and add an optional description.
- Remove Holiday: Delete an existing holiday.
- Purpose: Blocks bookings on specified holidays for all staff using the default template.
- Example: Adding "December 25, 2025" with description "Christmas Day" prevents bookings on that date.


Appearance Tab
This section customizes the look and feel of the Schedula admin panel. It allows you to select the Global Font Family from a dropdown of Google Fonts (e.g., Inter, Roboto) to enhance the visual style, such as applying Roboto to all admin text. You can also set the Header Background Color using a color picker to tailor the header's appearance for branding or readability. The Header Text Color ensures text readability against the header background. Additionally, the Logo 'S' Background Color and Logo 'S' Text Color let you style the Schedula's "S" icon for better visibility and branding. Use the "Save Settings" button to apply changes and the "Reset" button to restore defaults.

Dark Mode
The admin panel supports dark mode, with colors adjusting dynamically for better visibility. For that you can click on the toggle at the right corner on the header.

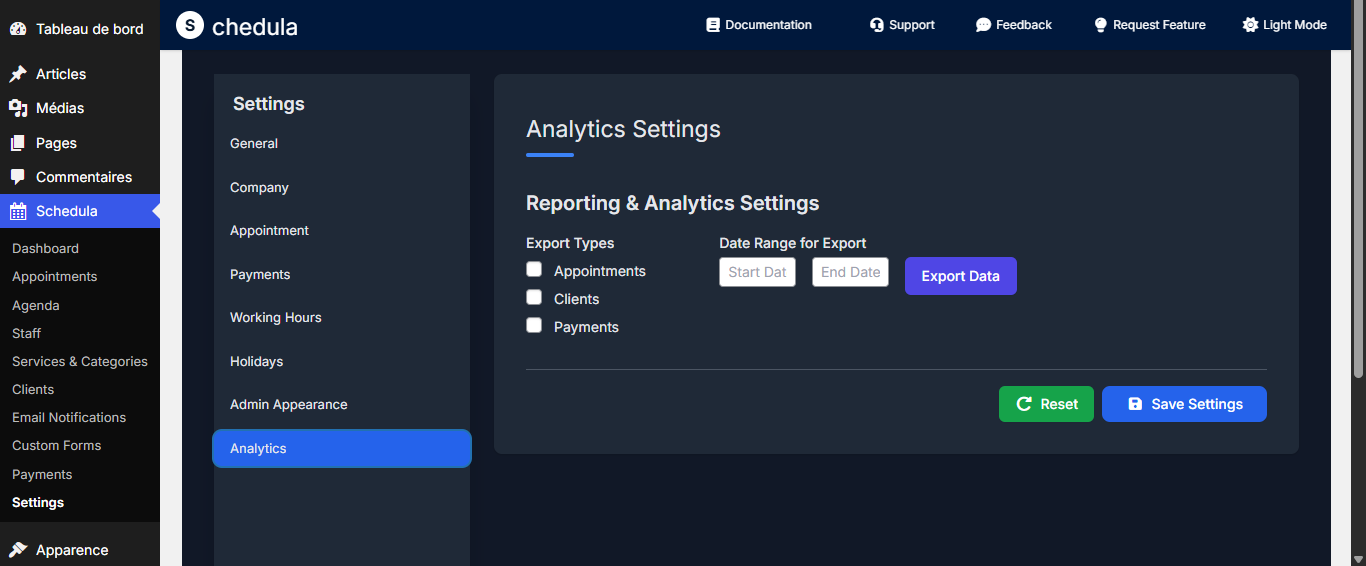
Analytics Tab
The Analytics Tab allows you to export your data, including appointments, clients, and payment information, for further analysis or record-keeping. You select the date range and then you click on export.
Export and Import Full Data
We also have two buttons for full data management:
- Export: Export all your Schedula data (appointments, clients, services, staff, settings, etc.) to a backup file.
- Import: Import previously exported data to restore your Schedula configuration and information.
These features allow you to backup your data or migrate it between WordPress installations.

WhatsApp Settings
Enable WhatsApp Integration
- Description: If checked, WhatsApp notifications will be sent for appointments.
- Purpose: Sends automated WhatsApp notifications to customers when appointments are created, confirmed, or updated. When activated, customers will receive WhatsApp messages on their phone number with appointment details (customer name, appointment date and time).
- Requirements:
- ✓ WhatsApp Business API account and credentials
- ✓ Permanent access token from WhatsApp Business API dashboard
- ✓ Phone number ID from your WhatsApp Business phone number
- ✓ Business Account ID from your WhatsApp Business Account
WhatsApp Settings (Visible if Enabled)
Permanent Access Token
- Description: Your WhatsApp Business API permanent access token.
- Input: Text field for entering the token.
- Purpose: Authenticates your application with WhatsApp Business API to send messages.
- Note: Obtain this token from your WhatsApp Business API dashboard. The token is encrypted and stored securely.
- Example: The token typically starts with "EAA..." and is provided by Meta's WhatsApp Business API.
Phone Number ID
- Description: The ID of your WhatsApp Business phone number.
- Input: Text field for entering the phone number ID.
- Purpose: Identifies which WhatsApp Business phone number will be used to send notifications.
- Note: This is different from the actual phone number. You can find this ID in your WhatsApp Business API dashboard.
Business Account ID
- Description: Your WhatsApp Business Account identifier.
- Input: Text field for entering the account ID.
- Purpose: Identifies your WhatsApp Business Account for API requests.
- Note: You can find this ID in your WhatsApp Business API dashboard under your Business Account settings.
- Example: The account ID is typically a long numeric string that uniquely identifies your WhatsApp Business Account.

Frontend Forms
Schedula provides two distinct frontend booking forms to accommodate different booking scenarios and business needs.
Overview
The frontend interface allows customers to book appointments directly on your website through two specialized forms:
- Main Reservation Form - A comprehensive booking solution
- Service-Specific Form - Targeted forms for specific services with custom fields
Both forms feature modern, responsive design.
1. Main Reservation Form
Description
The main reservation form is a comprehensive booking solution that provides customers with full access to all available services, staff members, and time slots. It's designed for businesses that want to offer a complete booking experience on a single page.
Key Features
- Universal Service Access: Customers can browse and select from all available services
- Staff Selection: Choose from available staff members based on service requirements
- Dynamic Availability: Real-time checking of staff availability and time slots
- Responsive Design: Optimized for desktop, tablet, and mobile devices
- Vue.js Powered: Modern, reactive user interface with smooth interactions
Page Integration
- Create a new page (e.g., "Book Appointment")
- Add the shortcode
[schesab_reservation_form]to the page content - Publish the page
- The form will automatically load with all necessary scripts and styles

2. Service-Specific Reservation Form
Description
Service-specific forms are targeted booking solutions designed for individual services, categories, or staff members. These forms can include custom fields, specific validations, and tailored booking flows for specialized services.
Key Features
- Service-Specific: Pre-configured for specific services or categories
- Custom Fields: Additional form fields based on service requirements
- Custom Validations: Service-specific validation rules and requirements
- Staff Filtering: Automatically filtered to relevant staff members
- Tailored Experience: Streamlined booking flow for specific use cases
- Multiple Forms: Support for multiple service forms on the same site
Service Form Configuration
Service forms are created and configured through the WordPress admin panel in the custom form option page:
- Service Selection: Choose which service(s) the form handles
- Category Filtering: Limit to specific service categories
- Staff Assignment: Pre-assign specific staff members
- Custom Fields: Add service-specific form fields
- Validation Rules: Set custom validation requirements
- Styling Options: Configure appearance settings
- Create a new page
- Add the shortcode
[schesab_service_form id="Form Id"]to the page content - Publish the page
- The form will automatically load with all necessary scripts and styles

Customize Reservation Settings (Main Form)
The Customize Reservation Form option, located within the Custom Form Options page of the Schedula plugin's General Settings, provides a comprehensive set of tools to personalize the main reservation form's appearance and functionality. This feature allows you to modify colors, fonts, remove certain details, adjust layouts, and edit labels (except the date-related ones), ensuring the form aligns with your branding and meets your operational needs.
Customize Reservation Form
This section enables detailed customization of the main reservation form.
Global Colors & Theme
- Description: Adjust the form's color theme settings to reflect your brand.
- Options: Use color pickers to set primary, background, text, and header text colors, with toggles for rounded corners, shadows, and header visibility.
- Purpose: Enhances the form's visual appeal and consistency with your website's design.
Typography & Layout
- Description: Customize the font and layout of the form elements.
- Options: Input a custom font family (e.g., "Arial, sans-serif") and select input/button size, border radius, shadow strength, and form max width from dropdowns.
- Purpose: Allows fine-tuning of text readability and form structure for better user experience.
Service Settings
- Description: Control the display of service-related details.
- Options: Checkboxes to show or hide service images, category descriptions, service descriptions, and service preview images.
- Purpose: Lets you simplify or enhance the service selection step based on your preferences.
Calendar & Time Slot Settings
- Description: Modify the calendar and time slot display options.
- Options: Checkboxes to show/hide the calendar, blocked timeslots, or only the nearest timeslot.
- Purpose: Customizes how clients view and select available dates and times.
Customer Details Settings
- Description: Adjust the fields displayed for customer information.
- Options: Checkboxes to show or hide notes, first name, last name, email, and phone fields.
- Purpose: Allows you to collect only the necessary client details, improving form efficiency.
Payment Settings
- Description: Customize the payment step of the form.
- Options: Checkboxes to show/hide the payment step, allow cash/card payments, display price breakdowns, taxes, and payment method descriptions.
- Purpose: Tailors the payment process to your business model.
- Example: Disable card payment if only cash is accepted.
Confirmation Settings
- Description: Modify the confirmation step's content.
- Options: Checkboxes to show/hide the summary step, service image, staff info, "Book Again" button, and confirmation details (date, time, employee, price).
- Purpose: Customizes the post-booking experience for clarity and convenience.
- Example: Hide staff info if it's not relevant to clients.
Custom CSS
- Description: Add custom CSS to further personalize the form.
- Options: A textarea for entering custom CSS code, applied directly to the frontend form.
- Purpose: Offers advanced styling control for unique designs.
Label Editing
- Description: Edit text labels on the form (except date-related ones).
- Options: Open a modal to update labels like "Book Appointment" or "Booking Steps Description" via the live preview.
- Purpose: Allows branding-specific terminology without altering core data fields.
- Example: Change "Book Appointment" to "Schedule Now" for a more engaging call-to-action.
Embed Your Form
- Options: A readonly input with a "Copy" button for the shortcode.
- Purpose: Simplifies integration into WordPress pages or posts.


Service Form Customization
The Service Form Customization option, accessible within the custom forms option, focuses on creating and managing service-specific forms. These forms are tailored booking solutions designed for individual services, categories, or staff members, incorporating custom fields, specific validations, and customized booking flows to meet the needs of specialized services.
This section enables the creation and editing of service-specific reservation forms, allowing detailed customization for individual services, categories, or staff members.
General Settings
- Description: Configure the basic details of the service form.
- Options:
- Form Name: Input a unique name for the form (e.g., "Haircut Booking Form").
- Associated Service: Select a service from the dropdown of available services; auto-populates category if linked.
- Associated Category: Displays the category tied to the selected service (disabled for manual edit).
- Associated Staff: Choose a specific staff member or leave as "Any Staff Member" for the service.

Global Settings Integration
Now, from the Global Settings, the customization options available within the Service Form Customization section of the Schedula plugin are seamlessly aligned with the features found in the Reservation Form Settings. This ensures a consistent and intuitive experience, allowing you to tailor service-specific forms with the same flexibility, including adjustments to colors, fonts, layouts, and labels (except date-related ones), as well as the ability to add custom fields, set validations, and customize booking flows, all while benefiting from the same user-friendly interface and live preview functionality.


Second Skin Form
The Sidebar Skin is an alternative form design layout that provides a different user interface compared to the default form design. When selected in the Custom form settings under the choose your design option, the booking form uses a two-column layout with a sidebar navigation structure, offering a more structured and organized presentation of the booking steps. This design provides users with a choice between two distinct form layouts - the default vertical flow layout and the sidebar layout.
Key Features:
- Two-column layout with sidebar navigation structure
- Clear step progression with visual indicators
- Enhanced organization with separated navigation and content areas
- Guided step-by-step booking experience
- Better visual hierarchy and user experience


Liste des Shortcodes
Schedula provides two main shortcodes that allow you to embed booking forms on any page or post within your WordPress site. These shortcodes can be easily added to your content using the WordPress editor, and they automatically load the necessary styles and scripts when detected on a page. The shortcodes are flexible and can be customized through the Appearance settings to match your website's design and branding.
Available Shortcodes:
[schesab_reservation_form]
Displays the main reservation form where customers can browse all available services, select staff members, choose appointment dates and times, and complete their bookings. This shortcode requires no attributes and can be added directly to any page or post. It displays all available services and allows customers to select from any service, staff member, and available time slot.
[schesab_service_form id="FORM_ID"]
Displays a customized service-specific booking form for a particular service configuration. This shortcode requires the 'id' attribute which corresponds to a form ID created in the Forms management section. Each form can be customized with specific services, staff members, and settings, making it ideal for creating dedicated booking pages for different services or departments. The form ID can be found in the Customize Service form.
[schesab_reservation_form]
Service-Specific Form:
[schesab_service_form id="FORM_ID"]
Support and Resources
The Schedula Smart appointment plugin is designed to simplify appointment management, improve customer experience, and streamline your business operations. From service configuration, staff management, and booking customization, to payments and notifications — every feature is built to help you run your scheduling system with flexibility and confidence.
To get the best results:
- Take time to configure each section of the settings according to your business needs.
- Test your booking flow end-to-end (including payments) before going live.
- Keep your plugin updated to benefit from new features, security patches, and performance improvements.
Your feedback matters to us. If you run into any issues, need clarification, or have suggestions for improvement, please don't hesitate to contact our support team. We're here to ensure your scheduling system runs smoothly and delivers the best possible experience for both you and your clients.
For additional help, documentation, and support resources, please visit the following links:
Developed by Vertim Coders / BELTECH