3D WP Tag Cloud-S User Guide
Version 5.3.5
https://wordpress.org/plugins/my-wp-tagcanvas/
N.B. 3D WP Tag Cloud-S creates a Single Tag Cloud. Working with it gives you the full variety of over 80 options for tuning your cloud. Here you can apply multiple colors, multiple backgrounds and multiple fonts to your cloud content. It is suitable also for creating a slideshow imitating cloud. Supports Shortcodes
This Guide is intended to help ordinary users in working with 3D WP Tag Cloud-S plugin. Since many functions of the plugin might be of interest only to web developers their description will be omitted here. The Guide focuses on those options that an average user will need to set. Those who want to see what can be done with the plugin check the examples. All the rest may start reading.
When you open a widget instance and save it without any change, it will add to the sidebar you have chosen a cloud with following basic option values by default:

Title: My 3D WP Tag Cloud
Width: 260px
Height: 260px
Shape: sphere
Content: post tags
Weight: off
Initial Speed [x, y]: 0, 0
Tag Color: #666666
Shadow Offset [x, y]: 1 px, 1 px
It is quite dull result and your job is to make it beautiful as per your understanding of this word.

Before you start, be advised that each option has a tooltip. So read them while working and Life will be much easier for you. In case you are not keen on following somebody’s advises – turn them off.
On another hand there is a HELP at the bottom of the widget where you can find this guide and number of specific practical tips. So take a look there when you have a problem.
N.B. Here the plugin will put a sort code for your usage in pages, posts etc. This will happen after you set up your cloud and save it in Inactive Widgets,

Now:
1.
Set widget’s Width and Height.
N.B. Consider these two values with the size of your sidebar.
2. Title it if you want.
3. Open CLOUD: SHAPE & CONTENT section.

1. Choose one or more SHAPEs.
N.B. In case of multiple selection plugin will change shapes automatically through fadein-fadeout transition. Go to Shape Tips under GUIDE & TIPS section for advices on selection.
2. Choose CONTENT.
N.B. Depending on your choice later you may have to change number of tags to show and/or where they come from (particular category, menu or HTML container). You may also turn off counters showing number of posts in a category or number of posts where a post tag is used.
3. Apply Magic after setting Shape & Content. Works for shapes denoted with triple asterisks (***). It changes the way tags are distributet on the shape and may give an amaizing view of your cloud.
4. Go to section CLOUD: SIZES & ZOOM.

1. Play with Radius X, Radius Y and Radius Z.
N.B. If a 2D shape spiral or hexagon is selected Radius Z is hidden. In order to avoid your tags from going beyond widget’s frame you have to fit the content of your cloud to it by these three options. Change them all and equally. Otherwise you will modify the shape of the cloud. For instance if it is sphere, you can make it disk or cigar.
You may have to change Depth (perspective) in some cases.
2. Go to section CLOUD: SPEED.

N.B. A general rule for this section: High speed is not good idea. And meanwhile don't get confused by the units!
1. Choose Initial Speed.
N.B. By default it is 0 in all axes hence your cloud is still.
Choose Min Speed, Max Speed and Deceleration.N.B. First one determines the speed of cloud when mouse pointer leaves it. If you put 0 your cloud will stop in a while. Second one limits maximal speed. You will need to reduce it when intend to apply dragging. Once again: Don’t get confused by the units of the speeds. Just speed up or slow down. As to the third setting it refers to rate of deceleration.
2. Go to section CLOUD: TIME & FUNCTIONS.

1. Tune Click to Front Time.
N.B. It is the time for bringing a clicked tag to cloud’s front. Keep in mind that when it takes that front position cloud rotation stops and begins loading of the new page.
2. Tune Pulsate Time and Pulsate to Opacity.
N.B. This is about pulsation of a tag when mouse pointer is over it. If you don’t like pulsation set Pulsate to Opacity to 1.
3. Change direction of cloud’s moving when mouse pointer touches it by switching on/off Reverse option. Set Front Select to on if you want to prevent selection of tags at back of the cloud. Use Lock if you want to limit cloud’s rotation to one of axes or if you prefer to prevent it in response to the mouse.
N.B. It makes sense to use Freeze Active and Freeze Deceleration when number of tags is relatively small: 5-10.
4. Switch on Drag Control in order to let your site visitors moving the cloud by dragging it.
5. Go to ATTRIBUTES: BG IMG, TOOLTIPS, CURSOR, CENTER FN section.

1. Enter a BACKGROUND IMAGE URL for your cloud.
2. Enter a CLOUD TOOLTIP.
N.B. Use this option especially when the cloud allows Drag Control. Then you can suggest your site visitors to "Drag and Click".
3. Move to CENTER FUNCTION subsection and choose Function.
N.B. If you want to put an image in cloud's center choose image_cf(). If you want to put there some text choose text_cf().
Choose direction of Rotation (if you prefer rotating image/text). Change Opacity for adding transparency.
4. In case of image_cf() enter your image location (http://your-site.com/your-folder/your-image.png).
N.B. It is advisable to use png format images due to advantage of transparency. It is good if image sizes are equal to widget's Width, and Height or bigger but in same proportion. Opaque part of it should look compact and be in the center. Plugin will resize image so that tags pass along without "bumping" in it.
5.
In case your choice is text_cf() select:
- Text Container (square, landscape rectangle or portrait rectangle);
- Font and its properties (Color, Size and Weight);
- Container Background, Border width and its Color.
Then enter short Text (up to five lines) and play with Zoom if necessary.
N.B. 1. If your text is one line use #3. If two - fill up #2 & #4. If three - fill #2, #3 and #4. In case of four - #1, #2, #4 and #5.
2. For no Border set it to 0 or empty its Color field.
3. For plain text empty Background and Border Color fields.
4. Landscape rectangle for Text Container is suitable for hring &
hcylinder shape when x-axis rotation is locked.
Portrait is suitable for
vring & vcylinder shape when y-axis rotation is locked.
5. Be aware that the plugin verifies entered hexadecimal color values.
A color indicator will show your choice once you leave the field if entered value is correct. If it is not you will be warned.
Below there is an example of entering a missing digit value and warning you get.

The color indicator is superseded by an exclamation "Oops!" and plugin does not let you continue until wrong value is corrected. For your ease both value formats 3-digit and 6-digit are acceptable.
6. Move to next section: WEIGHT & OUTLINE.

1. Switch on tags' weighting (Status) under WEIGHT.
N.B. Later you may change Weight Mode and most probably you will need to play with Weight Factor in order to improve visibility of your tags. If some tags are too small and others too big you can distribute tag sizes between the limits of Weight Size Min and Weight Size Max.
2. Select Outline Method if you don't like the dafault one.
N.B. For outline and clasic you may set Dash, Dash Space and Dash Speed in order to turn ouline into "marching ants".
3. Move to next section: TAGS: COLORS & OPACITY.

1. Enter Tag Color, Background, Border, Shadow and Outline colors.
N.B. All tags will look same.
2. Enter all four Gradient colors.
N.B. These are colors that will override the above Tag Color if you apply Weight in section WEIGHT & OUTLINE METHOD and Weight Mode is color or size&color.
3. Set Multiple Colors.
4. Set Multiple Backgrounds.
N.B. Multiple Colors and Multiple Backgrounds take effect either when Weight is off or if on – when Weight Mode is set to size. In addition for Multiple Colors the field of Tag Color should be left empty. In the case of Multiple Backgrounds type tag in the field for Background color. Multiple Colors and Multiple Backgrounds will be distributed randomly among tags
5. Change Min Opacity (opacity of tags at back of cloud).
N.B. Transparent by default but you can increase it to a proper value.
Be aware that the plugin verifies entered hexadecimal color values. A color indicator will show your choice once you leave the field if entered value is correct. If it is not you will be warned.
 Here is an example of entering a missing digit value and warning you get. The color indicator is superseded by an exclamation "Oops!".
Of course there are exceptions to the rule. For using the original link's background and/or border color you type in
Background, respectively in Border field the word tag.
Then color indicator will be replaced by following text: original color.
Here is an example of entering a missing digit value and warning you get. The color indicator is superseded by an exclamation "Oops!".
Of course there are exceptions to the rule. For using the original link's background and/or border color you type in
Background, respectively in Border field the word tag.
Then color indicator will be replaced by following text: original color.

In the case of multiple a question mark shows which value is the wrong one. An example on the left shows a mistake in forth value and it is a wrong letter (r).
In both cases the plugin does not let you continue until wrong value is corrected. For your ease both value formats three-digit and six-digit are acceptable.
It’s time for another important place.

1. Open TAGS: SIZES section.
2. Tune Tag Height, Padding and Split Width.
N.B. For content of Archives, Authors, Links and especially Recent Posts you will have to reduce Split Width, because usually they are much longer than ordinary tags.
3. Tune Image Scale. Set Image Radius.
N.B. Image Scale is used for tuning size of: avatars (Authors); link images (Links); icons (Menu) and featured images (Pages & Rrecent posts). Plugin resizes them to 48x48px for Menu, 96x96px for Authors & Links or 120x120px for Pages & Recent Posts. Due to perspective images become smaller at Cloud's back but bigger at its front. So if their real size is 48x48px (respectively 96x96px or 120x120px) at Cloud's front their resolution will worsen. That's why use images at least 10% bigger than the above sizes. Increasing Image Scale over 1 may also worsen resolution if it is not considered with the real size of images. By proper value of Image Radius the images can become circles.
4. Set Border, Border Radius, Shadow Offset & Shadow Blur.
N.B. For tags casting no shadow set Shadow Offset to 0.
5. Set Outline, Outline Radius and Outline Offset.
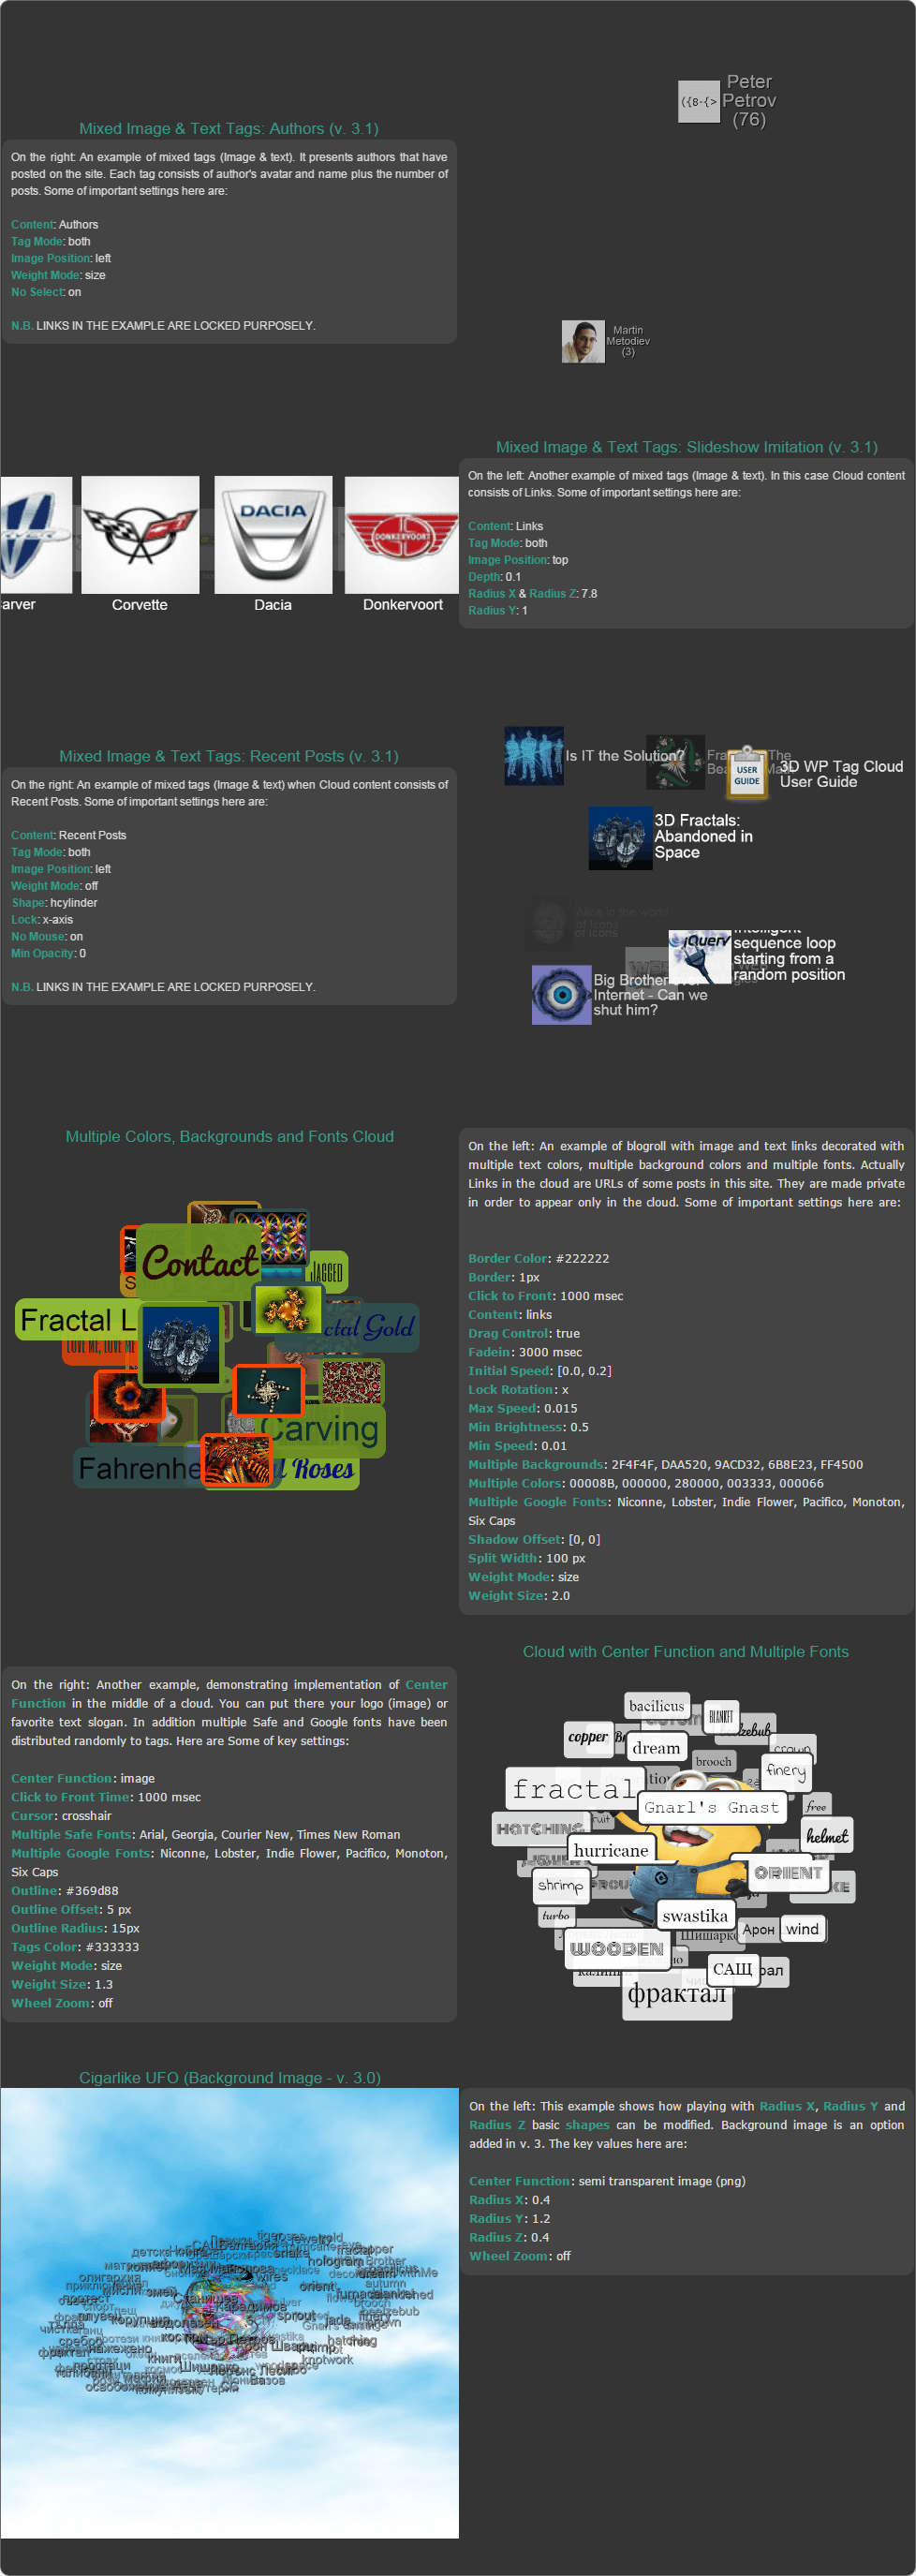
6. Open TAGS: MIXED IMAGE & TEXT section.
Here we are at some of most interesting settings. They have effect on 7 types of Content: Authors, Blogroll, Menu, Pages, Rrecent posts, Current Page/Post Links and Customer's HTML container.

1. Choose Tag Mode and eventually Image Position.
N.B. Selecting both for Tag Mode will make your tags of text and image. The other setting Image Position lets you change image position relative to text of the tag. For example this is suitable when the cloud consist of Links. In that case it is better to set it to top. This will put the image above tag text, which is suitable when your cloud imitates slideshow.
2. Go to TAGS: FONTS section.

1. Choose one or more Web Safe Fonts and/or Google Fonts.
N.B. If you don’t select any, the plugin will apply Arial. If you select more than one, the plugin will distribute them randomly on Cloud's content. You can select fonts from both types and they will be mixed in the Cloud. If number of fonts you have selected is bigger than number of tags in the Cloud the plugin will ignore those that exceed. Help selecting/unselecting by Ctrl and Shift keys on your keyboard. While the names of Web Safe Fonts show the way your tags will look like, Google Fonts need hovering by the mouse cursor in order to show it via tooltips.
Now save your work. A message with a generated Shortcode will pop up. If you want to put your cloud apart from sidebars (in a page or in a post) save the instance in Inactive Widgets. After this first saving the Shortcode will be available at the top of the widget in WIDGET OPTIONS section of the instance.

That’s all folks. Before you go and use the plugin see below some examples of clouds made with it.