# 在 Vue 中预加载组件
在 Vue 中,利用 VueRouter 可以轻松的实现两个组件(页面)之间的切换,有个常用的设计就是需要在登录页登录后跳转至一个内容页,通常的做法是在登录校验完成之后立即切换路由至内容页,接着内容页发送网络请求获取渲染需要的数据然后渲染带有业务数据的 DOM:
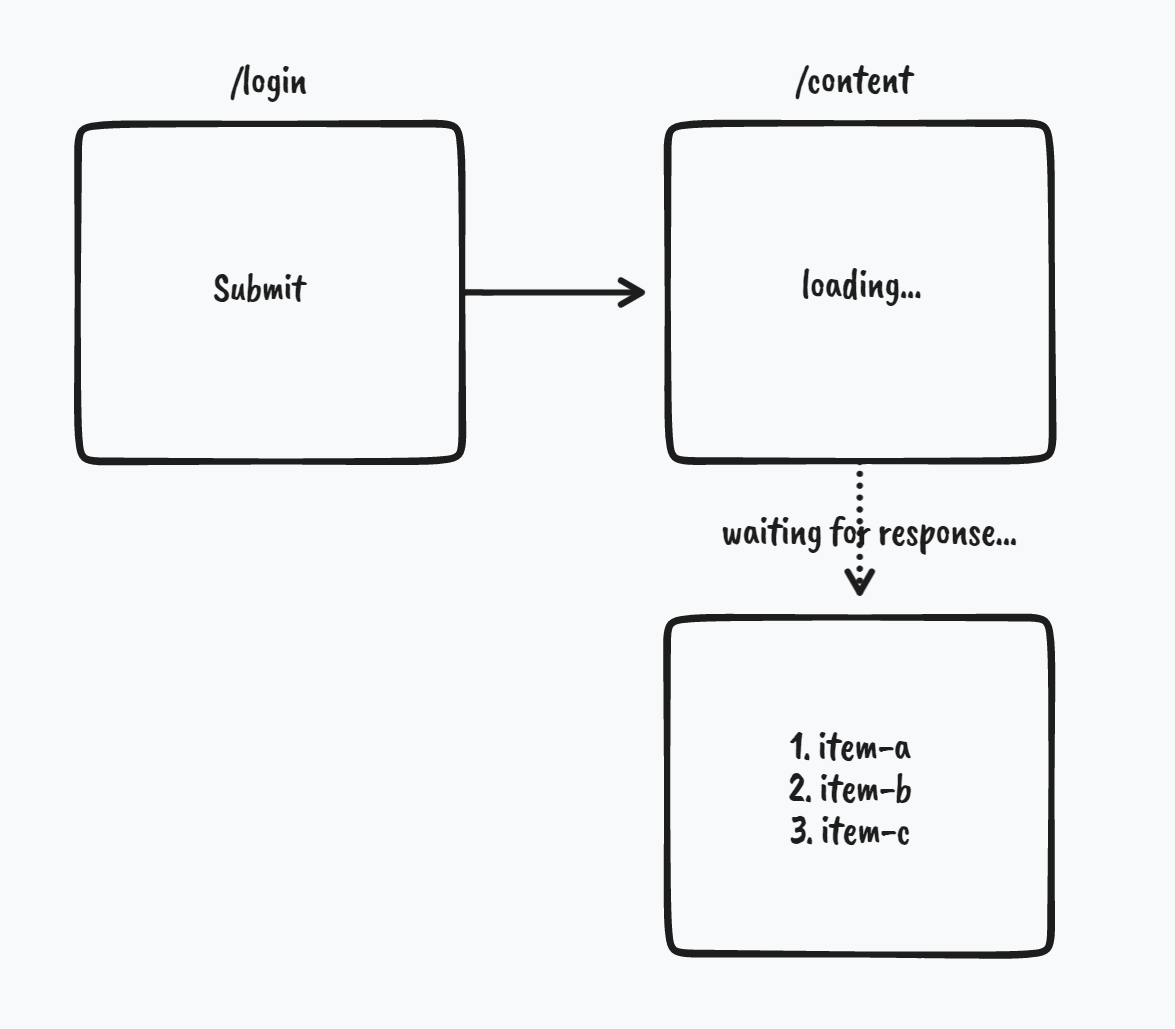 上图中,由于内容页的核心数据都是需要通过网络请求来获取,在数据获取回来之前页面处于空白(或 loading)状态,这里并没有什么逻辑问题,只是有时候可能会想,怎么将这个等待过程提前一点比如放置路由跳转之前,让内容页的初始数据准备好了再进行路由跳转?如下图示:
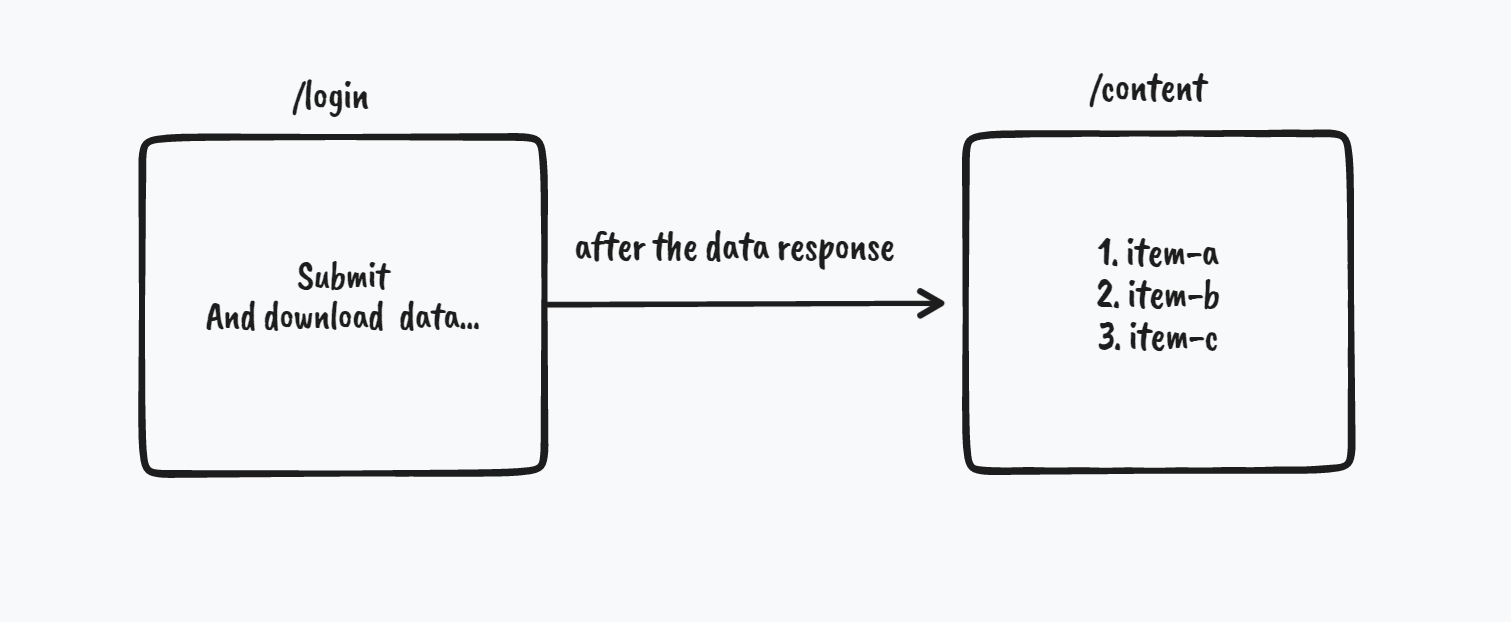 这篇文章的主要内容将会讨论这个问题。
## 方法一,数据缓存
容易想到的办法是提前将内容页的数据通过网络请求获取,待数据响应后,将获取的数据缓存至内存中,接着进行页面跳转至内容页,内容页拿到缓存的初始数据进行页面渲染,从而跳过了内容页空白(或 loading)状态
一个简单的代码实现:
```ts
// contentLogic.ts
export function loadContentRecords(params: Record) {
// 逻辑 A
// 逻辑 B
// 逻辑 C
// ...
return axios.post('...', params)
}
```
```vue
```
```vue
```
上面的实现中,可以看出此方法有一些缺陷:
1. 为了实现能在内容页之外预先发送网络请求来获取数据,需要将内容页的数据加载逻辑(`loadContentRecords` 方法)抽离至公共文件中(`contentLogic.ts` ),但显然这部分逻辑不应该被多余的抽离维护成单独的文件,因为它是只属于内容页的逻辑,别的组件不会使用;
2. 内容页组件的内部其它状态需要同步维护,在上面的 Content.vue 中,有一个默认的过滤条件 A,可以看到这个过滤条件的初始值不得不维护两次,增加了维护成本和出错概率:
+ 标记`①`:组件外部为了保证预加载的数据正确性,需要同步组件内部的默认过滤条件;
+ 标记`②`:组件内部为了配合 UI 展示,定义一个 Ref 来跟视图进行绑定。
3. 随着“下一页面“的选择可能性变多,如可能会跳转至内容页1、内容页2... 这时每个不同选择都会有第 1、2 步,变得更加难以维护。
## 方法二,预加载 Vue 组件
在方法一中,导致种种缺陷的原因是我们在一个功能完整的组件中,只把其中一部分的逻辑抽离出来单独执行,且这部分逻辑丢失了组件中的上下文(如过滤条件 A,或者一些分页参数等),所以不得不再维护一份意义相同的上下文来正确执行预加载操作
方法二则通过预加载组件,在不重构组件内部逻辑的前提下来实现相同的功能
在 Vue3 中,可以通过 `h` 方法来创建一个 VNode ,参数是一个组件对象
```ts
import { h } from 'vue'
import Content from './Content.vue'
const vnode = h(Content)
```
通过 render 方法将一个 VNode 渲染至 DOM 中,其中我们的目的是需要执行组件的逻辑,不需要将组件渲染进页面的 DOM 树中,因此只需要在内存中准备一个空的容器放置组件的 DOM 即可
```ts
import { h, render } from 'vue'
import Content from './Content.vue'
const vnode = h(Content)
render(vnode, window.document.createElement('div'))
```
至此,Content 组件已经被正常加载并挂载在内存中的一个匿名 div 中,假设 Content 的组件内部的网络请求总是需要 1s 才能完成,结合方法一中的示例,修改 login.vue:
```vue
```
事实上,目前仅仅是内存中加载了 Content 组件并不会有缓存的效果,因为在路由跳转后,VueRouter 又会重新渲染一个全新的 Content 组件,和我们在内存中预加载的 Content 没有任何联系
借用 KeepAlive 组件的思想,在路由跳转后渲染 Content 组件时,让 Vue 知道 “这个 Content 组件有缓存,读缓存就完事了“
给预加载的 vnode 加上有缓存标识,也就是给 vnode 的 shapeFlag 属性添加已被缓存的标识
```vue
```
在 RouterView 组件插槽拿到了路由匹配到的组件之后,通过自定义一个“代理”组件,来判断是否有缓存的组件可以读取
```vue
```
至此实现完成。
上面代码演示了思路,代码比较简陋需完善,有一个正在使用的例子是
http://192.168.0.44:8010/#/login
[源码 Gitlab](http://192.168.0.41/game/yogurt_backoffice/blob/master/admin/src/preloadComponent.ts)
登录后跳转至列表页,列表页的数据是直接展现出来的。
这篇文章的主要内容将会讨论这个问题。
## 方法一,数据缓存
容易想到的办法是提前将内容页的数据通过网络请求获取,待数据响应后,将获取的数据缓存至内存中,接着进行页面跳转至内容页,内容页拿到缓存的初始数据进行页面渲染,从而跳过了内容页空白(或 loading)状态
一个简单的代码实现:
```ts
// contentLogic.ts
export function loadContentRecords(params: Record) {
// 逻辑 A
// 逻辑 B
// 逻辑 C
// ...
return axios.post('...', params)
}
```
```vue
```
```vue
```
上面的实现中,可以看出此方法有一些缺陷:
1. 为了实现能在内容页之外预先发送网络请求来获取数据,需要将内容页的数据加载逻辑(`loadContentRecords` 方法)抽离至公共文件中(`contentLogic.ts` ),但显然这部分逻辑不应该被多余的抽离维护成单独的文件,因为它是只属于内容页的逻辑,别的组件不会使用;
2. 内容页组件的内部其它状态需要同步维护,在上面的 Content.vue 中,有一个默认的过滤条件 A,可以看到这个过滤条件的初始值不得不维护两次,增加了维护成本和出错概率:
+ 标记`①`:组件外部为了保证预加载的数据正确性,需要同步组件内部的默认过滤条件;
+ 标记`②`:组件内部为了配合 UI 展示,定义一个 Ref 来跟视图进行绑定。
3. 随着“下一页面“的选择可能性变多,如可能会跳转至内容页1、内容页2... 这时每个不同选择都会有第 1、2 步,变得更加难以维护。
## 方法二,预加载 Vue 组件
在方法一中,导致种种缺陷的原因是我们在一个功能完整的组件中,只把其中一部分的逻辑抽离出来单独执行,且这部分逻辑丢失了组件中的上下文(如过滤条件 A,或者一些分页参数等),所以不得不再维护一份意义相同的上下文来正确执行预加载操作
方法二则通过预加载组件,在不重构组件内部逻辑的前提下来实现相同的功能
在 Vue3 中,可以通过 `h` 方法来创建一个 VNode ,参数是一个组件对象
```ts
import { h } from 'vue'
import Content from './Content.vue'
const vnode = h(Content)
```
通过 render 方法将一个 VNode 渲染至 DOM 中,其中我们的目的是需要执行组件的逻辑,不需要将组件渲染进页面的 DOM 树中,因此只需要在内存中准备一个空的容器放置组件的 DOM 即可
```ts
import { h, render } from 'vue'
import Content from './Content.vue'
const vnode = h(Content)
render(vnode, window.document.createElement('div'))
```
至此,Content 组件已经被正常加载并挂载在内存中的一个匿名 div 中,假设 Content 的组件内部的网络请求总是需要 1s 才能完成,结合方法一中的示例,修改 login.vue:
```vue
```
事实上,目前仅仅是内存中加载了 Content 组件并不会有缓存的效果,因为在路由跳转后,VueRouter 又会重新渲染一个全新的 Content 组件,和我们在内存中预加载的 Content 没有任何联系
借用 KeepAlive 组件的思想,在路由跳转后渲染 Content 组件时,让 Vue 知道 “这个 Content 组件有缓存,读缓存就完事了“
给预加载的 vnode 加上有缓存标识,也就是给 vnode 的 shapeFlag 属性添加已被缓存的标识
```vue
```
在 RouterView 组件插槽拿到了路由匹配到的组件之后,通过自定义一个“代理”组件,来判断是否有缓存的组件可以读取
```vue
```
至此实现完成。
上面代码演示了思路,代码比较简陋需完善,有一个正在使用的例子是
http://192.168.0.44:8010/#/login
[源码 Gitlab](http://192.168.0.41/game/yogurt_backoffice/blob/master/admin/src/preloadComponent.ts)
登录后跳转至列表页,列表页的数据是直接展现出来的。