---
sidebar_position: 6
---
# 开发 API 服务
本章将介绍如何使用 Modern.js,进行 API 服务项目的开发。本章对应的代码仓库地址在[这里查看](https://github.com/modern-js-dev/modern-js-examples/tree/main/quick-start/api-service)。
通过本章你可以了解到:
- 如何创建一个 API 服务项目。
- 如何在项目中创建和开发 API。
- BFF 函数写法和框架写法。
- 如何使用测试功能。
:::info 注
API 服务指提供 HTTP 接口的服务端项目。
:::
## 环境准备
import EnvPrepare from '@site/docs/components/env-prepare.md';
## 创建项目
使用 `@modern-js/create` 创建新项目,运行命令如下:
```bash
npx @modern-js/create api-service-demo
```
:::info 注
api-service-demo 为创建的项目名。
:::
按照如下选择,生成项目:
```bash
? 请选择你想创建的工程类型: 应用
? 请选择开发语言: TS
? 请选择包管理工具: pnpm
? 是否需要支持以下类型应用: 不需要
? 是否需要调整默认配置: 否
```
现在我们生成的是一个前端项目,我们给该项目添加 BFF 功能,在项目根目录下,执行 `pnpm run new`,进行如下选择:
```bash
? 请选择你想要的操作:启用可选功能
? 启用可选功能: 启用「BFF」功能
? 请选择 BFF 类型:函数写法
? 请选择运行时框架:Egg
```
删除 `src/` 目录,这样我们的项目就是一个纯粹的 API 服务项目了。
:::info 补充信息
Modern.js 中的 BFF 和 API 服务支持四种不同的运行时框架,详细介绍请参考【[运行时框架](/docs/guides/features/server-side/bff/frameworks)】。
:::
## IDE 支持
Modern.js 对 VS Code 等主流 IDE 提供了开箱即用的支持,具备 Lint 问题自动检测、自动修复,代码提交前的准入检查等功能特性,可以让代码开发更加高效和智能。详细介绍请参考【[确认编程环境](/docs/guides/tutorials/c03-ide/3.1-setting-up)】。
## 开发调试
在项目的根目录,执行 `pnpm run dev` 即可启动开发服务器:
```bash
# 启动开发服务器
pnpm run dev
```
浏览器访问 `http://localhost:8080/api`,可以看到返回信息为:`{ "message": "Hello Modernjs" }`。
### 开发接口
现在让我们开发一个报表接口,报表接口返回所有的用户信息。创建 `api/users` 文件,编写以下代码(需要先安装 axios 依赖):
```ts title=api/users.ts
import axios from 'axios';
export default async (): Promise<
{ key: string; name: string; age: number; country: string }[]
> => {
const res = await axios.get(
'https://lf3-static.bytednsdoc.com/obj/eden-cn/beeh7uvzhq/users.json',
);
return res.data;
};
```
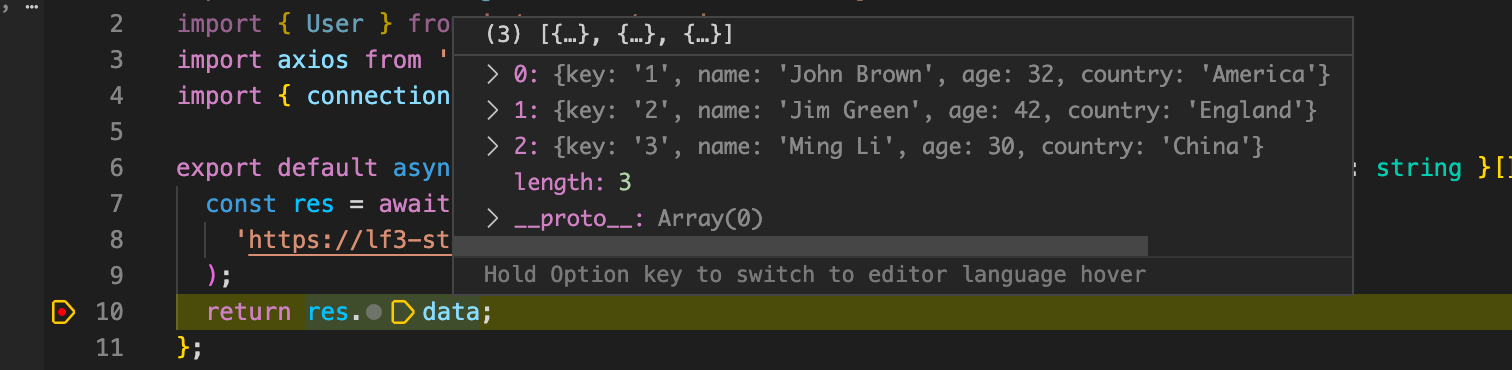
访问 `http://localhost:8080/api/users`,会返回一个数组,数组中的每一项是一个用户信息,如下所示:
```json
[
{ "key": "1", "name": "John Brown", "age": 32, "country": "America" },
{ "key": "2", "name": "Jim Green", "age": 42, "country": "England" },
{ "key": "3", "name": "Ming Li", "age": 30, "country": "China" }
]
```
### 调试接口
通过 VS Code 的 Debugger 模式,我们可以很容易地调试 API 服务。
在 VS Code 的 Terminal 面板,选择 Debugger Terminal,执行 `pnpm run dev` 命令,运行 API 服务。
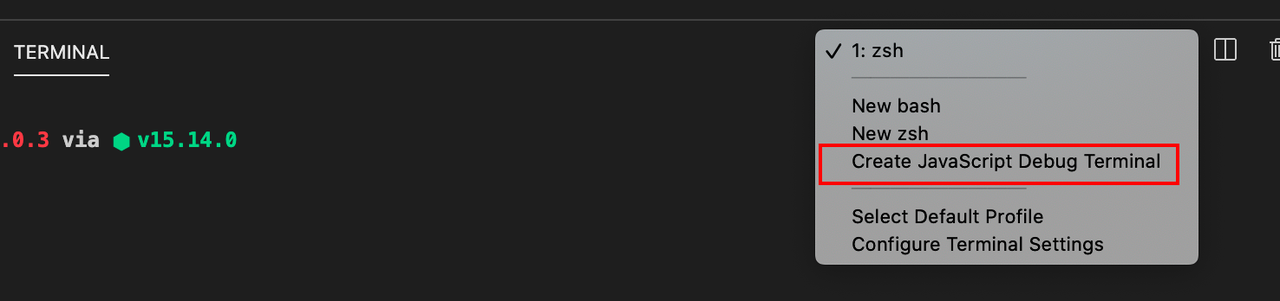
打上断点,重新访问 `http://localhost:8080/api/users`,代码逻辑会在对应的断点暂停。
### 获取单个用户
开发报表时,一个常见场景是过滤数据。现在,我们开发一个新接口,用于根据用于 ID 获取单个用户的信息。
首先创建 `api/users/[id].ts` 文件:
```bash
touch api/users/[id].ts
```
:::info 补充信息
在 `api/` 目录下当文件名以 `[xxx]` 命名时,该文件的 BFF 函数会注册为动态路由;更多信息,请参考【[动态路由](/docs/guides/features/server-side/bff/function#/动态路由)】。
:::
在服务端的代码中,我们需要获取到动态路由实际传入的参数。Modern.js 中提供了 [useContext](/docs/guides/features/server-side/bff/frameworks) API,用于获取请求的上下文信息。
在 `api/users/[id].ts` 文件中写以下代码:
```ts title=api/users/[id].ts
import axios from 'axios';
import { useContext } from '@modern-js/plugin-egg';
interface User {
key:string;
name: string;
age: number;
country: string;
}
export default async () => {
const res = await axios.get(
'https://lf3-static.bytednsdoc.com/obj/eden-cn/beeh7uvzhq/users.json',
);
const ctx = useContext();
const users: User[] = res.data;
const user = users.find(user => user.key === ctx.params.id)
return user || 'not found'
};
```
这样我们获取用户数据的接口就开发完成了,访问 `http://localhost:8080/api/users/1`,会返回以下数据:
```json
{ "key": "1", "name": "John Brown", "age": 32, "country": "America" }
```
:::info 注
Modern.js 服务端的代码同样是支持热更新功能的,修改代码后无需重启服务。
:::
### 连接数据库
在真实的业务场景中,API 服务经常需要查询数据库返回相关数据,下面会介绍 API 服务项目如何连接数据库。
我们以 MySQL 数据库为例:
:::info 注
如果没有安装 MySQL,需要先进行[下载安装](https://dev.mysql.com/downloads/mysql/)。
:::
- 创建数据库实例:
```sql
CREATE DATABASE modernjs;
```
- 选择数据库:
```sql
use modernjs;
```
- 创建表:
```sql
CREATE TABLE IF NOT EXISTS `users`(
`id` INT UNSIGNED AUTO_INCREMENT,
`name` VARCHAR(100) NOT NULL,
`age` INT(4) NOT NULL,
`country` VARCHAR(100),
PRIMARY KEY ( `id` )
)ENGINE=InnoDB DEFAULT CHARSET=utf8;
```
- 插入数据:
```sql
INSERT INTO users
(name, age, country)
VALUES
("John Brown", 32, "America");
```
- 查询数据:
```sql
select * from users;
```
- 在项目根目录下安装 `mysql2`:
```bash
pnpm add mysql2
```
- 编写连接数据库的代码:
```ts
const connection = mysql.createConnection({
host: 'localhost',
user: 'root',
password: 'password',
database: 'modernjs',
});
```
- 创建一个 `query` 函数,支持通过 `sql` 语句查询数据库:
```ts
const query = (sql: string) =>
new Promise((resolve, reject) => {
connection.query(sql, (error, results, fields) => {
if (error) {
reject(error);
}
resolve(results);
});
});
```
- 修改之前的示例,通过查询数据库获取数据:
```ts
export default async (): Promise => {
const users: User[] = await query(`select * from users`);
const ctx = useContext();
const user = users.find(user => user.id == ctx.params.id);
return user || 'not found';
};
```
- 访问 `http://localhost:8080/api/users/1`,会得到下面的数据:
```json
{ "id": 1, "name": "John Brown", "age": 32, "country": "America" }
```
### 添加数据
有了数据库之后,我们可以开发添加数据的接口。以上述例子为基础,在 `api/users.ts` 文件中创建 `addUser` 函数:
```ts title=api/users.ts
const addUser = ({
name,
age,
country,
}: Pick) =>
new Promise((resolve, reject) => {
connection.execute(
`
INSERT INTO users ( name, age, country) VALUES ( "${name}", "${age}", "${country}" );
`,
(error: Error, results) => {
if (error) {
reject(error);
}
resolve(results.insertId);
},
);
});
```
然后创建 `post` 函数,并将该 `post` 函数导出:
```ts title=api/users.ts
export const post = async ({
data,
}: {
data: Pick;
}) => {
const id: number = await addUser(data);
return {
id,
};
};
```
:::info 补充信息
这里声明的 `post` 函数会注册一条 `api/post` 的路由,具体函数参数及用法可以参考【[BFF 介绍](/docs/guides/features/server-side/bff/function)】。
:::
现在我们在终端通过 [curl](https://curl.se/) 发送 POST 请求到 `http://localhost:8080/api/users`,创建一个新用户:
```shell
curl -H "Content-类型: application/json" -X POST -d '{"name":"Modernjs", "age": 0, "country": "China"}' http://localhost:8080/api/users
```
再次访问 `http://localhost:8080/api/users`,可以看到新增了一个用户:
```json
[
{ "id": 1, "name": "John Brown", "age": 32, "country": "America" },
{ "id": 2, "name": "Jim Green", "age": 42, "country": "England" },
{ "id": 3, "name": "Ming Li", "age": 30, "country": "China" },
{ "id": 4, "name": "Modernjs", "age": 0, "country": "China" }
]
```
### 使用 Schema 校验请求参数
Modern.js 支持对接收到的请求做参数的类型校验。我们以 `post` 函数为例,对请求数据和响应数据做类型校验:
```ts title=api/users.ts
import { match, String, Number } from '@modern-js/runtime/server';
export const post = match(
{
request: {
data: {
name: String,
age: Number,
country: String,
},
},
response: {
id: Number,
},
},
async request => {
const id: number = await addUser(request.data);
return {
id,
};
},
);
```
:::info 补充信息
更多用法,请参考【[携带 Schema 的 BFF 函数](/docs/guides/features/server-side/bff/schema)】。
:::
当我们发送符合数据类型格式的数据时,会正常返回新增数据的 `id`。
```shell
curl -H "Content-类型: application/json" -X POST -d '{"name":"Modernjs", "age": 0, "country": "China"}' http://localhost:8080/api/users
```
当我们发送的数据类型不符合数据格式要求,就会返回 400 的错误信息,例如:
```shell
curl -H "Content-类型: application/json" -X POST -d '{"name":"Modernjs", "age": "age", "country": "China"}' http://localhost:8080/api/users
```
```shell
path: ["data","age"]
age is not a number
```
### 使用 BFF 代理
在一些场景下,我们只是做接口的转发;此时我们并不需要像前面所述,从零开发一个 API 服务的接口,而是可以直接使用 Modern.js 提供的 BFF 代理功能做请求转发。
例如,我们需要代理 [CNode](https://cnodejs.org/) 社区首页的接口,可以在项目的 `modern.config.js` 下,增加以下配置:
```js title="modern.config.js"
export default defineConfig({
bff: {
proxy: {
'/api/v1/topics': 'https://cnodejs.org',
},
},
});
```
现在访问 `http://localhost:8080/api/v1/topics`,就会得到 [CNode](https://cnodejs.org/) 首页的数据。
:::info 补充信息
更多用法,请参考【[BFF 代理](/docs/apis/config/bff/proxy)】。
更多 Modern.js 的代理方式请参考【[调试代理和 Mock](/docs/guides/usages/debug/proxy-and-mock)】。
:::
## 框架写法
上述示例中,我们使用的是 Modern.js 中的 [BFF 函数写法](/docs/guides/features/server-side/bff/function)。
使用这种写法,我们只需要简单地定义一些服务端的处理函数,就能开发 API 服务接口。但当我们项目越来越复杂时,就无法避免地需要对项目进行分层,需要更多的框架元素。此时我们可以使用**框架写法**。
以 Egg 为例,当使用**框架写法**时,可以在 `api/lambda/` 下写 **BFF 函数**,其他 `api/` 目录下的文件约定与 Egg 保持一致。所以 Egg 原有提供的能力,如 service、插件、定时器等在**框架写法**下都是支持的。
```bash title="egg 框架写法的目录结构"
.
├── api/
| ├── app.ts (可选)
| ├── agent.ts (可选)
| ├── app (可选)
| | ├── router.ts (可选)
| │ ├── controller (可选)
| │ | └── home.ts
| │ ├── service (可选)
| │ | └── user.ts
| │ ├── middleware (可选)
| │ | └── response_time.ts
| │ ├── schedule (可选)
| │ | └── my_task.ts
| │ └── extend (可选)
| │ ├── helper.ts (可选)
| │ ├── request.ts (可选)
| │ ├── response.ts (可选)
| │ ├── context.ts (可选)
| │ ├── application.ts (可选)
| │ └── agent.ts (可选)
│ ├── config/
│ │ └── config.default.ts
│ └── lambda/
│ └── hello.ts
├── modern.config.js
├── package.json
├── pnpm-lock.yaml
├── tsconfig.json
```
:::info 补充信息
在 Egg 中 router.ts 和 controller 必须存在,而 Modern.js 可以通过函数编写路由,因此这两部分内容是可选的。
更多信息,请参考【[BFF 框架写法](/docs/guides/features/server-side/bff/frameworks#框架写法)】。
:::
## 测试
:::tip 提示
近期上线,敬请期待。
:::
## 部署
:::tip 提示
近期上线,敬请期待。
:::