# threedy
## Home Asssistant card for 3D printers (via OctoPrint integration)

 # Table of Contents
- [Features](#-features)
- [Prerequisites](#-prerequisites)
- [Installation](#-installation)
- [Method 1: HACS](#method-1-hacs)
- [Method 2: Manual](#method-2-manual)
- [Config](#-config)
- [Graphical](#-Graphical)
- [Manual](#manual)
- [Required](#required)
- [Optional](#optional)
- [Example Config](#-example-config)
- [Custom Theming](#-custom-theming)
- [Screenshots](#-screenshots)
- [Active Print](#active-print)
- [Idle](#idle)
- [Printer Offline](#printer-offline)
- [Show/Hide Animation](#showhide-animation)
- [Developing](#-developing)
## Features
---
- Live animation of 3D printer
- Live camera view
- Current states of various OctoPrint sensors
- Tap to show/hide when printer is idle
- Power button for a switch entity
- Light button for a switch entity
- Adjustable 3D printer graphic scale
- Themes
## Prerequisites
---
- [OctoPrint](https://octoprint.org/)-enabled 3D printer
- [Home Assistant](https://www.home-assistant.io/) instance
- Home Assistant [OctoPrint integration](https://www.home-assistant.io/integrations/octoprint/)
- *** Make sure to expose all available data entities for your printer! ***
## Installation
---
### Method 1: HACS
1. Open _HACS_ and navigate to _Frontend_ Section
2. Open the Overflow Menu (⋮) in the top right corner and click on _Custom repositories_
3. Paste `https://github.com/dangreco/threedy` into the input field and select `Lovelace` from the dropdown
4. Click the Install Button on the highlighted Card titled _threedy_
### Method 2: Manual
1. Download ```threedy-card.js``` from the releases section.
2. Either:
* Move to the ```www``` folder of your Home Assistant instance
* Or copy the ffle's contents via the file editor.
3. In the Resources section of Lovelace (```Configuration -> Lovelace Dashboards -> Resources```), add ```/local/threedy-card.js``` as a ```JavaScript Module```.
4. Save
5. Add a manual card to your lovelace dashboard using the configuration instructions below.
6. Restart Server management
7. Reload Browser
## Config
---
### Graphical (Recommended)

### Manual
#### Required
- ```type``` — Always ```'custom:threedy-card'```
- ```base_entity``` — Take the beginning of one of the OctoPrint sensors of your printer. Example: for ```sensor.ender_3_v2_current_state``` it would be ```sensor_ender_3_v2```.
- ```name``` — Can be whatever you want!
- ```printer_type``` — Use a printer style: ```'I3' | 'Cantilever' ```
- ```monitored``` — A list of values to monitor throughout the print; gets displayed to the right of the printer.
#### Optional
- ```theme``` — Theme of the card: ```'Default' | 'Neumorphic' ```. Screenshots listed below.
- ```font``` — Specify the font used in the card. By default it is ```sans-serif```.
- ```scale``` — The scale factor of the animated 3D printer view. Try different values until you find one you like.
- ```round_time``` — Specify whether to round durations of time. Defaults to false. ```true | false```
- ```round_temperature``` — Specify whether to round decimal numbers for temperatures. Defaults to false. ```true | false```
- ```temperature_unit``` — Specify which unit of temperature measurement to convert to. ```'F' | 'C' ```
- ```use_24hr``` — Use 24 hour time format instead of 12 hour.
- ```use_mqtt``` — Use [MQTT integration](https://plugins.octoprint.org/plugins/homeassistant/) instead of OctoPrint API.
- ```printer_config``` — Use in with ```printer_type``` to set a custom printer style. If omitted, the default for the type will be used. Use [this tool](https://google.com) to create a custom value.
- ```camera_entity``` — Specify the entity ID of the camera entity you want to display **when the printer graphic is clicked**.
- ```light_entity``` — Specify the entity ID of a light you want to toggle for the printer.
- ```power_entity``` — Specify the entity ID of a power switch you want to toggle for the printer.
## Example Config
---
```yaml
# required
type: 'custom:threedy-card'
base_entity: 'sensor.ender_3_v2'
name: 'Ender 3 v2'
printer_type: I3
monitored:
- Status
- ETA
- Elapsed
- Remaining
- Hotend
- Bed
# optionals
theme: 'Default'
font: 'Roboto'
scale: 1.0
round: false
```
## Custom Theming
---
Custom theming can be accomplished using [lovelace-card-mod](https://github.com/thomasloven/lovelace-card-mod#mod-card)'s ```mod-card```.
Some styles may require the css keyword ``` !important``` to override the inline style.
Example usage as follows:
```yaml
type: 'custom:mod-card'
style: |
threedy-card > div {
box-shadow: none !important;
}
card:
type: 'custom:threedy-card'
.
.
.
```
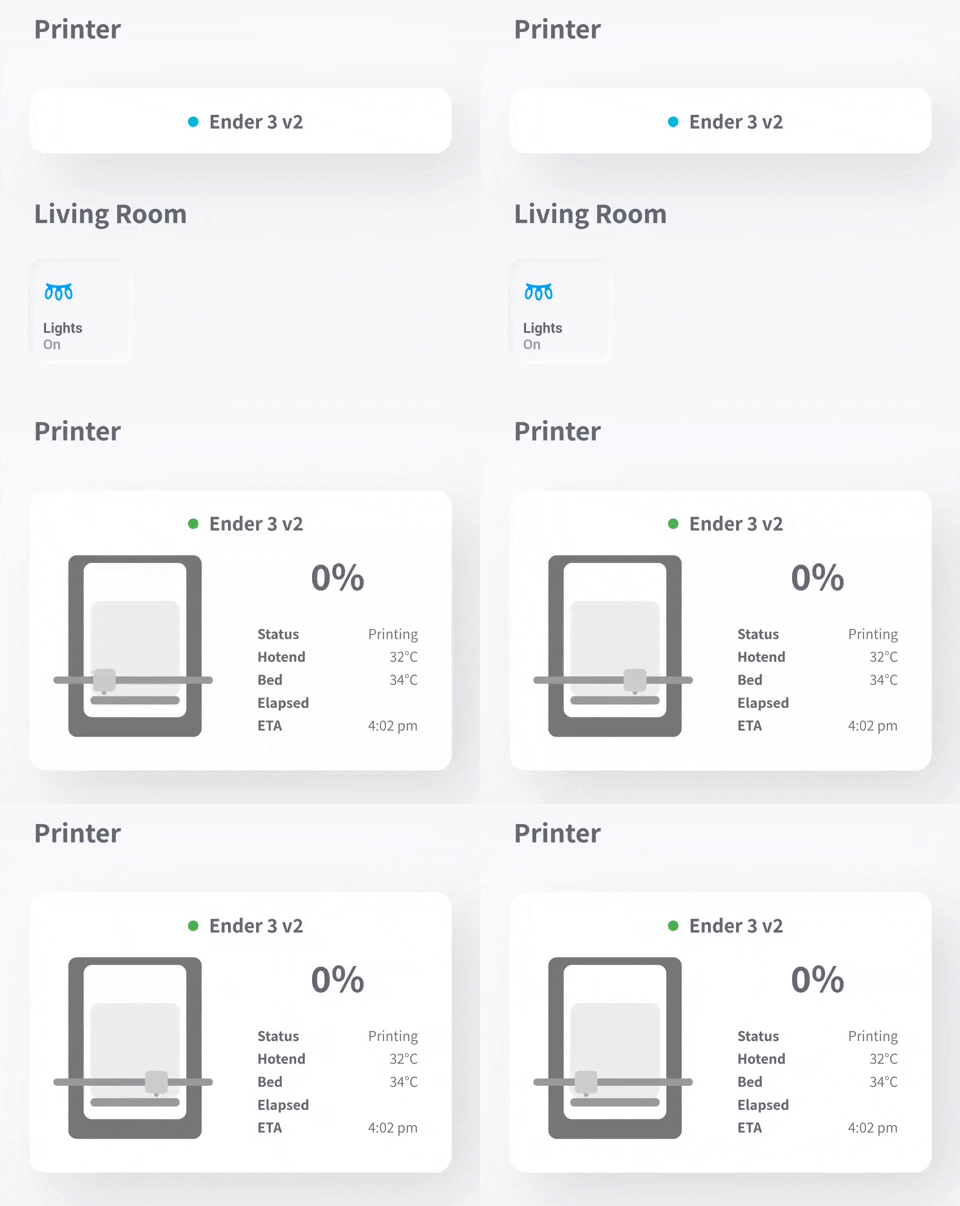
## Screenshots
---
### Active Print

### Idle

### Printer Offline

### Show/Hide Animation
## Developing
---
The 2.0 release of Threedy includes a nice local dev editor:

Clone the repository:
```zsh
$ git clone https://github.com/dangreco/threedy && cd threedy
```
Install dependencies:
```zsh
$ yarn install
```
Start dev server:
```zsh
$ yarn dev
```
# Table of Contents
- [Features](#-features)
- [Prerequisites](#-prerequisites)
- [Installation](#-installation)
- [Method 1: HACS](#method-1-hacs)
- [Method 2: Manual](#method-2-manual)
- [Config](#-config)
- [Graphical](#-Graphical)
- [Manual](#manual)
- [Required](#required)
- [Optional](#optional)
- [Example Config](#-example-config)
- [Custom Theming](#-custom-theming)
- [Screenshots](#-screenshots)
- [Active Print](#active-print)
- [Idle](#idle)
- [Printer Offline](#printer-offline)
- [Show/Hide Animation](#showhide-animation)
- [Developing](#-developing)
## Features
---
- Live animation of 3D printer
- Live camera view
- Current states of various OctoPrint sensors
- Tap to show/hide when printer is idle
- Power button for a switch entity
- Light button for a switch entity
- Adjustable 3D printer graphic scale
- Themes
## Prerequisites
---
- [OctoPrint](https://octoprint.org/)-enabled 3D printer
- [Home Assistant](https://www.home-assistant.io/) instance
- Home Assistant [OctoPrint integration](https://www.home-assistant.io/integrations/octoprint/)
- *** Make sure to expose all available data entities for your printer! ***
## Installation
---
### Method 1: HACS
1. Open _HACS_ and navigate to _Frontend_ Section
2. Open the Overflow Menu (⋮) in the top right corner and click on _Custom repositories_
3. Paste `https://github.com/dangreco/threedy` into the input field and select `Lovelace` from the dropdown
4. Click the Install Button on the highlighted Card titled _threedy_
### Method 2: Manual
1. Download ```threedy-card.js``` from the releases section.
2. Either:
* Move to the ```www``` folder of your Home Assistant instance
* Or copy the ffle's contents via the file editor.
3. In the Resources section of Lovelace (```Configuration -> Lovelace Dashboards -> Resources```), add ```/local/threedy-card.js``` as a ```JavaScript Module```.
4. Save
5. Add a manual card to your lovelace dashboard using the configuration instructions below.
6. Restart Server management
7. Reload Browser
## Config
---
### Graphical (Recommended)

### Manual
#### Required
- ```type``` — Always ```'custom:threedy-card'```
- ```base_entity``` — Take the beginning of one of the OctoPrint sensors of your printer. Example: for ```sensor.ender_3_v2_current_state``` it would be ```sensor_ender_3_v2```.
- ```name``` — Can be whatever you want!
- ```printer_type``` — Use a printer style: ```'I3' | 'Cantilever' ```
- ```monitored``` — A list of values to monitor throughout the print; gets displayed to the right of the printer.
#### Optional
- ```theme``` — Theme of the card: ```'Default' | 'Neumorphic' ```. Screenshots listed below.
- ```font``` — Specify the font used in the card. By default it is ```sans-serif```.
- ```scale``` — The scale factor of the animated 3D printer view. Try different values until you find one you like.
- ```round_time``` — Specify whether to round durations of time. Defaults to false. ```true | false```
- ```round_temperature``` — Specify whether to round decimal numbers for temperatures. Defaults to false. ```true | false```
- ```temperature_unit``` — Specify which unit of temperature measurement to convert to. ```'F' | 'C' ```
- ```use_24hr``` — Use 24 hour time format instead of 12 hour.
- ```use_mqtt``` — Use [MQTT integration](https://plugins.octoprint.org/plugins/homeassistant/) instead of OctoPrint API.
- ```printer_config``` — Use in with ```printer_type``` to set a custom printer style. If omitted, the default for the type will be used. Use [this tool](https://google.com) to create a custom value.
- ```camera_entity``` — Specify the entity ID of the camera entity you want to display **when the printer graphic is clicked**.
- ```light_entity``` — Specify the entity ID of a light you want to toggle for the printer.
- ```power_entity``` — Specify the entity ID of a power switch you want to toggle for the printer.
## Example Config
---
```yaml
# required
type: 'custom:threedy-card'
base_entity: 'sensor.ender_3_v2'
name: 'Ender 3 v2'
printer_type: I3
monitored:
- Status
- ETA
- Elapsed
- Remaining
- Hotend
- Bed
# optionals
theme: 'Default'
font: 'Roboto'
scale: 1.0
round: false
```
## Custom Theming
---
Custom theming can be accomplished using [lovelace-card-mod](https://github.com/thomasloven/lovelace-card-mod#mod-card)'s ```mod-card```.
Some styles may require the css keyword ``` !important``` to override the inline style.
Example usage as follows:
```yaml
type: 'custom:mod-card'
style: |
threedy-card > div {
box-shadow: none !important;
}
card:
type: 'custom:threedy-card'
.
.
.
```
## Screenshots
---
### Active Print

### Idle

### Printer Offline

### Show/Hide Animation

## Developing
---
The 2.0 release of Threedy includes a nice local dev editor:

Clone the repository:
```zsh
$ git clone https://github.com/dangreco/threedy && cd threedy
```
Install dependencies:
```zsh
$ yarn install
```
Start dev server:
```zsh
$ yarn dev
```