在前面两篇文档中已经介绍了如何使用Clouda进行开发,这篇文档将从目录结构、文件作用、用法等方面对Clouda进行详细的介绍。
##Clouda目录结构
Clouda目录结构如下图:
([\W\w]*?)<\/div>/;
var topnews = decodeData.match(topnewsRegex)[1];
var resolved = {
topnews: topnews
}
return resolved;
},
fetchInterval : 6 * 1000,
//true:表示originData为buffer,默认为false,表示originData为String
buffer : true
}
module.exports = extpubConfig;
详细代码和说明请参考《Examples》文档。
## Controller
如果你曾经接触过MVC模型,那么将会很熟悉Controller的概念。在Clouda中,Controller是每个场景的控制器,负责实现App的核心业务逻辑。每一个Controller文件都放在controller/下。
App.studentList = sumeru.controller.create(function(env, session){
});
使用sumeru.controller.create()创建一个名为studentList的Controller。
Controller具有以下几个时态:onload()、onrender()、onready()、onsleep()、onresume()、ondestroy(),下面将详细介绍这几个时态的作用和用法。
* ### onload
语法:env.onload(){}
onload()是Controller的第一个时态,Controller中需要使用的数据都在这个时态中加载,我们上面谈到过的subscribe()也多在这个时态中使用,方法如下。
App.studentList = sumeru.controller.create(function(env, session){
var getAllStudents = function(){
env.subscribe("pub-allStudents",function(studentCollection){
});
};
env.onload = function(){
return [getAllStudents];
};
});
注意:如果您开启了**Server端渲染**,那么在onload函数中需确保onload中,没有使用前端的js中的变量或函数,比如window,document,Localstorage等
* ### onrender
语法:env.onrender(){}
当数据获取完成后,这些数据需要显示在视图(View)上,这个过程通过onrender()中的代码来实现,这是Controller的第二个时态,负责完成对视图(View)的渲染和指定转场方式。
env.onrender = function(doRender){
doRender(viewName,transition);
};
* viewName
需要渲染的视图(View)名称。
* transition
定义视图转场,形式如下:
['push', 'left']
转场方式:我们提供'none', 'push'、'rotate'、'fade'、'shake'五种转场方式
转场方向:不同的转场方式有不同的转场方向,请参考附录:《API说明文档》
* ### onready
语法:env.onready(){}
这是Controller的第三个时态,在View渲染完成后,事件绑定、DOM操作等业务逻辑都在该时态中完成;每段逻辑使用session.event包装,从而建立事件与视图block的对应关系。
env.onready = function(){
session.event(blockID,function(){
});
};
* blockID
View中block的id,关于block在接下View中会做详细的介绍。
* function(){}
事件绑定、DOM操作等业务逻辑在这里完成。例如有一个View如下:
如何对view中的submit做事件绑定呢?可以通过下面代码实现:
env.onready = function(){
session.event("studentList",function(){
Library.touch.on('#submit', 'touchstart', 'submitMessage');
});
};
Library.touch是集成在框架中的事件与手势库,他可用于实现复杂交互手势,兼容鼠标与触摸屏事件等各种场景。关于WebApp事件与手势库的详细介绍,请参考《API说明文档》。
* ### onsleep
语法:env.onsleep(){}
当Controller长时间不处于活动状态时,可能会被置为睡眠状态,以确保正在运行中的Controller具有足够的资源。如果需要在Controller被暂停之前运行一些逻辑(比如暂存状态等),可以在onsleep()中完成。
env.onsleep = function(){
};
* ### onresume
语法:env.onresume(){}
当处在睡眠状态的Controller被唤醒时,onresume()时态将被调用。该时态可用于执行一些恢复性业务逻辑
env.onresume = function(){
};
* ### ondestroy
语法:env.ondestroy(){}
当Controller被销毁时,ondestroy()将被调用。
env.ondestroy = function(){
};
### Controller接收URL中的参数
* 使用env.redirect()方法
当一个Controller(起始Controller)跳转到另一个Controller(目标Controller)时,可以使用env.redirect()方法来实现参数的传递,方法如下:
* 在起始Controller中
env.redirect(queryPath ,paramMap);
第一个queryPath: 目标Controller在router中“pattern”的值;
paramMap:需要传递的参数
* 目标Controller中使用“param”对象接受参数
sumeru.controller.create(function(env, session, param){
});
* 实例
* SourceController.js
sumeru.router.add(
{
pattern: '/sourcepage',
action: 'App.SourceController'
}
);
App.SourceController = sumeru.controller.create(function(env, session){
env.redirect('/destinationpage',{a:100,b:200});
});
* DestinationController.js
sumeru.router.add(
{
pattern: '/destinationpage',
action: 'App.DestinationController'
}
);
App.DestinationController = sumeru.controller.create(function(env, session, param){
console.log(param.a);
console.log(param.b);
});
跳转后的URL为:http://localhost:8080/debug.html/destinationpage?a=100&b=200&
开发者也可按照上面的URl格式来拼接一个带参数的URL。
## Model
我们使用Model来定义App的数据模型,例如在model/下创建一个student.js
Model.student = function(exports){
};
在"student"中添加"studentName"、"age"和"gender"三个字段:
Model.student = function(exports){
exports.config = {
fields: [
{name : 'studentName', type: 'string'},
{name : 'age', type: 'int'},
{name : 'gender', type: 'string'}
]
};
};
* ##### name
字段的名称
* ##### type
字段的数据类型,包括"int"、"date"、"string"、"object"、"array"、"model"、"collection"。
除以上两种,常用的属性还包括:
* ### defaultValue
字段的默认值
{name: 'gender', type: 'string', defaultValue: 'male'}
若不提供"gender"值时,则字段的默认值为"male"。
再看一个时间的例子:
{name: 'time', type: 'date', defaultValue: 'now()'}
若不提供"time"值时,则字段的默认值为当前服务器时间。
* ### validation
字段的验证,validation包括以下方法:
* length[min,max]
字段值得长度在min-max的范围。
* mobilephone
必须为手机号码格式,长度为11位且必须为数字
* required
字段值不能为空
* number
字段值必须为数字
* unique
字段值必须唯一
更多内置验证方法和自定义验证方法,请参考附录:《API说明文档》
* #### model
当type值为model和collection时,表示该字段包含一个指向其他model的1:1 或 1:n 的关系。
此时,需同时提供model字段以声明指向的model对象。
{name: 'classes', type: 'model', model: 'Model.classes'}
## Collection
Collection是Model的集合,我们之前曾使用过的subscribe()返回的结果集即是Collection。
session.studentCollection = env.subscribe("pub-allStudents",function(myCollection){
});
session.studentCollection是返回的Collection。可对数据集进行“增、删、查、改”的操作:
* ### add
语法:add()
使用add()在Collection中添加一行数据。
session.studentCollection.add({
studentName: 'John',
age: 18,
gender:"male"
});
* ### save
语法:save()
save()是用于将collection的修改保存到Server,在通常情况下,调用save()方法会自动触发对应视图block的更新。
session.studentCollection.save();
* ### find
语法:find()
使用find()查询Collection中符合条件的所有Model。
session.studentCollection.find();
使用条件查询时,例如查找gender为“male”的Model;
session.studentCollection.find({gender:'male'});
* ### destroy
语法: destroy()
使用destroy()从Collection中移除数据,
session.studentCollection.destroy();
使用条件删除时,例如删除gender为“male”的Model:
session.studentCollection.destroy({gender:'male'});
更多Collection API 请参考附录:《API说明文档》
## View
Clouda使用handlebars组件作为模板引擎。在view/下新建student.html:
I'm a student!
在上一篇文档中我们介绍过Clouda的一个重要特性“随动反馈”,那么“随动反馈”是怎么实现的呢?
Controller的onready()时态里,每一个bind的BLOCKID,都对应View中的一个"block"标签。
Clouda使用Block为粒度来标记当数据发生变化时View中需要更新的部分
I'm a student!
当绑定数据时:
{{#each data}}
{{this.studentName}}
{{/each}}
View中的data来源于Controller中的session.bind()
env.subscribe("pub-allStudents",function(studentCollection){
session.bind('studentList', {
data : studentCollection.find(),
});
});
通过以上方法,我们就建立了一个基本的"随动反馈"单位,当订阅的数据发生变化时,View中对应的部分将自动更新。
Handlebars的语法非常易用,但为了更快的开发视图代码,Clouda还额外提供了便捷的工具方法
* foreach
用于快速遍历一个对象或数组
语法:{{#foreach}}{{/foreach}}
用法示例:
{{#foreach customObj}}
{{key}} : {{value}}
{{/foreach}}
* compare
比较两个对象
语法:
{{#compare a operator b}}
{{else}}
{{/compare}}
可以使用的operator:
operator
==
===
!=
!==
<
<=
>
>=
typeof
用法示例:
{{#compare a "<" b}}
a < b
{{else}}
a >= b
{{/compare}}
{{#compare a "typeof" "undefined"}}
undefined
{{/compare}}
**注意**:当省略operator时,系统默认使用操作符 ==:
{{#compare 1 1}}
1 == 1
{{/compare}}
* {{$ }}
在View中直接执行Javascript代码,并将返回结果输出在View中。
{{$ alert("data.length"); }}
### View之间的互相引用
* {{> viewname}}
在一个View中引用另一个View。
### 加载其他路径下view文件
一般情况下将编写的View文件都存放在view文件夹下,如果编写的view文件不在View文件夹下,我们也提供View文件路径配置的方法,方便框架找到需要的View文件:
sumeru.config.view.set('path', 'path/to/');
则Clouda会在如下目录中加载视图:
app目录/path/to/view/
注意:即使是修改viewpath的情况下,在最内一侧仍然需要有一层view文件夹,如上面路径的最后部分
## Router
Router用于建立URL中pattern与Controller之间的对应关系,添加router的操作通常在Controller文件中一些定义。
一个Controller可以对应多个URL,一个URL只能对应一个Controller。
* ### add
语法: sumeru.router.add({pattern:'' , action:''});
使用add()可以在router添加一组pattern与Controller的对于关系,方法如下:
sumeru.router.add(
{
pattern: '/studentList',
action: 'App.studentList'
}
);
* #### pattern
URL中pattern部分的值
* #### action
对应Controller的名称
在router中添加了URL(其路径部分)和Controller的对应关系,就可以使用“localhost:8080/debug.html/studentList”运行URL(其路径部分)为"/studentList"对应的Controller。
同时我们还提供定义默认启动Controller的方法:
* ### setDefault
语法: sumeru.router.setDefault(Controller Name)
实例:
sumeru.router.setDefault('App.studentList');
在Controller中使用setDefault()后,浏览器中输入“localhost:8080/debug.html”就可以启动该Controller,不需要在URL中带路径部分。
这里使用debug.html为调试模式
Clouda加入了Server渲染的功能,框架能在Server端将数据以及view渲染完成后下发到客户端,这样加快view渲染的速度。**server渲染默认是开启的**,如果想**单独禁止某个View在Server渲染**,可在Router中添加
sumeru.router.add({
pattern:'/test',
action : 'App.unittest',
server_render:false
})
### router的外部处理器
如果您使用backbone等第三方框架,或是存在已有代码根据URL的变化执行一些逻辑,那么这些需求,都可以通过注册一个router的外部处理器使其保持正常工作。
一个外部处理器的写法:
var processor = function(path){
//do something
return true;
}
添加一个外部处理器:
sumeru.router.externalProcessor.add(processor);
添加一个backbone的外部处理器的例子:
sumeru.router.externalProcessor.add(Backbone.Router.extend());
## Library
有的时候我们会遇到这样的麻烦,比如Model中有一个数据类型为“date”的时间字段,而在View上我想显示的是年,我们可以在View使用{{$ }}方法嵌入JavaScript来实现。
虽然这种方法可以实现,但是不易代码管理,我们需要一个library库的管理机制来解决这个问题,例如你可以将这个时间格式化函数存放在library/下:
* /library/getTime.js
Library.timeUtils = sumeru.Library.create(function(exports){
exports.formatDate = function(time){
return time.getFullYear();
};
});
* /view/student.html
{{#each data}}
{{$Library.timeUtils.formatDate(this.time)}}
{{/each}}
也可以在controller中调用library库,例如:
* /controller/student.js
session.bind('studentList', {
year : Library.timeUtils.formatDate(time)
});
通常,在onload,onrender和视图文件中使用到的新增加的Library或Handlebars Helpers,都需要同时配置在server_config/server_library中,方法如下:
打开server_config/server_library.js
sumeru.packages('../library/handlbars_helper.js');
## Server渲染
Clouda能在Server端将数据以及view渲染完成后下发到客户端,以加快view渲染的速度。**server渲染默认是开启**
onload中要求不能包含window,document,Localstorage等浏览器特有的DOM和BOM操作,这些操作应该放在on ready中
如果在Controller的onload方法中使用了前端的js中的变量或函数,可以通过开关来关闭该功能。
* 全部关闭,当需要全部禁止时,修改config/sumeru.js中,添加一行
sumeru.config({
runServerRender:false
})
* **单独禁止某个View在Server渲染**,可在Router中添加
sumeru.router.add({
pattern:'/test',
action : 'App.unittest',
server_render:false
})
##Manifest
Clouda框架会将各个package.js中描述的JS和CSS资源自动写入manifest文件形成离线缓存。
如果对于图片,音乐等其他文件也有离线缓存需求,可通过建立app.manifest文件进行描述。
在app.manifest中描述过的资源,Clouda框架在启动时会一并写入整体manifest文件中。
app.manifest文件应该建立在如下位置,与controller,publish等目录平级:
app/app.manifest
app.manifest文件的格式与w3c规定的manifest文件格式一致,见:
但目前暂不支持**SETTINGS:域**
一个示例:
CACHE MANIFEST
# the above line is required
# this is a comment
# there can be as many of these anywhere in the file
# they are all ignored
# comments can have spaces before them
# but must be alone on the line
# blank lines are ignored too
# these are files that need to be cached they can either be listed
# first, or a "CACHE:" header could be put before them, as is done
# lower down.
images/sound-icon.png
images/background.png
# note that each file has to be put on its own line
# here is a file for the online whitelist -- it isn't cached, and
# references to this file will bypass the cache, always hitting the
# network (or trying to, if the user is offline).
NETWORK:
comm.cgi
# here is another set of files to cache, this time just the CSS file.
CACHE:
style/default.css
## URL说明
Clouda中URL的格式如下:
/{controller}/{arguments[1]}/{arguments[2]}/...?params1=string¶ms2=string
* controller
与router中的pattern对应
* arguments
URL中的传递参数
* params
与controller中使用env.redirect(queryPath ,paramMap)传递的paramMap对应
一个URL解析的实例:
URL: localhost:8080/debug.html/studentList/index/123/007?p=2
router定义为:
sumeru.router.add{
{
pattern: '/studentList/index',
action: 'App.studentList'
}
}
Clouda对URL解析如下:
* 自动匹配到 /controller是/studentList/index
* 将后面的参数 /123/007 作为 arguments传入env.arguments
* 将p传入session和controller的params参数中
如何获取URL中的参数:
* env.arguments["/studentList/index","123","007"]
* session.get('p')或者通过上面Controller之间传参部分中的params.p获取;
URl中有两种模式
* 调试模式
使用debug.html访问,在调试模式下可以看到工程的源码,方便在浏览器中进行调试
localhost:8080/debug.html/studentList/index/123/007?p=2
* 正式模式
使用index.html访问,在正式模式下看不到源码
localhost:8080/index.html/studentList/index/123/007?p=2
## package.js
package.js用于将文件之间的依赖关系添加到Clouda中,我们可以使用下面的语法编写该文件:
sumeru.packages(
'student.js',
.....
'studentList.js'
)
并不是在所有文件夹下新建文件或者文件夹后就要修改package.js文件,view文件夹和publish文件夹例外。
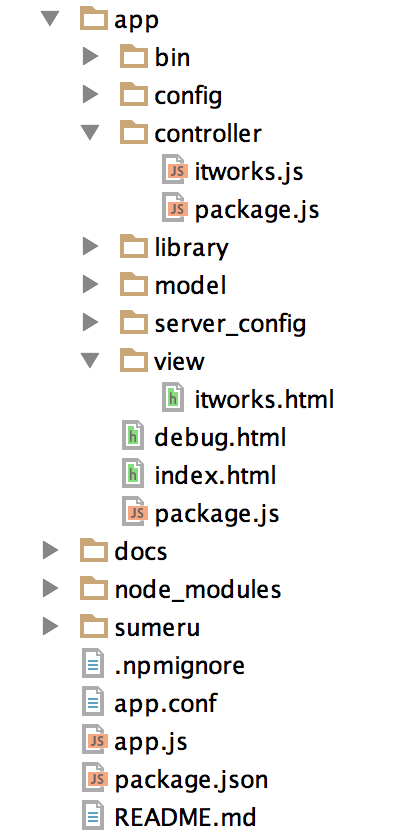 app:应用开发相关的代码和资源放在该目录下
app/config: 应用相关框架文件存放在该目录下
app/controller: controller全部放在该目录下
package.js: 用于将文件之间的依赖关系添加到Clouda中
app/model: Model文件存放在该目录下
app/server_config:服务器端配置文件(包括部署BAE配置文件,mongodb配置文件以及Url配置)存放在该目录下
app/publish: publish文件存放在该目录下(默认没有该目录,如需要可在app/下创建)
app/index.html: 应用release版本访问使用
app/debug.html: 应用debug版本时使用
app/view: view文件放在该目录下
docs:离线文档存放该文件夹下
node_modules: 模板放在该文件夹下
sumeru: 框架的文件,开发者可不关心
## Publish/Subscribe
### Publish
Clouda使用PubSub模型描述数据的传输,其中,publish是发布数据的方法,其运行在Server上,每一个publish文件均需要放置在publish/。
module.exports = function(sumeru){
sumeru.publish(modelName, publishName, function(callback){
});
}
可以看到在sumeru.publish()中有三个参数,modelName、publishName和一个匿名方法function(callback){},下面详细介绍这些参数的作用。
* #### modelName:
被发布数据所属的Model名称
* #### publishName:
所定义的Publish的唯一名称,在一个App内全局唯一,该参数与Controller中subscribe()成对使用。
* #### function(callback){}
描述数据发布规则的自定义函数,在这里定义被发布数据所需要符合的条件。自定义函数自身也可接受由subcribe()传入的参数,如:。
* function(arg1,arg2,...,callback){}
其中arg1, arg2为传入参数,传入参数的数量不限,但需要与对应的subscribe()中所传递的参数数量一致。
### Subscribe
与sumeru.publish()相对应,我们在Controller中使用env.subscribe()订阅被发布的数据。其中env是Controller中很重要的一个内置对象,稍后我们还会多次见到。
env.subscribe(publishName, function(collection){
});
* #### publishName:
所定义的Publish的唯一名称,在一个App内全局唯一,该参数与sumeru.publish(modelName, publishName,function(callback))中的publishName名称需要保持一致。
* #### function(collection)
Subscribe成功获得数据时,被调用的响应方法。通常,我们主要在其中完成将订阅得到的数据与视图进行绑定(bind)的工作。
* collection:
订阅获得的数据Collection对象
如果需要向Publish传递参数(在上一节的最后我们曾经提到),则使用如下形式。
env.subscribe(publishName,arg1, arg2, ..., function(collection){});
arg1,arg2...等任意数量的参数会被传入sumeru.publish()对应的function(arg1,arg2,...,callback)中。
### 一个Pub/Sub实例
现有一个学生信息的Model(student),假设Controller希望获取全班同学的信息,我们使用Publish/Subscribe方式实现如下:
* Publish
module.exports = function(sumeru){
sumeru.publish('student', 'pub-allStudents', function(callback){
var collection = this;
collection.find({}, function(err, items){
callback(items);
});
});
}
* Subscribe
env.subscribe("pub-allStudents", function(studentCollection){
});
假设我们在这个基础上加一个条件限制,现在只希望获取年龄大于18岁同学的信息。
* Publish
module.exports = function(sumeru){
sumeru.publish('student', 'pub-adultStudents', function(callback){
var collection = this;
collection.find({"age":
{$gt:18}
}, function(err, items){
callback(items);
});
});
}
大家可以看到我们使用了{"age":{$gt:18}}的方式表达了“年龄大于age”的约束要求。
相似的,“年龄小于18”的表达方式如下:
{"age":
{$lt:18}
}
“大于min且小于max”的表达方式如下:
{"age":
{$gt:min},
{$lt:max}
}
支持的操作符如下:
app:应用开发相关的代码和资源放在该目录下
app/config: 应用相关框架文件存放在该目录下
app/controller: controller全部放在该目录下
package.js: 用于将文件之间的依赖关系添加到Clouda中
app/model: Model文件存放在该目录下
app/server_config:服务器端配置文件(包括部署BAE配置文件,mongodb配置文件以及Url配置)存放在该目录下
app/publish: publish文件存放在该目录下(默认没有该目录,如需要可在app/下创建)
app/index.html: 应用release版本访问使用
app/debug.html: 应用debug版本时使用
app/view: view文件放在该目录下
docs:离线文档存放该文件夹下
node_modules: 模板放在该文件夹下
sumeru: 框架的文件,开发者可不关心
## Publish/Subscribe
### Publish
Clouda使用PubSub模型描述数据的传输,其中,publish是发布数据的方法,其运行在Server上,每一个publish文件均需要放置在publish/。
module.exports = function(sumeru){
sumeru.publish(modelName, publishName, function(callback){
});
}
可以看到在sumeru.publish()中有三个参数,modelName、publishName和一个匿名方法function(callback){},下面详细介绍这些参数的作用。
* #### modelName:
被发布数据所属的Model名称
* #### publishName:
所定义的Publish的唯一名称,在一个App内全局唯一,该参数与Controller中subscribe()成对使用。
* #### function(callback){}
描述数据发布规则的自定义函数,在这里定义被发布数据所需要符合的条件。自定义函数自身也可接受由subcribe()传入的参数,如:。
* function(arg1,arg2,...,callback){}
其中arg1, arg2为传入参数,传入参数的数量不限,但需要与对应的subscribe()中所传递的参数数量一致。
### Subscribe
与sumeru.publish()相对应,我们在Controller中使用env.subscribe()订阅被发布的数据。其中env是Controller中很重要的一个内置对象,稍后我们还会多次见到。
env.subscribe(publishName, function(collection){
});
* #### publishName:
所定义的Publish的唯一名称,在一个App内全局唯一,该参数与sumeru.publish(modelName, publishName,function(callback))中的publishName名称需要保持一致。
* #### function(collection)
Subscribe成功获得数据时,被调用的响应方法。通常,我们主要在其中完成将订阅得到的数据与视图进行绑定(bind)的工作。
* collection:
订阅获得的数据Collection对象
如果需要向Publish传递参数(在上一节的最后我们曾经提到),则使用如下形式。
env.subscribe(publishName,arg1, arg2, ..., function(collection){});
arg1,arg2...等任意数量的参数会被传入sumeru.publish()对应的function(arg1,arg2,...,callback)中。
### 一个Pub/Sub实例
现有一个学生信息的Model(student),假设Controller希望获取全班同学的信息,我们使用Publish/Subscribe方式实现如下:
* Publish
module.exports = function(sumeru){
sumeru.publish('student', 'pub-allStudents', function(callback){
var collection = this;
collection.find({}, function(err, items){
callback(items);
});
});
}
* Subscribe
env.subscribe("pub-allStudents", function(studentCollection){
});
假设我们在这个基础上加一个条件限制,现在只希望获取年龄大于18岁同学的信息。
* Publish
module.exports = function(sumeru){
sumeru.publish('student', 'pub-adultStudents', function(callback){
var collection = this;
collection.find({"age":
{$gt:18}
}, function(err, items){
callback(items);
});
});
}
大家可以看到我们使用了{"age":{$gt:18}}的方式表达了“年龄大于age”的约束要求。
相似的,“年龄小于18”的表达方式如下:
{"age":
{$lt:18}
}
“大于min且小于max”的表达方式如下:
{"age":
{$gt:min},
{$lt:max}
}
支持的操作符如下: