<h1 align="center">
  <br>
  <a href="https://github.com/spreadlab/spreadparser">
    <img src="https://github.com/spreadlab/spreadparser/blob/main/readme_data/logo.png?raw=true" alt="Spreadparser Logo" width="180"></a>
  <br>
  Spreadparser
  <br>
</h1>

<p align="center">Google Spreadsheet data for human beings... and developers!</p>

## Resources

Spreadparser turns a JSON endpoint from Google Spreadsheets into a easier to understand list of objects.

**[View the Demo on CodePen &rarr;](https://codepen.io/teles/pen/OJWjWeE)**

So, using Spreadparser could be useful for some goals such as:

* ✅ Small web projects
* ✅ Static generated websites
* ✅ Projects consuming government generated data 
* ✅ Project prototyping
* ✅ Generate and share pages for visualizing third party data 
* ✅ Studying project for frontend and backend developers
* ✅ Small companies online stores
* ✅ Allow non tech teams to provide data for tech teams
* ✅ Use Spreadsheet to create and maintain app config files

But it's probably not appropriate for:

* 🛑 Automatic spreadsheet update
* 🛑 Complex project based on relational database relations 
* 🛑 Project with a huge amount of data
* 🛑 Google Spreadsheet data that can't be published to the web

## Features

<img src="https://github.com/spreadlab/spreadparser/blob/main/readme_data/features-screenshot.png?raw=true" alt="Features samples">


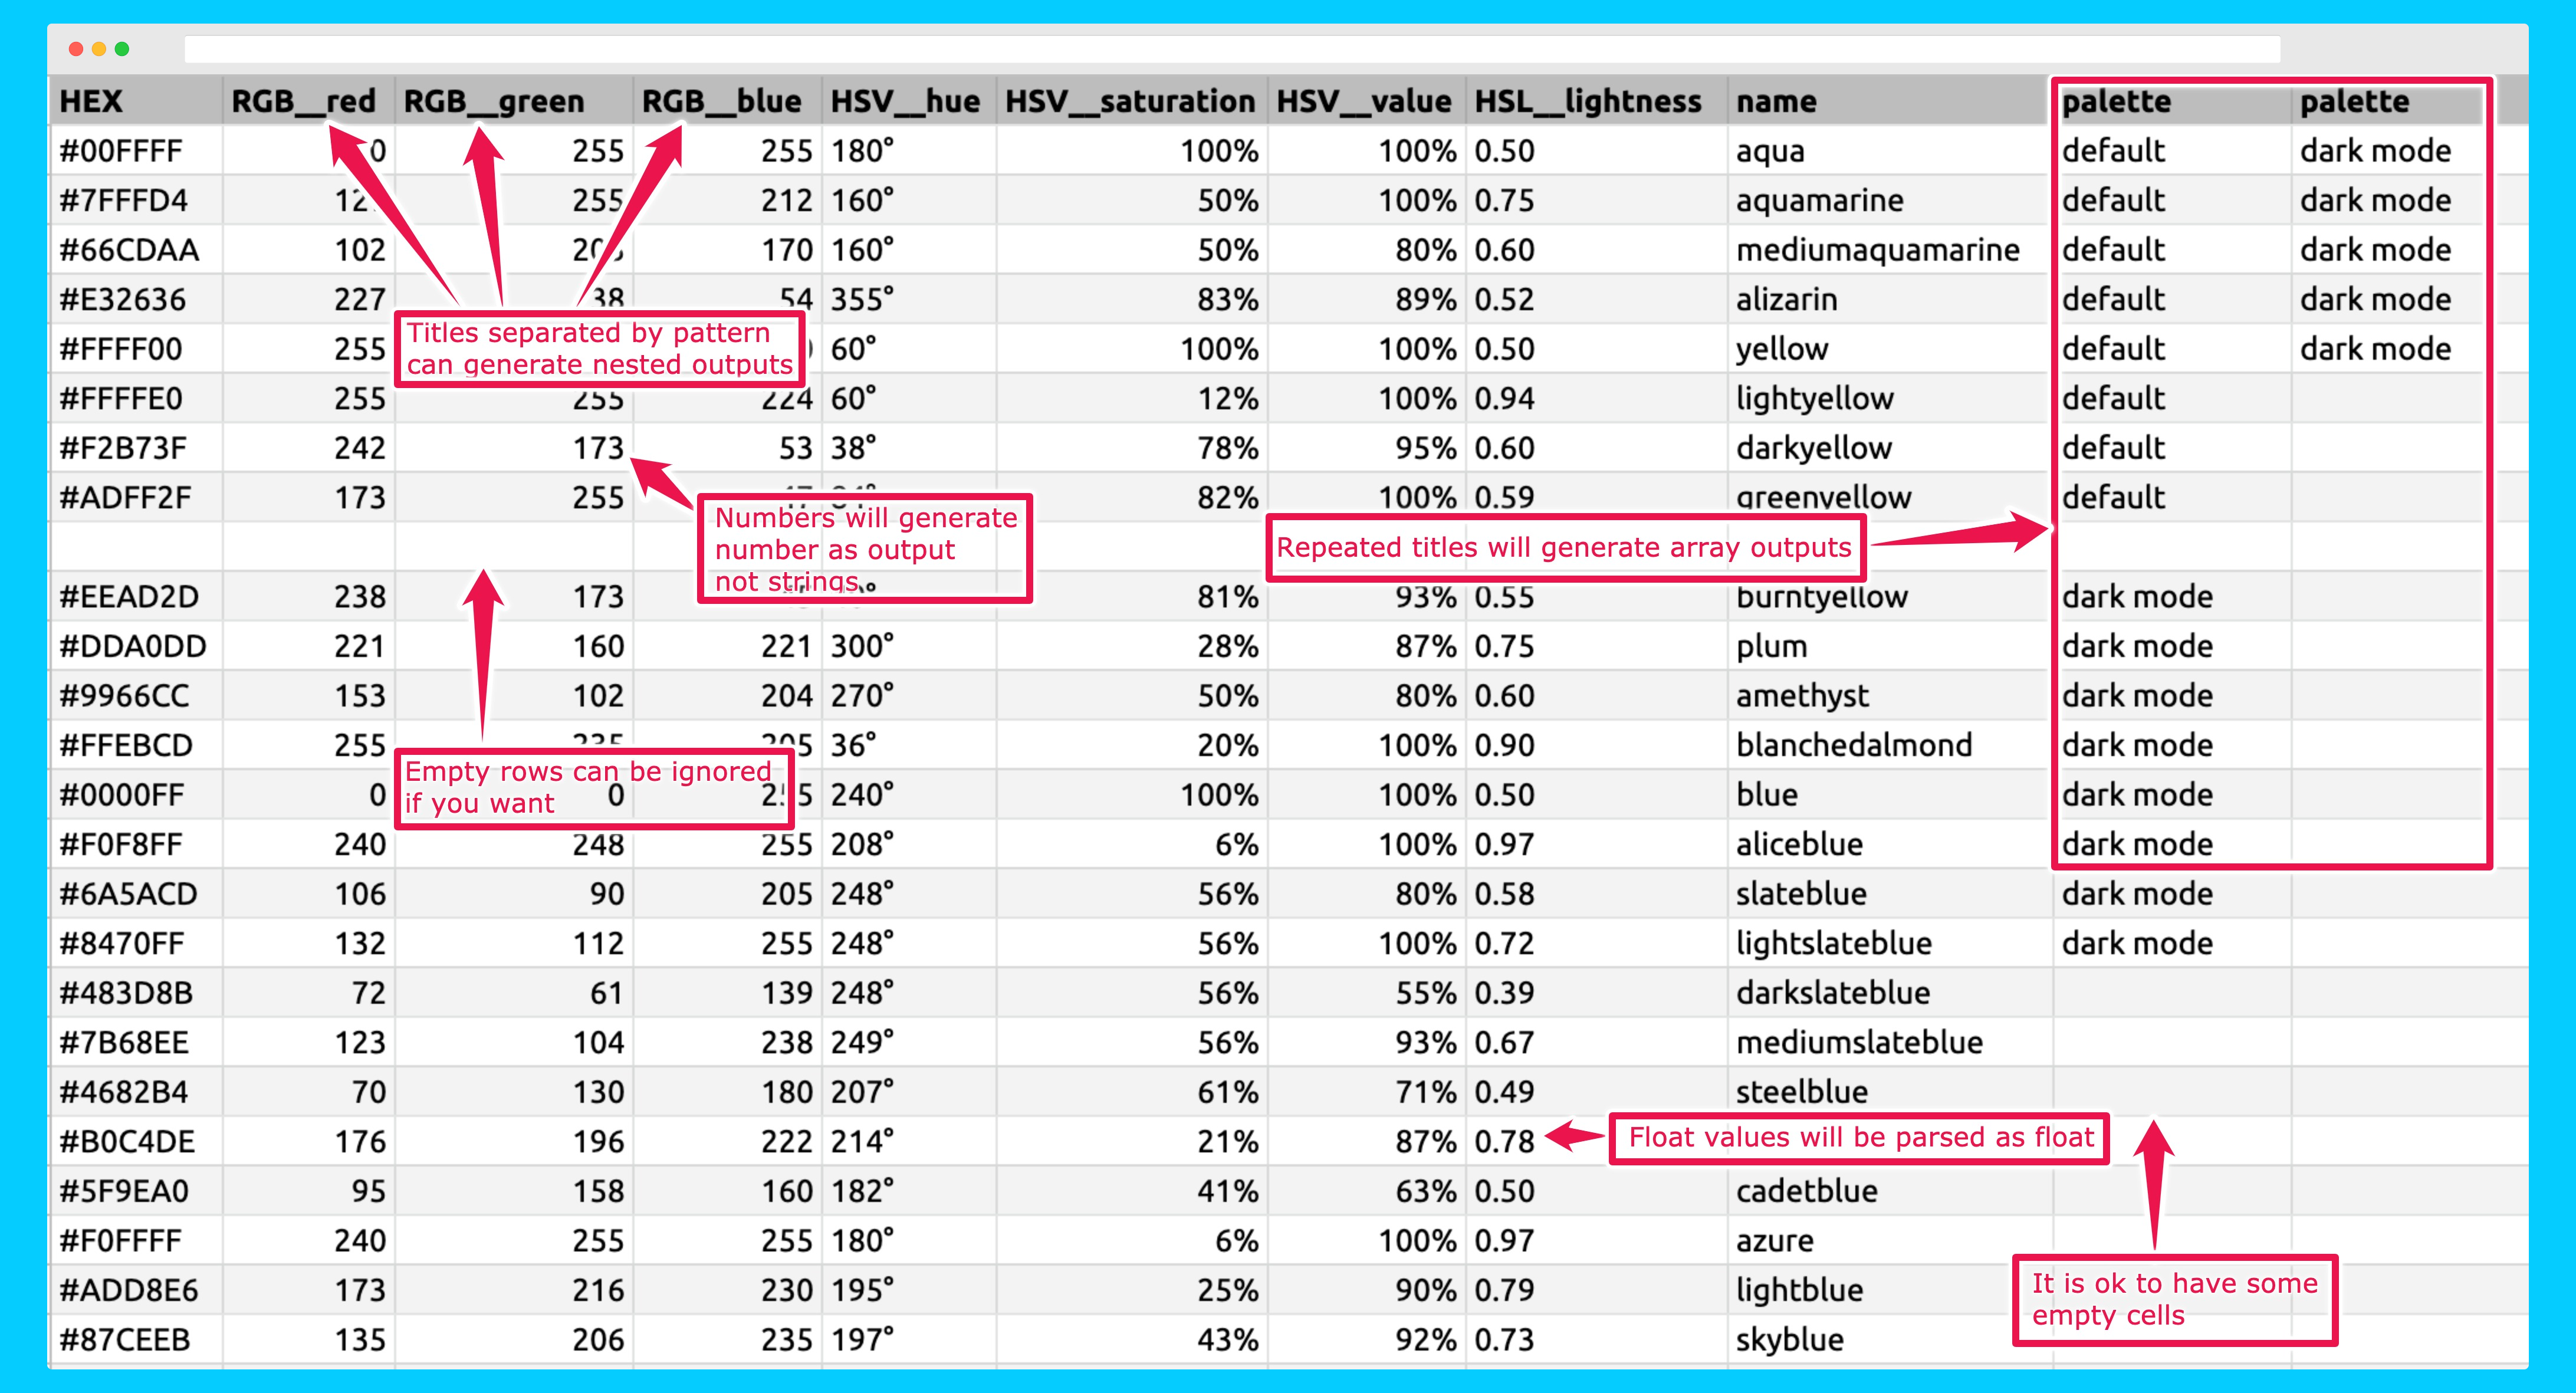
* 📦 **Lightweigth**: less than 2kb and zero dependencies 
* 🧰 **Versatile**: Can be used for ES6/web projects, node project and as script tag
* 👍 **Tested**: Highly covered with unit testing, written with typescript 
* 🎯 **Understands your data as it is**:
    * ➡️ `"TRUE"`, `"FALSE"` strings and checkboxes become boolean values `true` and `false`
    * ➡️ Integers and floats become real numbers like `10` e `0.33`
    * ➡️ Repeated title columns are parsed as arrays 
    * ➡️ Allow spreadsheet data to be parsed as nested objects with inner properties and value 
    * ➡️ Translate your data to your desired pattern like camel case or snake case

## Getting Started

Compiled and production-ready code can be found in the `dist` directory. The `src` directory contains development code.

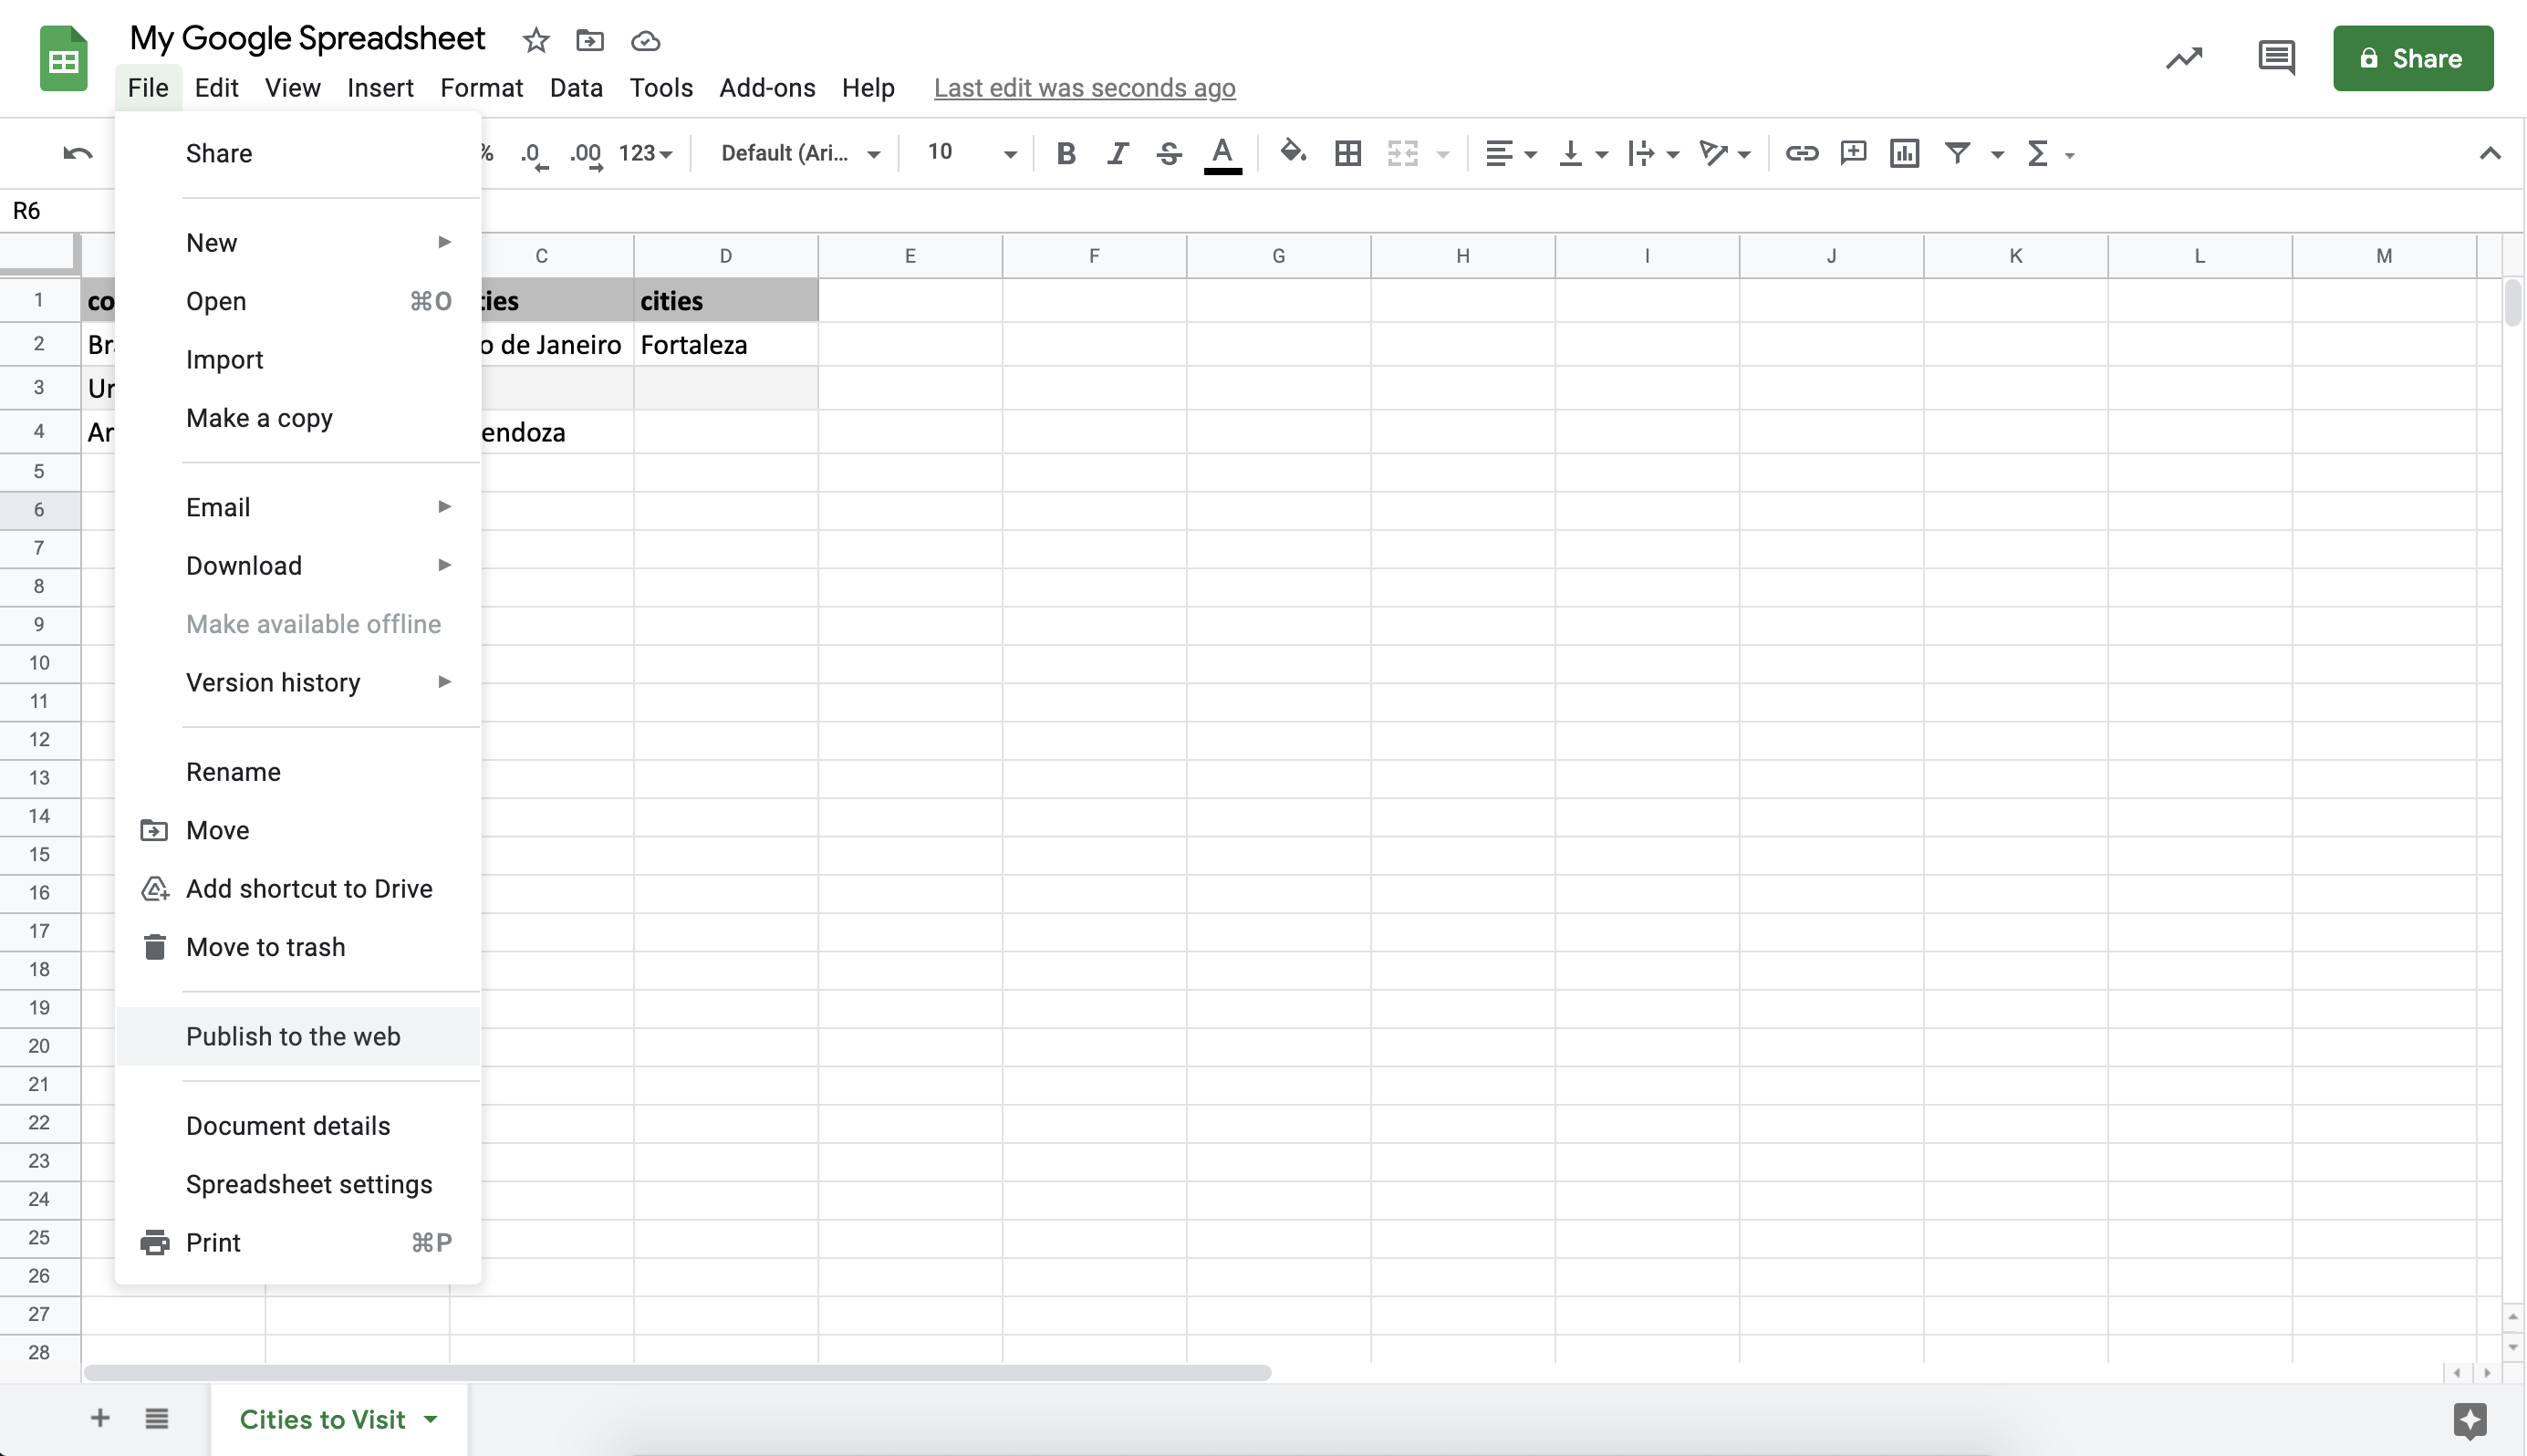
### Publishing your Google Spreadsheet to web

First of all you need to have a [Google Spreadsheet](https://docs.google.com/spreadsheets/u/0/) with your data and publish it to the web.

<details>
  <summary><strong>Check how to 'Publish to the web' in 4 steps ⬇️</strong></summary>
  <p>1. On your spreadsheet click on<strong> File > Publish to Web</strong></p>
  <img src="https://github.com/spreadlab/spreadparser/blob/main/readme_data/publishing-to-web-step-1.png?raw=true" alt="Publish to Web screenshot - Step 1">

  <p>2. In the following dialog click on <strong>'Publish'</strong></p>  
  <img src="https://github.com/spreadlab/spreadparser/blob/main/readme_data/publishing-to-web-step-2.png?raw=true" alt="Publish to Web screenshot - Step 2">
  
  <p>
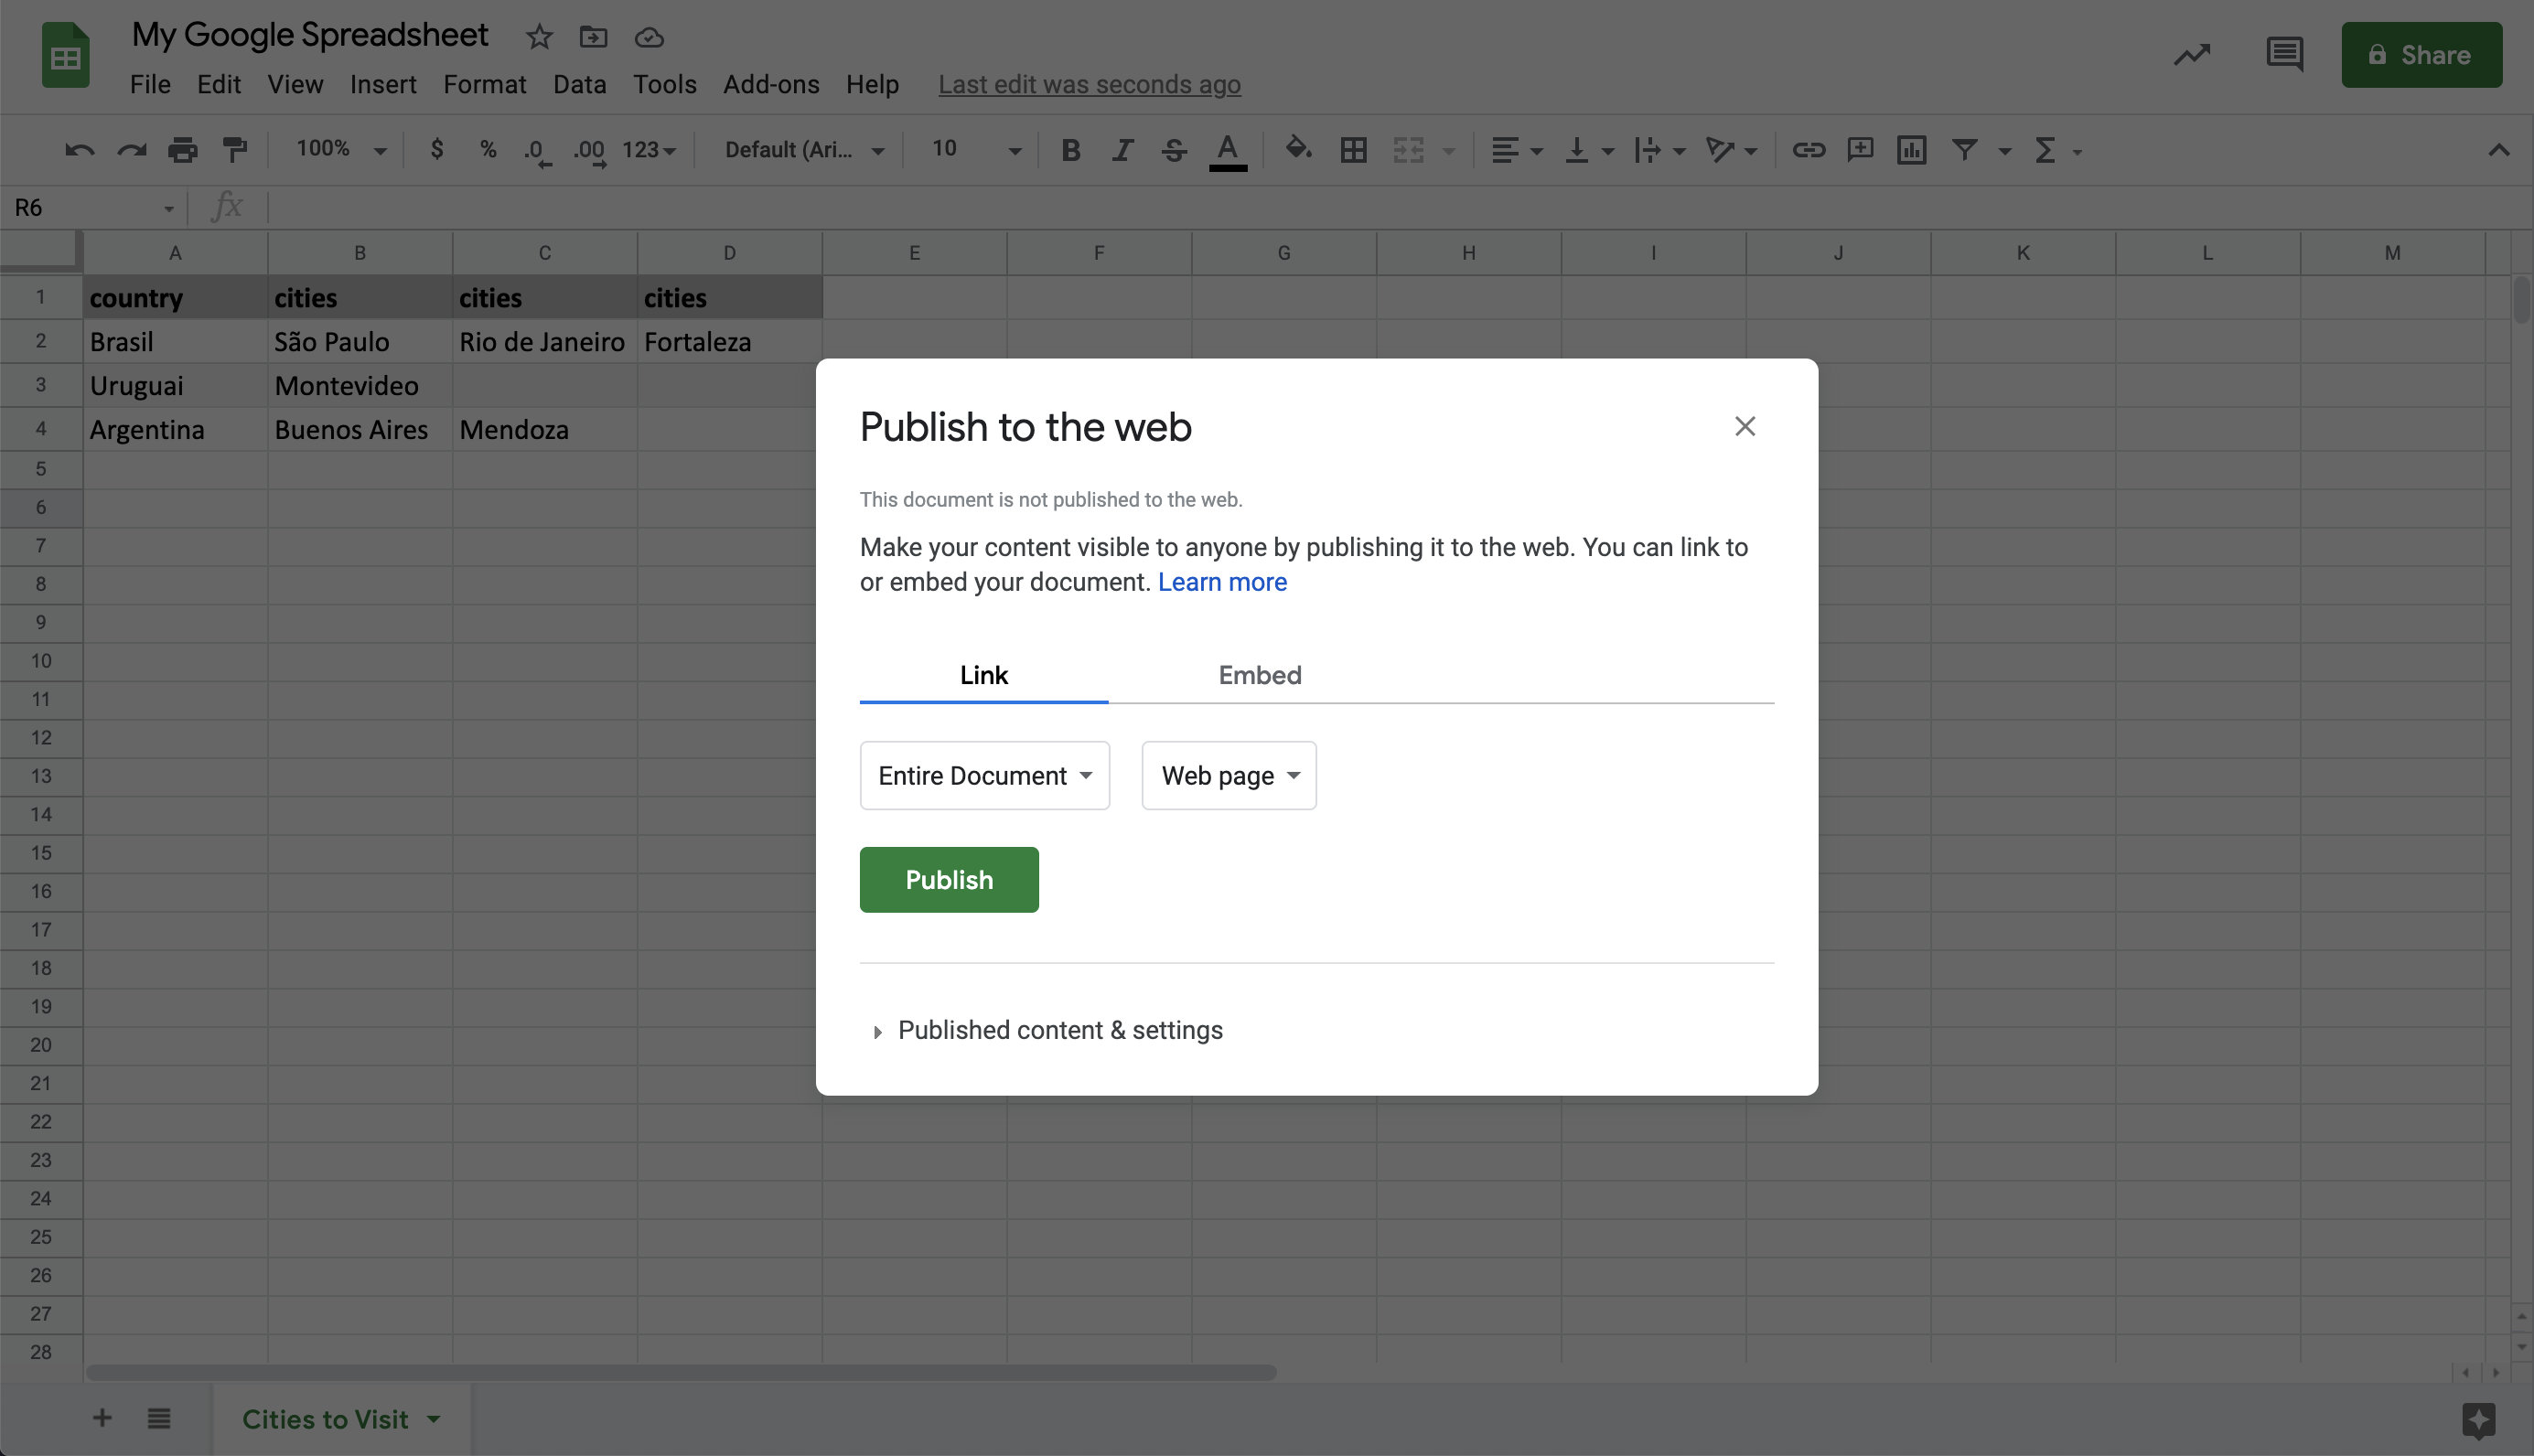
3. Its Published! You don't need to copy the generated url</p>
  <img src="https://github.com/spreadlab/spreadparser/blob/main/readme_data/publishing-to-web-step-3.png?raw=true" alt="Publish to Web screenshot - Step 3">

  <p>
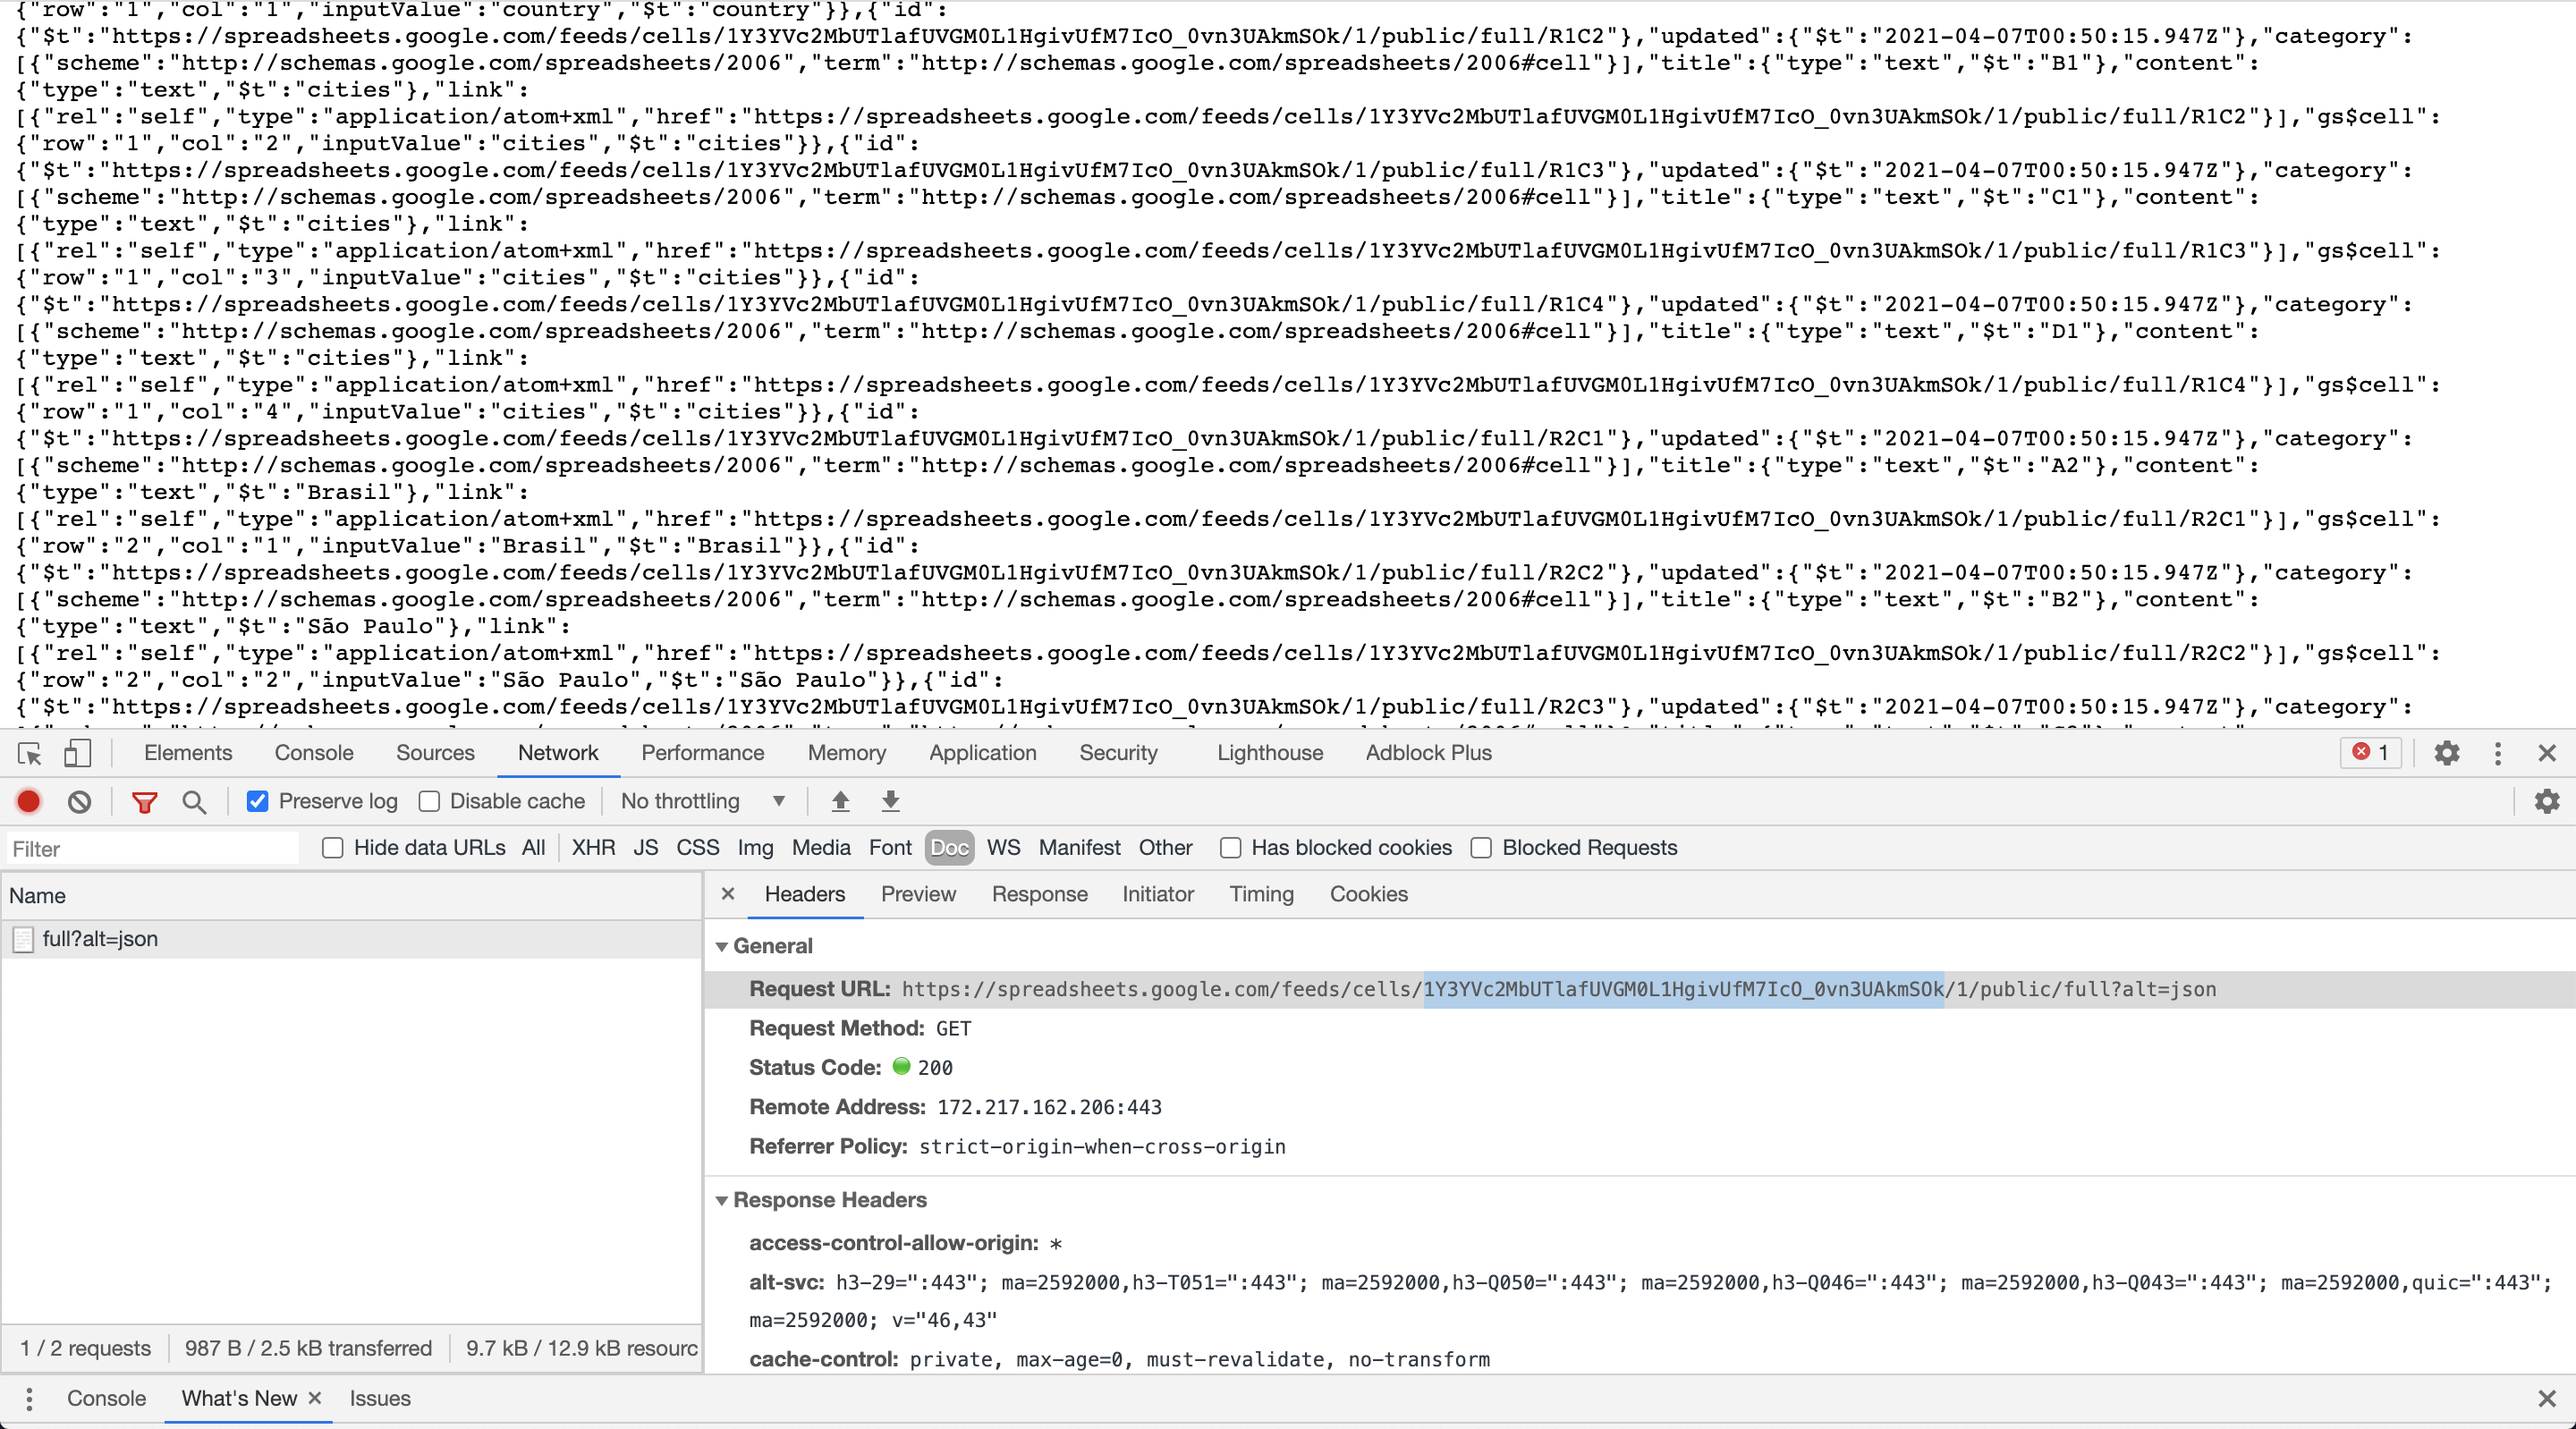
4. Open the JSON endpoint containing your data</p>
  <p>The JSON url is made of your spreadsheet id, your spreadsheet id is part of your spreadsheet edition url.</p>
  <p>For instance, if you have this spreadsheet edition url:</p>
  <p><code>https://docs.google.com/spreadsheets/u/1/d/<strong>13FWF89zLCqKzeUzUfOwUqbRGhNSW3dLVHzItCe9WIAw</strong>/edit#gid=0</code></p>
  <p> Your spreadsheet url is <strong>13FWF89zLCqKzeUzUfOwUqbRGhNSW3dLVHzItCe9WIAw</strong></p>
  <img src="https://github.com/spreadlab/spreadparser/blob/main/readme_data/publishing-to-web-step-4.png?raw=true" alt="Publish to Web screenshot - Step 4">  

</details>

Now that you have your spreadsheet JSON running let's use Spreadparser.

### 1. Include Spreadparser on your site.

**Direct Download**

You can [download the files directly from GitHub](https://github.com/spreadlab/spreadparser/archive/main.zip).

```html
<script src="path/to/spreadparser.min.js"></script>
```

**CDN**

You can also use the [jsDelivr CDN](https://cdn.jsdelivr.net/npm/spreadparser/dist/). I recommend linking to a specific version number or version range to prevent major updates from breaking your site. Spreadparser uses semantic versioning.

```html
<!-- Always get the latest version -->
<!-- Not recommended for production sites! -->
<script src="https://cdn.jsdelivr.net/npm/spreadparser/dist/spreadparser.min.js"></script>

<!-- Get minor updates and patch fixes within a major version -->
<script src="https://cdn.jsdelivr.net/npm/spreadparser@1/dist/spreadparser.min.js"></script>

<!-- Get patch fixes within a minor version -->
<script src="https://cdn.jsdelivr.net/npm/spreadparser@1.0/dist/spreadparser.min.js"></script>

<!-- Get a specific version -->
<script src="https://cdn.jsdelivr.net/npm/spreadparser@1.0.0/dist/spreadparser.min.js"></script>
```

**NPM**

You can also use yarn (or your favorite package manager).

```bash
yarn add spreadparser
```

### 2. Add the markup to your HTML.

No extra configuration needed&mdash;just standard JavaScript. 

```javaScript
fetch(Spreadparser.getSpreadsheetUrl("1Rr2y3ljAJPApYXcPyLXwxLciUCxz8XCu1Q0OnWH1l-U", 2))
    .then(response => response.json())
    .then(json => Spreadparser.parse(json, {titleCase: 'camelCase'}))
    .then(spreadsheet => {
        console.log(spreadsheet.data[0]); // You can see this console.log output bellow
    });
```

Giving us the following output:

```JSON
{
   "nome":"Água",
   "hex":"#00FFFF",
   "rgb":{
     "red":0,
     "green":255,
     "blue":255
   },
   "hsv": {
     "hue":"180°",
     "saturation":"100%",
     "value":"100%"
   },
   "nomeWeb":"aqua"
 }
```

## Installation (for web projects)

Install it as a dependency: 

```bash
yarn add spreadparser # or npm install spreadparser
```

Now you can import Spreadparser as following:

```bash
import Spreadparser from "spreadparser";
```

## Installation (for node projects)

It is possible to use Spreadparser for server side projects using node. For instance you can create a 11ty blog or a command line tool with Spreadparser:

Install it as a dependency: 

```bash
yarn add spreadparser # or npm install spreadparser
```

Now you can import Spreadparser as following:

```bash
const Spreadparser = require("spreadparser/dist/umd/spreadparser.js");
```

## Using it as a third party library

Spreadparser is available at jsDelivr CDN, for using it all you have to do is add proper url as script src to your HTML page:

```html
<script src="https://unpkg.com/spreadparser">
```

Spreadparser is also available on [unpkg.com](https://unpkg.com/spreadparser) 

In the next topic we provide live examples of Spreadpaser as thirdy party library combined with other frontend tools.

## Live examples

Here are some live examples for Spreadparser:

* [A list of brazilian named colors](https://codepen.io/teles/pen/MWJmjwj) - VueJS + Bulma + Spreadpaser


## Documentation: getSpreadsheetUrl method

`Spreadparser.getSpreadsheetUrl` is a static method that receives two parameters: `spreadsheetId` and `sheetNumber`.

| Parameter | Type | Default | Required |
|-|-|-|-|
|spreadsheetId|string|`undefined`|`true`|
|sheetNumber|number|`1`|`false`|

Sample usage:

```JavaScript
Spreadparser.getSpreadsheetUrl("1Rr2y3ljAJPApYXcPyLXwxLciUCxz8XCu1Q0OnWH1l-U")
// https://spreadsheets.google.com/feeds/cells/1Rr2y3ljAJPApYXcPyLXwxLciUCxz8XCu1Q0OnWH1l-U/1/public/full?alt=json

Spreadparser.getSpreadsheetUrl("1Rr2y3ljAJPApYXcPyLXwxLciUCxz8XCu1Q0OnWH1l-U", 2)
// https://spreadsheets.google.com/feeds/cells/1Rr2y3ljAJPApYXcPyLXwxLciUCxz8XCu1Q0OnWH1l-U/2/public/full?alt=json
``` 

This method does exists because Spreadparser intentionally doesn't have a method to fetch data. 
So you can get your Spreadsheet JSON url and fetch data in your own way.  

## Documentation: parse method

`Spreadparser.parse` is a static method that receives two parameters: `originalData` and `options`.

| Parameter | Type | Required |
|-|-|-|
|originalData|object|`true`|
|options|object|`false`|

Right bellow theres documentation for `Spreadparser.parse` options.

### Parse Options

The second parameter for `Spreadparse.parse` is an object with properties. These properties are described below:

| Option | Type  | Default| Description|
|-|-|-|-|
| separator | string | `'__'` | String portion used to separate nested objects |
| titleCase | string | `'none'` | Selected case style for data keys |
| headerRow | number | `1` | Row number for title row |
| includeEmptyRows | boolean | `false` | Use to include empty rows as part os `data` array |

Here are some complete options examples.
Let's say we have a Google Spreadsheet as the following, we are going to asume that row column represents a real row number for each row:

|row|Person > Name | Adress > Street > Name | Adress > Street > Number | Hobbies | Hobbies|
|-|-|-|-|-|-|
|5|Benjamin|Yancy| 32 | Gym | Reading|
| | | | | | |
|7|Peter|Queens Street| 62| Climb walls | Science | 

For the above Google Spreadsheet, the title row is number 4 not 1 as usual.
So, using the following options:

```JavaScript
const persons = Spreadparser.parse(originalData, {
  separator: '>',
  titleCase: 'camelCase',
  headerRow: 4,
  includeEmptyRows: true
})
```

The `persons.data` array will be:

```JSON
[{
  "row": 5,
  "person": {
    "name": "Benjamin"
  },
  "adress": {
    "street": {
      "name": "Yancy",
      "number": 32
    }
  },
  "hobbies": ["Gym", "Reading"]
}, {}, {
  "row": 7,
  "person": {
    "name": "Peter"
  },
  "adress": {
    "street": {
      "name": "Queens Street",
      "number": 62
    }
  },
  "hobbies": ["Climb Walls", "Science"]
}]
```

## How can you contribute?

* Give a :star: to [this project](https://github.com/spreadlab/spreadparser) if you like it
* Trust it as [npm dependency](https://www.npmjs.com/package/spreadparser) for some of your projects
* Help this project [opening an issue](https://github.com/spreadlab/spreadparser/issues), you may suggest a feature, documentation or share a bug
* Improve this project by creating a [pull request](https://github.com/spreadlab/spreadparser/pulls)
* Create a new live example using Spreadparser, maybe using [codepen](http://codepen.io/)
* Spread the idea! 

## License

[MIT](LICENSE) - Jota Teles - 2021
