# Scrollable Component

[![NPM Package](https://img.shields.io/npm/v/scrollable-component?label=release&color=%23cd2620&logo=npm)](https://www.npmjs.com/package/scrollable-component)
[![GitHub Repository](https://img.shields.io/github/stars/Julien-Marcou/Scrollable-Component?color=%23f5f5f5&logo=github)](https://github.com/Julien-Marcou/Scrollable-Component)

![Downloads per Month](https://img.shields.io/npm/dm/scrollable-component)
![Gzip Size](https://img.shields.io/bundlephobia/minzip/scrollable-component?label=gzip%20size)
![No Dependency](https://img.shields.io/badge/dependencies-none-%23872a84)
![MIT License](https://img.shields.io/npm/l/scrollable-component)

Scrollable Component is a custom element (Web Component) designed to provide custom scrollbars while preserving native scrolling behavior. Instead of trying to mimic or override the viewport's native scrolling, it uses the viewport's native scrolling to drive custom scrollbar visuals.

```html
<scrollable-component> ... </scrollable-component>
```


## Table of contents

- [Demo](#demo)
- [Installation](#installation)
- [Usage](#usage)
  - [With a bundler](#with-a-bundler)
  - [Without a bundler](#without-a-bundler)
- [Configuration](#configuration)
  - [Scrollbar visibility](#scrollbar-visibility)
  - [Scrollbar position](#scrollbar-position)
  - [Scrollbar overlay](#scrollbar-overlay)
  - [Edge detection](#edge-detection)
  - [Custom HTML tag](#custom-html-tag)
- [Customized appearance](#customized-appearance)
  - [CSS properties](#css-properties)
  - [CSS parts](#css-parts)
  - [Content sizing](#content-sizing)
- [Why use Scrollable Component?](#why-use-scrollable-component)
  - [Perks](#perks)
  - [Quirks](#quirks)
- [Browser compatibility](#browser-compatibility)
- [How it works](#how-it-works)


## Demo

You can check out some examples [here](https://scrollable.julien-marcou.fr/).

And here is a screenshot of a native scrollbar vs the default scrollbar provided by Scrollable Component:

![Native vs Custom scrollbar](https://github.com/Julien-Marcou/scrollable-component-demo/raw/main/native-vs-custom.png)


## Installation

```shell
npm install scrollable-component
```


## Usage

This package is ESM-only. The recommended way to use it is with a bundler (e.g. webpack, esbuild, ...), which handles module resolution for you.

### With a bundler

Define the component:

```javascript
import { defineScrollableComponent } from 'scrollable-component';
defineScrollableComponent();
```

Then use it in your HTML:

```html
<scrollable-component>
  <!-- Your content -->
</scrollable-component>
```

### Without a bundler

If you are not using a bundler, you'll need to expose the `/node_modules/scrollable-component/index.js` file so it is accessible from the web, then import it in your HTML using a `module` script.

The simplest approach is to import the file directly:

```html
<script type="module">
  import { defineScrollableComponent } from '/node_modules/scrollable-component/index.js';
  defineScrollableComponent();
</script>
```

However, if you plan to re-use or share the component in other modules, I recommend using an [Import Map](https://developer.mozilla.org/en-US/docs/Web/HTML/Reference/Elements/script/type/importmap/), so that you can directly import the package using its name, just as you would with a bundler:

```html
<script type="importmap">
  {
    "imports": {
      "scrollable-component": "/node_modules/scrollable-component/index.js"
    }
  }
</script>

<script type="module">
  import { defineScrollableComponent } from 'scrollable-component';
  defineScrollableComponent();
</script>
```

Then use the component in your HTML:

```html
<scrollable-component>
  <!-- Your content -->
</scrollable-component>
```


## Configuration

The `ScrollableComponentElement` will automatically add custom scrollbars if the content overflows the height/width of the viewport, so you just have to constrain its size (using height, max-height, or whatever you want):

```html
<style>
  .my-content {
    height: 300px;
  }
</style>

<scrollable-component class="my-content">
  <!-- Your content -->
</scrollable-component>
```

Also, by default, the viewport's content will overflow in both directions, so if you have some content you don't want to overflow, you can override this just like you would with plain CSS:

```css
/* Disable horizontal scrolling */
.my-content {
  overflow-x: hidden;
}

/* Disable vertical scrolling  */
.my-content {
  overflow-y: hidden;
}
```

### Scrollbar visibility

By default, the scrollbars only appear when hovering the viewport.

You can override this behavior by setting the `scrollbar-visibility` attribute.

Supported values are:

- `auto`: scrollbars are only shown when hovering the viewport (this is the default value)
- `never`: scrollbars are never shown
- `always`: scrollbars are always shown
- `trackbar`: scrollbars are always shown but their thumbs are only shown when hovering the viewport

```html
<scrollable-component scrollbar-visibility="always">
  <!-- Your content -->
</scrollable-component>
```

### Scrollbar position

By default, the vertical scrollbar will appear on the right of the viewport, while the horizontal scrollbar will appear at the bottom of the viewport.

You can change this behavior by setting the `vertical-scrollbar-position` & `horizontal-scrollbar-position` attributes.

Supported values for `vertical-scrollbar-position` are:

- `right`: vertical scrollbar is shown on the right (this is the default value)
- `left`: vertical scrollbar is shown on the left
- `both`: vertical scrollbar is shown both on the left & right

Supported values for `horizontal-scrollbar-position` are:

- `bottom`: horizontal scrollbar is shown at the bottom (this is the default value)
- `top`: horizontal scrollbar is shown at the top
- `both`: horizontal scrollbar is shown both at the top & bottom

```html
<scrollable-component
  vertical-scrollbar-position="left"
  horizontal-scrollbar-position="top"
>
  <!-- Your content -->
</scrollable-component>
```

### Scrollbar overlay

By default, the scrollbars are overlaid on top of the content.

This is often the desired behavior when we implement custom scrollbars, as we don't want the spacing around the content to be unbalanced by the presence or absence of scrollbars, and allows for more unobtrusive scrollbars.

But if you prefer the scrollbars to take up space next to your content instead of overlaying them, you can disable the overlay behavior by setting the `scrollbar-overlay` attribute to `false`.

Supported values are:

- `true`: scrollbars are overlaid on top of the content (this is the default value)
- `false`: scrollbars take up space next to your content

```html
<scrollable-component scrollbar-overlay="false">
  <!-- Your content -->
</scrollable-component>
```

### Edge detection

If you want to know when the viewport is fully scrolled to one end or another, you can enable edge detection by setting the `edge-detection` attribute to `true`.

Supported values are:

- `false`: edge detection is disabled (this is the default value)
- `true`: edge detection is enabled

```html
<scrollable-component edge-detection="true">
  <!-- Your content -->
</scrollable-component>
```

When edge detection is enabled, some attributes will be toggled on & off on the component itself, so you can use CSS selectors to change the look of the component depending on them:

- when `top-overflow` is present, the viewport isn't fully scrolled up
- when `bottom-overflow` is present, the viewport isn't fully scrolled down
- when `left-overflow` is present, the viewport isn't fully scrolled left
- when `right-overflow` is present, the viewport isn't fully scrolled right

For example, you could decide to display a top & bottom shadow to indicate to the user that they haven't fully scrolled the content yet:

```css
scrollable-component {
  box-shadow:
    0 0 10px -12px rgba(0, 0, 0, 0) inset, /* hidden top shadow */
    0 0 10px -12px rgba(0, 0, 0, 0) inset; /* hidden bottom shadow */
  transition: box-shadow 200ms ease-in;
}
scrollable-component[top-overflow] {
  box-shadow:
    0 14px 10px -12px rgba(0, 0, 0, 0.6) inset, /* visible top shadow */
    0 0 10px -12px rgba(0, 0, 0, 0) inset;      /* hidden bottom shadow */
}
scrollable-component[bottom-overflow] {
  box-shadow:
    0 0 10px -12px rgba(0, 0, 0, 0) inset,       /* hidden top shadow */
    0 -14px 10px -12px rgba(0, 0, 0, 0.6) inset; /* visible bottom shadow */
}
scrollable-component[top-overflow][bottom-overflow] {
  box-shadow:
    0 14px 10px -12px rgba(0, 0, 0, 0.6) inset,  /* visible top shadow */
    0 -14px 10px -12px rgba(0, 0, 0, 0.6) inset; /* visible bottom shadow */
}
```

### Custom HTML tag

If you don't like the default `<scrollable-component>` tag, you can override it by calling `window.customElements.define()` instead of calling `defineScrollableComponent()`:

```javascript
import { ScrollableComponentElement } from 'scrollable-component';
window.customElements.define('my-custom-tag', ScrollableComponentElement);
```

And then use it like this:

```html
<my-custom-tag>
  <!-- Your content -->
</my-custom-tag>
```


## Customized appearance

You can change the look & feel of the scrollbars using CSS.
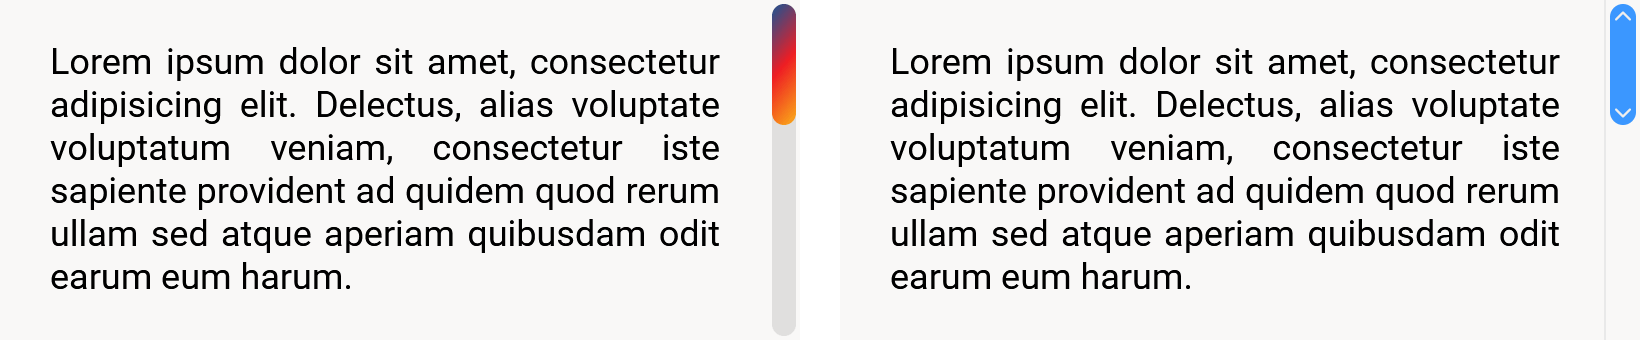
![Two custom-looking scrollbars](https://raw.githubusercontent.com/Julien-Marcou/scrollable-component-demo/main/customization.png)

Although you can fully customize every part of the component using plain CSS, it may sometimes be easier to override the provided CSS properties first.

### CSS properties

Here is the list of all the default CSS properties you can override:

```css
scrollable-component {
  /* Transitions */
  --fade-in-transition-duration: 150ms;
  --fade-out-transition-duration: 800ms;
  --fade-out-transition-delay: 300ms;
  --fill-color-transition-duration: 150ms;

  /* Scrollbar sizing */
  --scrollbar-width: 16px;
  --scrollbar-padding: 2px;

  /* Scrollbar's track color */
  --scrollbar-track-fill-color: transparent;
  --scrollbar-track-fill-color-hover: var(--scrollbar-track-fill-color);

  /* Scrollbar's thumb color */
  --scrollbar-thumb-fill-color: #ccc;
  --scrollbar-thumb-fill-color-hover: #aaa;
  --scrollbar-thumb-fill-color-active: var(--scrollbar-thumb-fill-color-hover);

  /* Content & scrollbar overlaying */
  --content-z-index: 0;
  --scrollbar-z-index: 10;
  --scrollbar-z-index-hover: 20;

  /* Content padding */
  /* Use this instead of setting the padding directly on the component */
  --content-padding: 0;
}
```

### CSS parts

If you need more control over the look of each part of the scrollbars, you can use CSS `::part()` selectors to directly target the elements you want, and then use plain CSS to fully customize it.

Scrollable Component exposes the following part selectors:

- `content` to target the viewport's content
- `content-wrapper` to target the wrapper around the viewport's content
- `scrollbar` to target the container of each scrollbar
- `scrollbar-track` to target the track of each scrollbar
- `scrollbar-thumb` to target the thumb of each scrollbar

In addition, you can combine the previous `scrollbar*` part selectors with the following ones:

- `vertical`: to target left & right parts
- `horizontal`: to target top & bottom parts
- `left`: to target left parts
- `right`: to target right parts
- `top`: to target top parts
- `bottom`: to target bottom parts

Here are some examples:

```css
/* Target all scrollbars */
scrollable-component::part(scrollbar) {
  background-color: #fff;
}

/* Target top scrollbar */
scrollable-component::part(top scrollbar) {
  background-color: #000;
}

/* Target horizontal scrollbar tracks */
scrollable-component::part(horizontal scrollbar-track) {
  border: 1px solid #f00;
}

/* Target left scrollbar thumb */
scrollable-component::part(left scrollbar-thumb) {
  border: 1px solid #ccc;
}

/* Target hovered left scrollbar thumb */
scrollable-component::part(left scrollbar-thumb):hover {
  border-color: #00f;
}
```

Finally, you can use the special `active` part, to target active scrollbar thumbs (when the user is actively dragging them):

```css
/* Target active scrollbar thumbs */
scrollable-component::part(active scrollbar-thumb) {
  outline: 1px solid #f00;
}
```

### Content sizing

Each `scrollable-component` is defining its own `--viewport-width` & `--viewport-height` CSS properties, which may be useful if you want to create something like a carousel, where child elements are sized proportionally to the viewport.

```html
<style>
  .carousel .carousel-track {
    display: grid;
    grid-auto-flow: column;
    grid-gap: 30px;
  }
  .carousel .carousel-item {
    width: var(--viewport-width);
    height: 300px;
  }
</style>

<scrollable-component class="carousel">
  <div class="carousel-track">
    <div class="carousel-item">Slide 1</div>
    <div class="carousel-item">Slide 2</div>
    <div class="carousel-item">Slide 3</div>
    <div class="carousel-item">Slide 4</div>
    <div class="carousel-item">Slide 5</div>
    <div class="carousel-item">Slide 6</div>
  </div>
</scrollable-component>
```


## Why use Scrollable Component?

### Perks

Simple, performant, modern, and customizable - Scrollable Component outperforms many older custom scrollbar packages.

- It's built for raw performance using modern browser features, which also allow for better customization & cleaner code
- It does not override the viewport's native behaviors (Mouse wheel scrolling, swipe scrolling, page down/up keys, arrow keys, middle mouse button's auto-scrolling, scroll snapping, JavaScript API...)
- It uses the [Web Component](https://developer.mozilla.org/en-US/docs/Web/Web_Components) standards, making it act like a black box from the outside (encapsulating HTML, CSS & JS) and leaving the DOM untouched, without extraneous `<div>` elements
- It's simple to use (you just need to add the `<scrollable-component>` tag around the content you want the custom scrollbars on)
- It's easy to customize and highly customizable

### Quirks

This package is not intended to replace all the scrollbars of your website, especially not the body's scrollbar. Tampering with native behaviors always carries risk, especially for accessibility.

It's recommended to only use it sparingly, on small parts of your website (like dialogs, chats, sidebars, dropdowns...) to enhance the user's experience through a cleaner UI.

- It will never be as fast as native scrollbars
- It doesn't support right-to-left and vertical writing mode
- It sacrifices some native features (e.g. Google Chrome's search result highlights in the scrollbar)
- Some native features might not work quite as expected (e.g. scroll snapping isn't smooth when using the custom scrollbars instead of the viewport)
- The custom scrollbars are simple divs that are absolutely positioned above the native viewport, which means scrolling using the custom scrollbars instead of the viewport is, in fact, handled with some javascript and not natively


## Browser compatibility

Every modern browser that supports the following features:

- [shadow dom](https://caniuse.com/shadowdomv1)
- [custom elements](https://caniuse.com/wf-autonomous-custom-elements)
- [javascript resize observer](https://caniuse.com/resizeobserver)
- [javascript private class fields](https://caniuse.com/mdn-javascript_classes_private_class_fields)
- [css sticky position](https://caniuse.com/css-sticky)
- [css scrollbar width](https://caniuse.com/wf-scrollbar-width)
- [css custom properties](https://caniuse.com/css-variables)
- [css part selector](https://caniuse.com/wf-shadow-parts)

So, basically, all up-to-date browsers since 2025.


## How it works

Scrollable Component uses the [Web Component](https://developer.mozilla.org/en-US/docs/Web/Web_Components) standards to create a custom element which handles all the work for you and can even be extended.

The native scrollbars are hidden using the CSS `scrollbar-width: none` rule.

The custom scrollbars are placed using a combination of the CSS `position: sticky` & `position: absolute` rules.

The custom scrollbars are redrawn when needed, to visually match where the native scrollbars would be placed.

All scrolling behaviors when interacting on the viewport itself are still the native ones.

Scrolling behaviors when using the custom scrollbar (i.e. dragging the scrollbar's thumb or clicking somewhere on the scrollbar's track) are handled with some JavaScript which then natively moves the viewport's scroll position.
