- `constructor`
- The constructor takes a `ScrollView` ref to enable the `scrollToEntry` method.
- `addSelectedEntryListener`
- A method to listen to selected entry changes. This will be useful in the table of content drawer to update the active entry on scroll.
- `removeSelectedEntryListener`
- A method to free a listener to selected entry changes.
- `registerScrollEntry`
- A method to be used with `onLayout` in order to store the coordinates of each entry in the body of the article.
- `handlers`
- Event handlers to be passed to a `ScrollView` component. The `onScroll` handler will be used to update the selected entry in the table of content drawer.
- `setOffset`
-
A method to set the offset of the `headings` container. Because of the DOM
structure offered by Docusaurus wich looks like:
```html
... ` rather then relative to the `ScrollView` content, and we need to adjust to that.- `scrollToEntry`
- A method to imperatively scroll to the given entry name.
### Sharing the `Scroller` in a React Context Let's start by creating a scroller context and export the relevant hook and provider: ```ts title="utils/scroller.tsx" import React, { createContext, PropsWithChildren, useContext } from "react"; import Scroller from './Scroller'; const scrollerContext = createContext(null as any); export function useScroller(): Scroller { return useContext(scrollerContext); } export function ScrollerProvider({ children, scroller }: PropsWithChildren<{ scroller: Scroller }>) { return ( {children} ); } ``` Then we can provide a `scroller` instance from the `ArticleScreen` component, and scroll to the targeted entry on menu entry press. ```tsx {1,3-4,8-15,22-26,34,41,49} title="screens/ArticleScreen.tsx" import React, { useCallback, useEffect, useRef, useMemo } from "react"; // ... other imports import Scroller from "../utils/Scroller"; import { ScrollerProvider } from "../utils/scroller"; // other hooks function useScrollFeature(scrollerDep: any) { const scrollViewRef = useRef(null); const scroller = useMemo(() => new Scroller(scrollViewRef), [scrollerDep]); return { scroller, scrollViewRef, }; } export default function ArticleScreen(props: ArticleScreenProps) { useSetTitleEffect(props); const url = props.route.params.url; const { dom, headings } = useArticleDom(url); const { drawerRef, openDrawer, closeDrawer } = useDrawer(); const { scrollViewRef, scroller } = useScrollFeature(url); const onPressEntry = useCallback((entry: string) => { closeDrawer(); scroller.scrollToEntry(entry); }, [scroller]); const renderToc = useCallback( function renderToc() { return ; }, [headings] ); return ( {/* ... */} ); } ``` Great! Nevertheless we have yet two unaddressed issues: - Update selected entry on scroll in the `TOC`; - Register headings layouts. We will use a custom renderer for that purpose. ### Listening to Entry Changes in `TOC` First of all, I propose to factor the logic of adding a listener to selected entry changes in a separate hook (`hooks/useOnEntryChangeEffect.ts`): ```ts title="hooks/useOnEntryChangeEffect.ts" import { useEffect } from "react"; import { useScroller } from "../utils/scroller"; export default function useOnEntryChangeEffect( onEntryChange: (entryName: string) => void ) { const scroller = useScroller(); useEffect( function updateActiveTargetOnScroll() { scroller.addSelectedEntryListener(onEntryChange); return () => scroller.removeSelectedEntryListener(onEntryChange); }, [scroller, onEntryChange] ); } ``` Then, we just need to consume this hook from the `TOC` component: ```ts {2,14} title="components/TOC.tsx" // ...other imports import useOnEntryChangeEffect from "../hooks/useOnEntryChangeEffect"; export default function TOC({ headings, onPressEntry, }: { headings: Element[]; onPressEntry?: (name: string) => void; }) { const [activeEntry, setActiveEntry] = useState( headings.length ? textContent(headings[0]) : "" ); useOnEntryChangeEffect(setActiveEntry); // ... } ``` ### Register Headings Layouts The `Scroller` is still missing the coordinates of each heading to be able to properly `scrollToEntry`. For this purpose, we are going to create a [custom renderer](/react-native-render-html/docs/guides/custom-renderers#component-based-custom-rendering) for `` and `
` tags. We will also need to register a `
` renderer to store the header height. If you remember well, the DOM has a structure like below: ```html ... ...
...
; }; const HeaderRenderer: CustomBlockRenderer = function HeaderRenderer({ TDefaultRenderer, ...props }) { const scroller = useScroller(); const onLayout = useCallback( (e: LayoutChangeEvent) => { scroller.setOffset(e.nativeEvent.layout.y + e.nativeEvent.layout.height); }, [scroller] ); return ; }; const renderers: CustomTagRendererRecord = { h2: HeadingRenderer, h3: HeadingRenderer, header: HeaderRenderer, }; const selectDomRoot: TRenderEngineConfig["selectDomRoot"] = (node) => findOne((e) => e.name === "article", node.children, true); const ignoredDomTags = ["button", "footer"]; export default function WebEngine({ children }: React.PropsWithChildren<{}>) { // Every prop is defined outside of the function component. // This is important to prevent extraneous rebuilts of the engine. return ( {children} `, `
` and `
` tags have a content model set to **block**, they will be rendered in a `View`, so we can pass `onLayout` in prop. Hence we're done with the tap-to-scroll feature! But the `ArticleBody` is still pretty ugly, so we'll use some styles and fixes to prettify it! ## Styling Refinements ### Fixing the Avatar The avatar should be 50x50 and its container displayed in row. We are going to fix it in two steps: 1. By targeting the container class with styles to display in row; 2. By setting a custom ` ` renderer to fix the size. So let's edit the `components/WebEngine` to apply those fixes: ```tsx {5,9,15-21,26,31-63,70} title="components/WebEngine" import React, { useCallback } from "react"; import { CustomBlockRenderer, CustomTagRendererRecord, MixedStyleRecord, RenderHTMLConfigProvider, TRenderEngineProvider, TRenderEngineConfig, useInternalRenderer, } from "react-native-render-html"; // ... other imports // HeaderRenderer const ImageRenderer: CustomBlockRenderer = function ImageRenderer(props) { const { Renderer, rendererProps } = useInternalRenderer("img", props); if (props.tnode.parent?.hasClass("avatar__photo")) { return
; } return ; }; const renderers: CustomTagRendererRecord = { h2: HeadingRenderer, h3: HeadingRenderer, img: ImageRenderer }; // ... other definitions const classesStyles: MixedStyleRecord = { avatar: { marginTop: 10, flexDirection: "row", alignItems: "center", flexWrap: "nowrap", }, avatar__photo: { width: 50, height: 50, borderRadius: 25, overflow: "hidden", }, avatar__intro: { flexShrink: 1, alignItems: "flex-start", }, avatar__name: { fontWeight: "bold", flexGrow: 0, marginBottom: 10, }, avatar__subtitle: { color: "rgb(118, 118, 118)", fontWeight: "bold", lineHeight: 16, }, "avatar__photo-link": { borderRadius: 25, marginRight: 10, overflow: "hidden", }, } export default function WebEngine({ children }: React.PropsWithChildren<{}>) { return ( {/*...*/} ); } ``` ### Fixing Paragraphs in `- ` Elements Paragraphs nested in `
- ` elements have top and bottom margins, which is undesirable. To fix the issue, we're going to add a custom `
` renderer like so: ```tsx title="components/WebEngine.tsx" // renderers and imports const ParagraphRenderer: CustomBlockRenderer = function ParagraphRenderer({ TDefaultRenderer, tnode, ...props }) { const marginsFix = tnode.markers.olNestLevel > -1 || tnode.markers.ulNestLevel > -1 ? { marginTop: 0, marginBottom: 0 } : null; return (
); }; const renderers: CustomTagRendererRecord = { // ... other renderers p: ParagraphRenderer }; ``` :::note We are using `markers` which contain the current nest level of `ol` and `ul` elements to assess if we are rendering inside a list. See . ::: ### Discard `#` anchors appended to Headings by Docusaurus These elements have a `"hash-link"` class, so we can use `ignoreDomNode` to discard them: ```tsx {5,15-16,25} title="components/WebEngine.tsx" import React, { useCallback } from "react"; import { CustomBlockRenderer, CustomTagRendererRecord, isDomElement, MixedStyleRecord, RenderHTMLConfigProvider, TRenderEngineProvider, TRenderEngineConfig, useInternalRenderer, } from "react-native-render-html"; // ... const ignoreDomNode: TRenderEngineConfig["ignoreDomNode"] = (node) => isDomElement(node) && !!node.attribs.class?.match(/hash-link/); export default function WebEngine({ children }: React.PropsWithChildren<{}>) { // Every prop is defined outside of the function component. // This is important to prevent extraneous rebuilts of the engine. return ( {/*...*/} ); } ``` Great! Now the `#` characters have been removed:However, code samples look pretty ugly: - They're missing padding; - They should be horizontally scrollable and lines should not wrap; - A monospace font should be used; - Whitespaces should be preserved. So, let's fix it! ### Fixing Code Samples Code samples are rendered by Docusaurus in a ` ` tag. We need to fix two issues: - Define a custom renderer for `pre` tags, which renders inside a `ScrollView` when matching the `"prism-code"` class. - Define a custom renderer for `span` tags. We need to do that because the whole code block is rendered inside a `code` element with a `display: flex; flex-direction: column`. However, `code` is translated to a React Native `Text` since his element model is **textual**. To work around this issue, we can inject line breaks after each `span` element with a CSS `token-line` class which content does not end with a new line. ```tsx title="components/WebEngine.tsx" // ...other imports import { TChildrenRenderer } from 'react-native-render-html'; import { ScrollView } from 'react-native-gesture-handler'; // ... const PreRenderer: CustomBlockRenderer = function PreRenderer({ TDefaultRenderer, ...props }) { if (props.tnode.hasClass("prism-code")) { return (; }; function tnodeEndsWithNewLine(tnode: TNode): boolean { if (tnode.type === "text") { return tnode.data.endsWith("\n"); } const lastChild = tnode.children[tnode.children.length - 1]; return lastChild ? tnodeEndsWithNewLine(lastChild) : false; } const SpanRenderer: CustomTextualRenderer = function SpanRenderer({ TDefaultRenderer, ...props }) { if (props.tnode.hasClass("token-line") && !tnodeEndsWithNewLine(props.tnode)) { return ( {"\n"} ; }; const renderers: CustomTagRendererRecord = { // ... other renderers span: SpanRenderer, pre: PreRenderer, }; const classesStyles: MixedStyleRecord = { // ... other classes styles "prism-code": { backgroundColor: "#282c34", fontFamily: "monospace", borderRadius: 10, fontSize: 14, lineHeight: 14 * 1.6, flexShrink: 0, }, }; ``` That's looking much better. We're almost done! ### Final Touch We could add a few more styles to match the React Native blog styles: ```tsx title="components/WebEngine.tsx" import { // ... MixedStyleDeclaration, // ... } from "react-native-render-html"; // other imports and declarations const tagsStyles: MixedStyleRecord = { a: { color: "#1c1e21", backgroundColor: "rgba(187, 239, 253, 0.3)", }, li: { marginBottom: 10, }, img: { alignSelf: "center", }, h4: { marginBottom: 0, marginTop: 0, }, code: { backgroundColor: "rgba(0, 0, 0, 0.06)", fontSize: 14, }, blockquote: { marginLeft: 0, marginRight: 0, paddingLeft: 20, paddingRight: 20, backgroundColor: "#fff8d8", borderLeftWidth: 10, borderLeftColor: "#ffe564", }, }; const baseStyle: MixedStyleDeclaration = { color: "#1c1e21", fontSize: 16, lineHeight: 16 * 1.8, }; export default function WebEngine({ children }: React.PropsWithChildren<{}>) { return ( {/*...*/} ); } ```## Epilogue ### Frustrating React Native Text Limitations As a final note, I'd like to mention a few frustrating limitations in React Native that prevented me from replicating more accurately the official blog styles: 1. `backgroundColor` spans to the full line-box of text elements, whereas in CSS, it only spans to the text content-area. Below is a diagram explaining the difference: 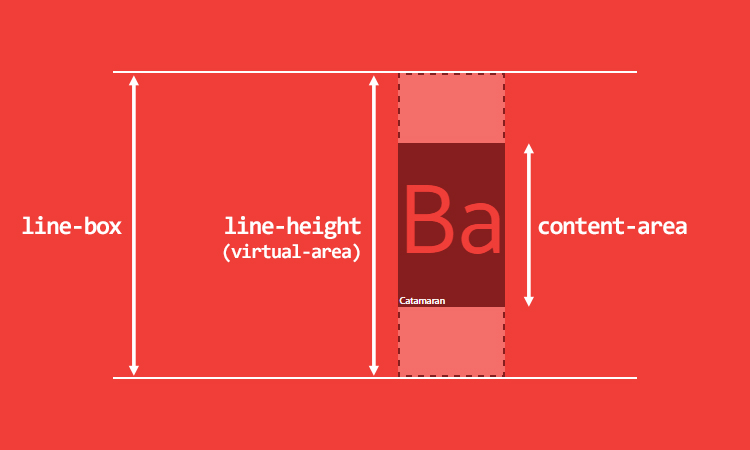 See a complete explanation [in this excellent article on CSS text styling](https://iamvdo.me/en/blog/css-font-metrics-line-height-and-vertical-align). 2. `padding` and `border` are ignored in nested text elements. All these features are required to get the official blog appealing anchors styles:  Instead we have backgrounds overlapping each other, which becomes weird when there is a high density of anchors:  This is because, as stated before, the `backgroundColor` spans to the entire height of the line box, instead of spanning to the content area. ### Going Further You can take a look at the [`enhanced` branch of the project](https://github.com/jsamr/rnrh-blog/tree/enhanced) and see how the below features have been implemented: - Cached queries with `react-queries`; - Dark mode (follows system mode); - Progressive rendering for fast time to first contentful paint via `FlatList`; - Collapsible header with `react-native-reanimated` (v2); - Video support with `expo-av`. That's all for this tutorial! Don't forget to [give us a star](https://github.com/meliorence/react-native-render-html) if you enjoy this library. You can also [follow me on Twitter](https://twitter.com/jsamrn), and [rate this library on Open Base](https://openbase.com/js/react-native-render-html?utm_source=embedded&utm_medium=badge&utm_campaign=rate-badge).