React Native Range Slider
The high-quality native iOS range slider for react native. A slider, similar in style to UISlider, but which allows you to pick a minimum and maximum range.
Note: This slider can also be used as a normal slider with only one handle.
Demo
## Getting Started
1. Installation
* Using npm: `npm install --save react-native-range-slider`
* Using yarn: `yarn add react-native-range-slider`
2. Link
* Run `react-native link react-native-range-slider`
* If linking fails, follow the
[manual linking steps](https://facebook.github.io/react-native/docs/linking-libraries-ios.html#manual-linking)
## Usage
If you want a working example you can check [this example](https://github.com/ismnoiet/example_RN_range_slider), otherwise you can use the following example as a starting point.
```javascript
import RangeSlider from 'react-native-range-slider'
```
```JSX
{ console.log(data);} }
/>
```
## API
| Property | Description | Type |
|----------|:-------------:|----------|
| disableRange | when set to true, the slider will mimic a normal slider with only one handle and the slider value will be stored in selectedMaximum | Boolean, false by default |
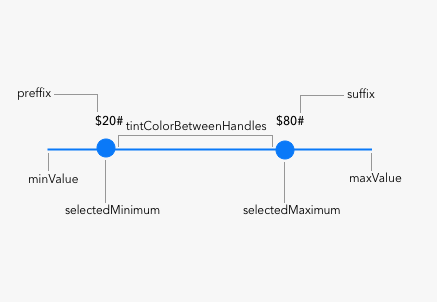
| minValue | the minimum value for the slider | Number(float) |
| maxValue | the maximum value for the slider | Number(float) |
| selectedMinimum | the selected minimum value, it shouldn't be less than `minValue` | Number(float) |
| selectedMaximum | the selected maximum value, it shouldn't be bigger than `maxValue` | Number(float) |
| onChange | a callback that will be called with slider data once the values change | Callback |
| tintColor | the color for the slider bar and the two handlers | String(**MUST BE A HEX VALUE**) |
| handleColor | the color for both `selectedMinimum` and `selectedMaximum` handlers | String(**MUST BE A HEX VALUE**) |
| handleBorderColor | the color for the slider handle border | String(**MUST BE A HEX VALUE**) |
| handleBorderWidth | the width for the slider handle border | Number(float) |
| handleDiameter | the diameter for the slider handle | Number(float) default 16.0 |
| tintColorBetweenHandles | the color of the slider bar between the `selectedMinimum` and `selectedMaximum` handlers | String(**MUST BE A HEX VALUE**) |
| minLabelColour | the color of the min label on top of `selectedMinimum` handler | String(**MUST BE A HEX VALUE**) |
| maxLabelColour | the color of the max label on top of `selectedMaximum` handler | String(**MUST BE A HEX VALUE**) |
| lineHeight | the height for slider bar | Number(float) default 1.0) |
| preffix | the string to be prepended to min and max labels values | String |
| suffix | the string to be appended to min and max labels values | String |
| hideLabels | a boolean to determine handle labels visibility, if set to true range labels will be hidden | Boolean |
## Todo
- [x] Add possibility to update handlers related properties.
- [x] Impliment other necessary methods.
- [x] Improve the documentation.
- [x] Make the module cooler.
- [ ] Add android support.
## Acknowledgement
* TTRangeSlider, which this module is based on.
## How to contribute ?
You are interested and want to contribute? Awesome, just consider the following steps:
1. Fork this repository.
2. Add and test the fixes/improvements you worked on to a seperate branch.
3. Submit your pull request(PR).