The basics

What Pimp My Page (PMP) allows you to do ?

That is just a fancy tool to help front-end developers in hostile territory.
PMP aims to close the gap between the ease and flexibility of static front-end development and the hurdles in, real-world, complex CMS front-end development.

Here are a few scenarii where PMP will help:

  • I don't have a development environment. Still I need to do some front-end work on this existing page
  • I don't know this CMS solution theming system. Still I need to contribute effectively without learning it, or introducing bugs.
  • I have to quiclky prototype some front-end elements and insert them in an existing page. I have to iterate a lot, without interfering with what is already in place. I don't have access to the sources.

In all those cases, PMP will help get up and running in a minute.
You'll be hacking on some existing page without fearing of breaking anything. Best of all, you don't even have to know how the page you are working on is pieced together.

That's magic ! How does this work ?

pmp micro anim

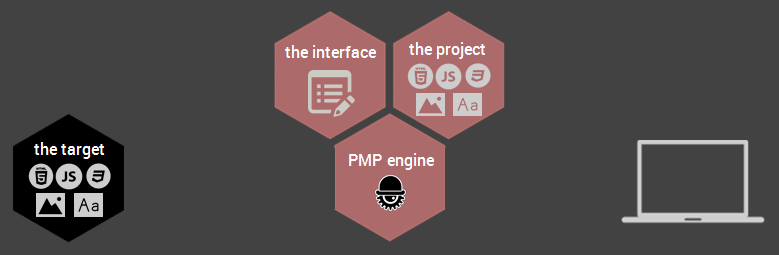
Pimp My page (PMP) is composed of 4 parts: the target, the project, the engine, the interface. Let's quickly go through each of those parts to understand how they play together.

  1. The target

    That's the website or page you want to work on. You don't need any kinf of server access privileges on it. Having access to the URL you are interested in is all you need.

  2. The project

    That's your basic front-end files and assets. If you know HTML, CSS and JS you know what I'm talking about.

    CSS - you can write SASS/CSS and see directly the changes in the page.
    JS - you can add some JS to the page and see the result after an automatic page refresh.
    HTML - write your HTML partials and inject/replace them in the page.
    Assets - provide images, fonts, JS libraries that can be used in the page in addition to what the page's server already provide.

  3. The engine

    Where the magic happens! It serves the modified page with all your customizations.

    BrowserSync is used internally to proxy the targeted website or page you wish to pimp.
    A configurable middelware intercepts the page request and transfroms it on the fly to apply various modifications.
    A Gulp node process takes care of glueing the project files to the page.

  4. The interface

    The web application you are currently on. It aims to provide intuitive control over the engine.

    START or STOP the engine with a button.
    Monitor what happens in the engine (logs, errors, sass compilation events, ...).
    Change, save, restore the pimp configuration that is used to instruct the engine what to do. Basically it is the configuration that is passed to the engine middleware.

Quick start

You just have to press the START button on the dasboard or in the top right corner. Voila!

If you never created a PIMP configuration before, a default one will be automatically provided. Then a sequence of actions will unfold:

  • Dashboard engine' state indicator will turn yellow, then green. Useful information will also appear.
  • Console engine starting logs will begin to show in the console.
  • Browser A new browser window will open with the pimp page being loaded (proxied URL)

At that point you have already everything setup to start pimping. You can start playing around with project files (see "Pimp source files" folder path in the dashboard).

Edit targeted website or page

Of course you'll want to pimp a page you have chosen.
First thing to do is to point to the website you want to work on.

  1. Go to the configuration page | general tab
  2. Change "URL to proxy" input field with a valid URL
  3. click the apply button to update the engine target (will restart the engine).
Configuration editing

Now you are ready to provide your own custom configuration.

rule editing

A pimp rule is the basic instruction unit that will support the pimping of the page. To summarize, this will describe actions to perform and where on the page.
A rule is composed of an URL pattern and a list of javascript instructions to perform.
More information on this in the following help sections.

  1. Go to the configuration page | pimp rules tab
  2. Choose an existing rule to edit or create one with the button
  3. modify the rule pattern input field to describe which pages of the target website will be impacted by the rule.
    Here are a few patterns examples (see pattern syntax documentation):
    • "*" will match all pages
    • "*/specific-page.html" will match only URLs endings
    • "*/news*" will match all URLs containing the "news" path
  4. update the modification script textarea with the modifications you want to apply to the page.
    Staple instructions

    The bare minimum to apply your custome CSS/JS to the page. This function comes from the pmp-staples-plugin (must be activate)

    helpers.staple.baseInjects();

    This code is equivalent to this one below
    $('head').append('<link rel="stylesheet" type="text/css" href="/css/main.min.css">');
    $('body').append('<script type="text/javascript" src="/js/main.min.js"></script>');

    Here are common gotchas and pitfalls
    • the modification script is written in javascript/node
    • the modification script is executed in the engine middleware therefore it leaves no traces in the browser.
    • you can't use ES6's' multi-line strings in your instructions
    • A light version of jQuery is accessible through the $ object (see available methods there).
    • For more information on rule editing, see the related help sections
  5. click the apply button to update the engine target (will restart the engine).

Bare minimum VS advanced rules

The base inject rule instruction above is all you need to modify CSS or JS live in the page you are targeting. So just proceed with the next section Start pimping

For more complex cases, you'll need to add more logic into the rule editing. If so read the advanced tips section. Here below is a list of cases where baseInjects will not suffice:

  • remove stylesheets from the page
  • remove scripts from the page
  • remove, edit existing HTML from the page
  • inject custom HTML to the page
Start pimping

Now that you have customized your PIMP configuration you should have:

  • started engine (green state indicator)
  • got a browser tab displaying the proxied website you are targeting
  • some PIMP rules defined and applied accordingly to the pages you display

At that point you have already everything setup to start pimping the page in the browser.

what now

Click on the "Pimp source files" dashboard button, you'll have the project folder path in your clipboard. Paste that path in your explorer address bar to open it at that location.
Now you have access to HTML, JS, CSS files to start working. Open them in your editor of choice and start editing.

General configuration tips

Port

Indicates which localhost port will be used to display the targeted website or web page. You can pick-up anything between 0 - 65535 but a few reserved values:

  • 4200 reserved for PMP web interface (this very UI)
  • 5000 reserved for websocket communication between the PMP web interface and the PMP engine
  • 3001 reserved for BrowserSync web interface (multi-browser controls, history, ...)

Cookies

Some websites require authenticated access through session cookies. To enable pimping of those, just open a regular session (not via PMP) and then PMP will be able to take advantage of this current session using the aformentioned cookie.

CORS

Some websites enforces cross origin policies for accessing some assets or APIs. Enabling CORS requests can solve part of those issues if the given policy isn't too restrictive.

Pimp rules

Rules matching

Special syntax is used to matches the page URL you are visualizing in the browser against the set of pimp rules you have declared (see pattern syntax documentation). Each rule matching is applied in the order it was defined in the configuration.

modularize rules

Instead of repeating yourself and providing huge rules for each pages, you can leverage the rule pattern behavior described above.

For example, it is generaly a good idea to apply the staple base injects on all pages. So instead of creating a rule for each page, you'll just create one rule that is applied on all pages. Then you can craft rules for individual pages or group of pages with an appropriate URL pattern.

  • pattern '*' base injects are applied on all pages
  • pattern '*/articles/*' rules transform are applied only on articles category of the website (in addition to the above).
  • full URL rule applied specifically to the page specified by this URL (in addition to the above).

Rules independent context

Each rule has its own context. This means that an object defined in one rule isn't available in another one even if both are applied to the same page.

Rules shared Objects and virtual DOM

All rules can access the helper shared object that holds plugins helpers. Same thing for the JQuery helper object $. To share variables or functions across rules you can add properties to the $ (jQuery Object) or helper object, please note that you might overwrite existing functions, and also rules order is still applied.

Rules are acting upon a virtual DOM that is common for each rules. So if some rule add a HTML component to this DOM, all subsequent rules can manipulate this HTML element.

Rules JavaScript errors and console

Rules are executed in a backend process, therefore their execution can't be monitored from the browser client.

If some syntaxic or run-time error happens in your rule you'll have to check the console provided in this PMP UI interface to see it. Same goes for any console log you want to output.