# Installation
```bash
# Install the admob module
yarn add new-react-native-google-mobile-ads
```
> On Android, before releasing your app, you must select _Yes, my app contains ads_ in the Google Play Store, Policy, App content, Manage under Ads.
## Optionally configure iOS static frameworks
On iOS if you need to use static frameworks (that is, `use_frameworks! :linkage => :static` in your `Podfile`) you must add the variable `$RNGoogleMobileAdsAsStaticFramework = true` to the targets in your `Podfile`. You may need this if you use this module in combination with react-native-firebase v15 and higher since it requires `use_frameworks!`.
Expo users may enable static frameworks by using the `expo-build-properties` plugin.
To do so [follow the official `expo-build-properties` installation instructions](https://docs.expo.dev/versions/latest/sdk/build-properties/) and merge the following code into your `app.json` or `app.config.js` file:
#### app.json
```json
{
"expo": {
"plugins": [
[
"expo-build-properties",
{
"ios": {
"useFrameworks": "static"
}
}
]
]
}
}
```
#### app.config.js
```js
{
expo: {
plugins: [
[
'expo-build-properties',
{
ios: {
useFrameworks: 'static',
},
},
],
];
}
}
```
## What does it do
The AdMob module allows you to display adverts to your users. All adverts are served over the Google AdMob network, meaning
a [Google AdMob account](https://apps.admob.com) is required.
The module supports four types of Ads:
1. Full screen [App Open Ads](/displaying-ads#app-open-ads).
2. Full screen [Interstitial Ads](/displaying-ads#interstitial-ads).
3. Full screen [Rewarded Ads](/displaying-ads#rewarded-ads).
4. Component based [Banner Ads](/displaying-ads#banner-ads).
## Getting Started
A number of steps must be taken and considered before you start serving adverts to your users:
- [Installation](#installation)
- [Getting Started](#getting-started)
- [Setting up Google AdMob](#setting-up-google-admob)
- [Configure outbound requests](#configure-outbound-requests)
- [European User Consent](#european-user-consent)
- [Test ads](#test-ads)
- [Next Steps](#next-steps)
### Setting up Google AdMob
Before you are able to display ads to your users, you must have a [Google AdMob account](https://apps.admob.com). Under the
"Apps" menu item, create or choose an existing Android/iOS app. Each app platform exposes a unique account ID which needs to
be added to the project.
> Attempting to build your app without a valid App ID in `app.json` or `app.config.js` will cause the app to crash on start or fail to build.
Under the "App settings" menu item, you can find the "App ID":
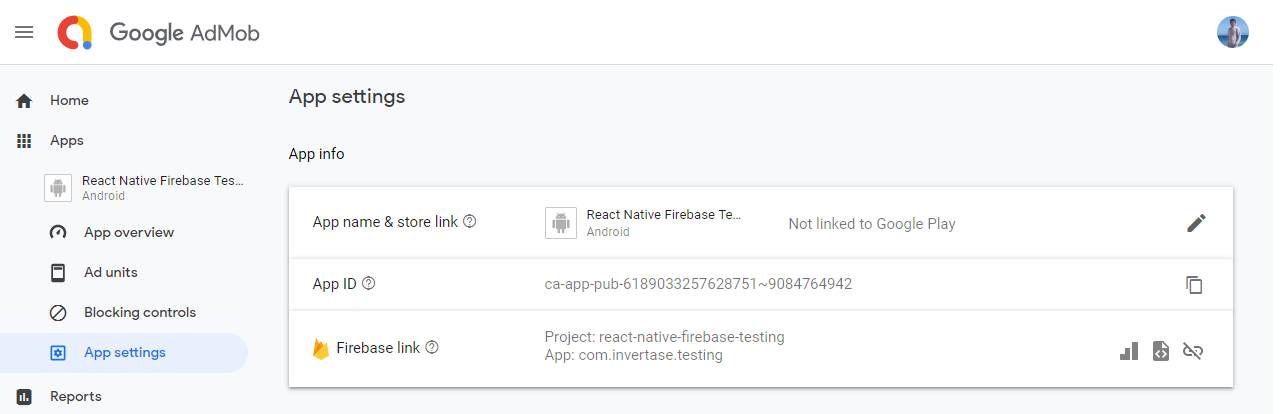
Within the root of your React Native project, open the `app.json` or (if using Expo) `app.config.js` file and add the
`android_app_id` & `ios_app_id` keys with the IDs from the Google AdMob console:
#### app.json
```json
// /app.json
{
"new-react-native-google-mobile-ads": {
"android_app_id": "ca-app-pub-xxxxxxxx~xxxxxxxx",
"ios_app_id": "ca-app-pub-xxxxxxxx~xxxxxxxx"
}
}
```
#### app.config.js
```js
// /app.config.js
module.exports = {
'new-react-native-google-mobile-ads': {
android_app_id: 'ca-app-pub-xxxxxxxx~xxxxxxxx',
ios_app_id: 'ca-app-pub-xxxxxxxx~xxxxxxxx',
},
};
```
If you're an expo user, make sure the `new-react-native-google-mobile-ads` block is outside of the `expo` block!
It should look like this:
#### app.json
```json
// /app.json
{
"expo": {
// ...
},
"new-react-native-google-mobile-ads": {
"android_app_id": "ca-app-pub-xxxxxxxx~xxxxxxxx",
"ios_app_id": "ca-app-pub-xxxxxxxx~xxxxxxxx"
}
}
```
#### app.config.js
```js
// /app.config.js
module.exports = {
expo: {
// ...
},
'new-react-native-google-mobile-ads': {
android_app_id: 'ca-app-pub-xxxxxxxx~xxxxxxxx',
ios_app_id: 'ca-app-pub-xxxxxxxx~xxxxxxxx',
},
};
```
For the changes to take effect, rebuild your project:
```bash
# For iOS
npx pod-install
npx react-native run-ios
# For Android
npx react-native run-android
```
> ⚠️ This module contains custom native code which is NOT supported by Expo Go
If you're using Expo without EAS, run the following commands:
```bash
# For iOS
npx expo prebuild
npx expo run:ios
# For Android
npx expo prebuild
npx expo run:android
```
If you're using Expo with EAS, create a new build:
```bash
npx eas-cli build --profile development
```
Don't forget to install the new build on your device!
### Configure outbound requests
If the default ad settings are not correct for your app, you can provide settings that will apply to all ad requests.
For example, if the application targets children then you must configure the outbound requests to only
receive content suitable for children before loading any adverts.
If you need to set a custom request configuration, you must call the `setRequestConfiguration` method before initializing the Google Mobile Ads SDK:
```js
import mobileAds, { MaxAdContentRating } from 'new-react-native-google-mobile-ads';
mobileAds()
.setRequestConfiguration({
// Update all future requests suitable for parental guidance
maxAdContentRating: MaxAdContentRating.PG,
// Indicates that you want your content treated as child-directed for purposes of COPPA.
tagForChildDirectedTreatment: true,
// Indicates that you want the ad request to be handled in a
// manner suitable for users under the age of consent.
tagForUnderAgeOfConsent: true,
// An array of test device IDs to allow.
testDeviceIdentifiers: ['EMULATOR'],
})
.then(() => {
// Request config successfully set!
});
```
To learn more about the request configuration settings, view the [`RequestConfiguration`](/reference/admob/requestconfiguration) documentation.
### Initialize the Google Mobile Ads SDK
Before loading ads, have your app initialize the Google Mobile Ads SDK by calling `initialize` which initializes the SDK and returns a promise once initialization is complete (or after a 30-second timeout).
This needs to be done only once, ideally at app launch.
> ⚠️ **Warning:** Ads may be preloaded by the Mobile Ads SDK or mediation partner SDKs upon calling `initialize`.
> If you need to obtain consent from users in the European Economic Area (EEA), set any request-specific flags (such as tagForChildDirectedTreatment), or otherwise take action before loading ads, ensure you do so before initializing the Mobile Ads SDK.
```js
import mobileAds from 'new-react-native-google-mobile-ads';
mobileAds()
.initialize()
.then(adapterStatuses => {
// Initialization complete!
});
```
If you are using mediation, you may wish to wait until the promise is settled before loading ads, as this will ensure that all mediation adapters are initialized.
### Enable SKAdNetwork to track conversions (iOS)
The Google Mobile Ads SDK supports conversion tracking using Apple's SKAdNetwork, which lets Google and participating third-party buyers attribute an app install even when the IDFA is not available.
Within your projects `app.json`/`app.config.js` file, add the advised [SKAdNetwork identifiers](https://developers.google.com/ad-manager/mobile-ads-sdk/ios/3p-skadnetworks):
#### app.json
```json
{
"new-react-native-google-mobile-ads": {
"android_app_id": "ca-app-pub-xxxxxxxx~xxxxxxxx",
"ios_app_id": "ca-app-pub-xxxxxxxx~xxxxxxxx",
"sk_ad_network_items": [
"cstr6suwn9.skadnetwork",
"4fzdc2evr5.skadnetwork",
"4pfyvq9l8r.skadnetwork",
"2fnua5tdw4.skadnetwork",
"ydx93a7ass.skadnetwork",
"5a6flpkh64.skadnetwork",
"p78axxw29g.skadnetwork",
"v72qych5uu.skadnetwork",
"ludvb6z3bs.skadnetwork",
"cp8zw746q7.skadnetwork",
"3sh42y64q3.skadnetwork",
"c6k4g5qg8m.skadnetwork",
"s39g8k73mm.skadnetwork",
"3qy4746246.skadnetwork",
"f38h382jlk.skadnetwork",
"hs6bdukanm.skadnetwork",
"v4nxqhlyqp.skadnetwork",
"wzmmz9fp6w.skadnetwork",
"yclnxrl5pm.skadnetwork",
"t38b2kh725.skadnetwork",
"7ug5zh24hu.skadnetwork",
"gta9lk7p23.skadnetwork",
"vutu7akeur.skadnetwork",
"y5ghdn5j9k.skadnetwork",
"n6fk4nfna4.skadnetwork",
"v9wttpbfk9.skadnetwork",
"n38lu8286q.skadnetwork",
"47vhws6wlr.skadnetwork",
"kbd757ywx3.skadnetwork",
"9t245vhmpl.skadnetwork",
"eh6m2bh4zr.skadnetwork",
"a2p9lx4jpn.skadnetwork",
"22mmun2rn5.skadnetwork",
"4468km3ulz.skadnetwork",
"2u9pt9hc89.skadnetwork",
"8s468mfl3y.skadnetwork",
"klf5c3l5u5.skadnetwork",
"ppxm28t8ap.skadnetwork",
"ecpz2srf59.skadnetwork",
"uw77j35x4d.skadnetwork",
"pwa73g5rt2.skadnetwork",
"mlmmfzh3r3.skadnetwork",
"578prtvx9j.skadnetwork",
"4dzt52r2t5.skadnetwork",
"e5fvkxwrpn.skadnetwork",
"8c4e2ghe7u.skadnetwork",
"zq492l623r.skadnetwork",
"3rd42ekr43.skadnetwork",
"3qcr597p9d.skadnetwork"
]
}
}
```
#### app.config.js
```js
module.exports = {
'new-react-native-google-mobile-ads': {
android_app_id: 'ca-app-pub-xxxxxxxx~xxxxxxxx',
ios_app_id: 'ca-app-pub-xxxxxxxx~xxxxxxxx',
sk_ad_network_items: [
// list of network ids removed to avoid duplication
// please refer to the list in the `app.jaon` configuration section for the list of
// network ids you should include here and paste them into your `app.config.js` file
],
},
};
```
### App Tracking Transparency (iOS)
Apple requires apps to display the App Tracking Transparency authorization request for accessing the IDFA (leaving the choice to the user, whether to use personalized or non-personalized ads).
Within your projects `app.json` or `app.config.js` file, you have to use the `user_tracking_usage_description` to describe your usage:
#### app.json
```json
{
"new-react-native-google-mobile-ads": {
"android_app_id": "ca-app-pub-xxxxxxxx~xxxxxxxx",
"ios_app_id": "ca-app-pub-xxxxxxxx~xxxxxxxx",
"user_tracking_usage_description": "This identifier will be used to deliver personalized ads to you."
}
}
```
#### app.config.js
```js
module.exports = {
'new-react-native-google-mobile-ads': {
android_app_id: 'ca-app-pub-xxxxxxxx~xxxxxxxx',
ios_app_id: 'ca-app-pub-xxxxxxxx~xxxxxxxx',
user_tracking_usage_description:
'This identifier will be used to deliver personalized ads to you.',
},
};
```
To request the App Tracking Transparency authorization we recommend using the [react-native-permissions](https://github.com/zoontek/react-native-permissions) library or making it part of the UMP consent flow [European User Consent page](/european-user-consent).
```js
import { check, request, PERMISSIONS, RESULTS } from 'react-native-permissions';
const result = await check(PERMISSIONS.IOS.APP_TRACKING_TRANSPARENCY);
if (result === RESULTS.DENIED) {
// The permission has not been requested, so request it.
await request(PERMISSIONS.IOS.APP_TRACKING_TRANSPARENCY);
}
const adapterStatuses = await mobileAds().initialize();
// Now ads can be loaded.
```
### European User Consent
Out of the box, AdMob does not handle any related regulations which you may need to enforce on your application.
It is up to the developer to implement and handle this on a user-by-user basis. You must consent to EEA users
being served both personalized and non-personalized adverts before showing them. For more information, see
[Obtaining Consent with the User Messaging Platform](https://developers.google.com/admob/ump/android/quick-start).
The AdMob module provides a `AdsConsent` helper to help developers quickly implement consent flows within their application.
See the [European User Consent page](/european-user-consent) for full examples of how to integrate the helper into your application.
### Test ads
Whilst developing your app with AdMob, you'll want to make sure you use test ads rather than production ads from your
Google AdMob account - otherwise your account may be disabled!
Although usage of different advert types is explained later, when creating your adverts the "Ad Unit ID" being used whilst
testing can be set to a testing ID. The code snippet below shows how to initialize each advert type with a test ID:
```jsx
import { AppOpenAd, InterstitialAd, RewardedAd, BannerAd, TestIds } from 'new-react-native-google-mobile-ads';
# App Open
AppOpenAd.createForAdRequest(TestIds.APP_OPEN);
# Interstitial
InterstitialAd.createForAdRequest(TestIds.INTERSTITIAL);
# Rewarded
RewardedAd.createForAdRequest(TestIds.REWARDED);
# Banners
```
## Next Steps
Now the basics of setting up and configuring AdMob have been explained, we can go ahead and start to display different
adverts to our users. The AdMob module provides integration with three different types:
- [App Open Ads](/displaying-ads#app-open-ads)
- [Interstitial Ads](/displaying-ads#interstitial-ads)
- [Rewarded Ads](/displaying-ads#rewarded-ads)
- [Banner Ads](/displaying-ads#banner-ads)