1
2
3
4
5
6
7
8
9
10
11
12
13
14
15
16
17
18
19
20
21
22
23
24
25
26
27
28
29
30
31
32
33
34
35
36
37
38
39
40
41
42
43
44
45
46
47
48
49
50
51
52
53
54
55
56
57
58
59
60
61
62
63
64
65
66
67
68
69
70
71
72
73
74
75
76
77
78
79
80
81
82
83
84
85
86
87
88
89
90
91
92
93
94
95
96
97
98
99
100
101
102
103
104
105
106
107
108
109
110
111
112
113
114
115
116
117
118
119
120
121
122
123
124
125
126
127
128
129
130
131
132
133
134
135
136
137
138
139
140
141
142
143
144
145
146
147
148
149
150
151
152
153
154
155
156
157
158
| '''
Author: muggledy
Date: 2021.7.19
'''
import win32gui
import sys,io,os.path,time
import cv2
import numpy as np
import PIL.Image as PILImage
import pytesseract as OCR
from PIL import ImageGrab
from PyQt5.QtWidgets import QApplication
from PyQt5.QtCore import QBuffer
from pynput.keyboard import Key,Controller
from pprint import pprint
def QImage2PILImage(img):
buffer = QBuffer()
buffer.open(QBuffer.ReadWrite)
img.save(buffer, "PNG")
return PILImage.open(io.BytesIO(buffer.data()))
def _hwnd_callback(hwnd,container):
if win32gui.IsWindow(hwnd) and win32gui.IsWindowEnabled(hwnd) and win32gui.IsWindowVisible(hwnd):
container.update({hwnd:[win32gui.GetClassName(hwnd),win32gui.GetWindowText(hwnd)]} if win32gui.GetWindowText(hwnd)!='' else {})
def GetAllHwndAndClsTitles():
hwnd_dict = {}
win32gui.EnumWindows(_hwnd_callback, hwnd_dict)
return hwnd_dict
def GetYourWantedHwnd():
d=GetAllHwndAndClsTitles()
pprint(d)
hwnd=int(input('Select your wanted hwnd: '))
print(d[hwnd])
return hwnd,d[hwnd]
def GetScreenshotOfApp(hwnd):
return ImageGrab.grab(win32gui.GetWindowRect(hwnd))
def CutImg(img,point1,point2):
min_x = min(point1[0], point2[0])
min_y = min(point1[1], point2[1])
max_x = max(point1[0], point2[0])
max_y = max(point1[1], point2[1])
return img[min_y:max_y , min_x:max_x]
def VecPosCal(vecs):
indx=np.argsort(vecs[:,0])
indy=np.argsort(vecs[:,1])
return {'lu':(set(indx[:2])&set(indy[:2])).pop(),'rb':(set(indx[2:])&set(indy[2:])).pop(),'lb':(set(indx[:2])&set(indy[2:])).pop(),'ru':(set(indx[2:])&set(indy[:2])).pop()}
def FindWrapperRectangle(vecs):
min_x=vecs[:,0].min()
max_x=vecs[:,0].max()
min_y=vecs[:,1].min()
max_y=vecs[:,1].max()
return np.array([[min_x,min_y],[max_x,min_y],[max_x,max_y],[min_x,max_y]])
def FilteWordContours(contours):
def rule(contour):
t=contour[2][0][1]-contour[0][0][1]
return False if t<12 or t>19 else True
return list(filter(rule,contours))
def SortWordContours(contours,game_shape):
z=np.array([game_shape[0]/2,game_shape[1]])
def keys(contour):
t=(contour[0]+contour[2])/2
return np.sqrt(((z-t)**2).sum())
return sorted(contours,key=keys)
def KeyClick(c):
keyboard.press(c)
keyboard.release(c)
def NormText(text):
return ''.join([i for i in text if (ord('a')<=ord(i)<=ord('z') or ord('A')<=ord(i)<=ord('Z'))])
hwnd = GetYourWantedHwnd()[0]
game_position=None
keyboard = Controller()
cv2.namedWindow('Win of ROI')
while cv2.waitKey(300) & 0xFF != 27:
screenshot = GetScreenshotOfApp(hwnd)
screenshot = cv2.cvtColor(np.asarray(screenshot),cv2.COLOR_RGB2BGR)
if game_position is None:
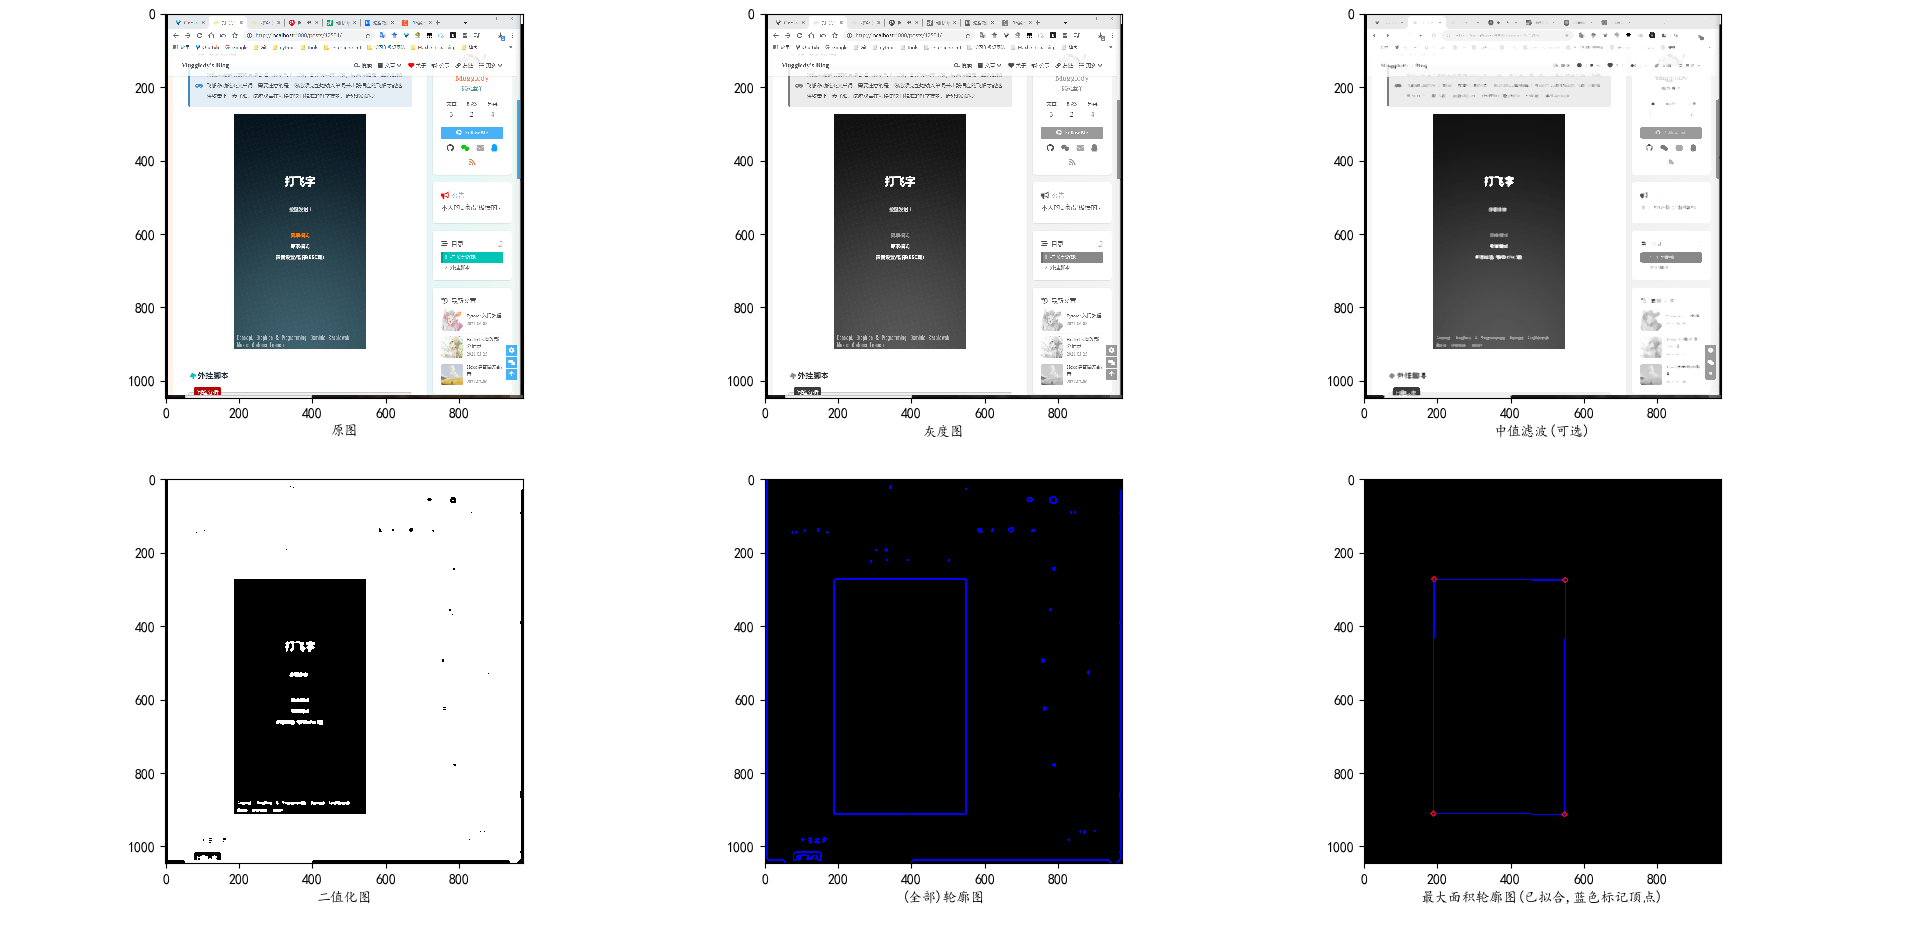
screenshot_gray = cv2.cvtColor(screenshot,cv2.COLOR_BGR2GRAY)
screenshot_median = cv2.medianBlur(screenshot_gray, 7)
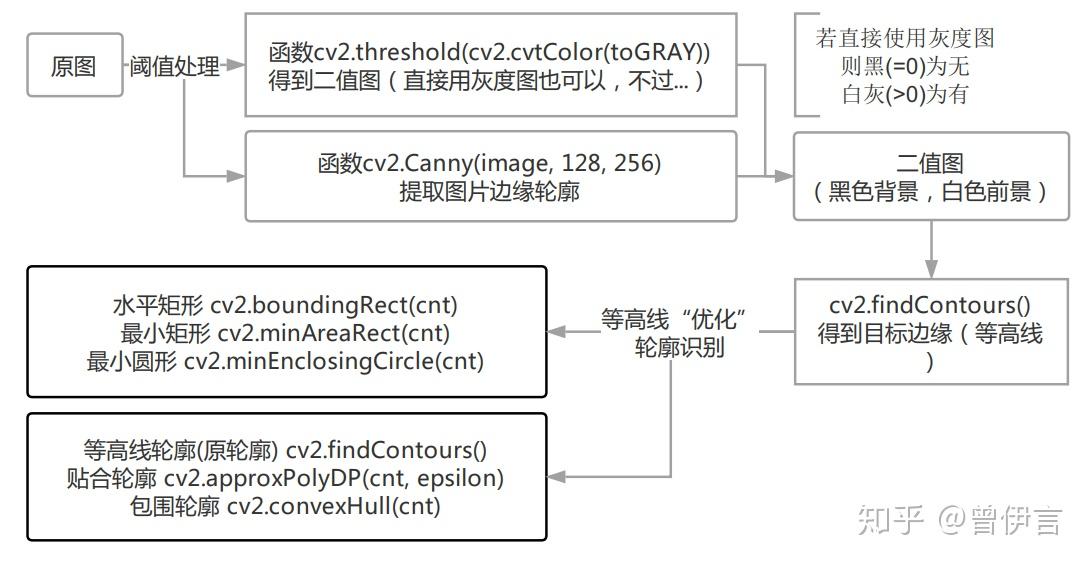
_,screenshot_threshold = cv2.threshold(screenshot_median, 90,255,cv2.THRESH_BINARY)
canny=cv2.Canny(screenshot_threshold,100,200)
contours, hierarchy = cv2.findContours(canny,cv2.RETR_EXTERNAL,cv2.CHAIN_APPROX_SIMPLE)
max_contour_ind = np.argsort([cv2.contourArea(c) for c in contours])[-1]
polyvec = cv2.approxPolyDP(contours[max_contour_ind],32,True)
t=polyvec.squeeze()
if len(t)!=4:
screenshot_contours=np.zeros_like(screenshot)
cv2.drawContours(screenshot_contours,contours,-1,(0,0,255),3)
cv2.polylines(screenshot_contours, [polyvec], True, (255, 0, 0), 2)
cv2.imshow('Win of ROI', screenshot_contours)
continue
z=VecPosCal(t)
game_position = (min([t[z['lu']][0],t[z['lb']][0]]),min([t[z['lu']][1],t[z['ru']][1]])),(max([t[z['ru']][0],t[z['rb']][0]]),max([t[z['lb']][1],t[z['rb']][1]]))
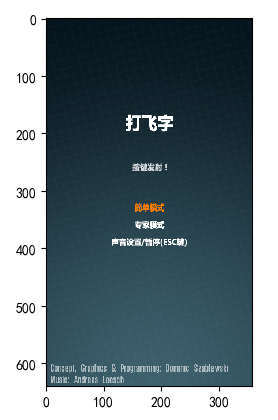
cuttedgameimg = CutImg(screenshot,*game_position)
'''
contours, hierarchy = cv2.findContours(cv2.Canny(cv2.threshold(cv2.medianBlur(cv2.cvtColor(cuttedgameimg,cv2.COLOR_BGR2GRAY), 5), 200,255,cv2.THRESH_BINARY)[1],100,200),cv2.RETR_EXTERNAL,cv2.CHAIN_APPROX_SIMPLE)
cv2.drawContours(cuttedgameimg,contours,-1,(0,0,255),3)
'''
'''
cuttedgameimg_gray=cv2.cvtColor(cuttedgameimg,cv2.COLOR_BGR2GRAY)
cuttedgameimg_median=cv2.medianBlur(cuttedgameimg_gray, 5) #must do this to alleviate noise
cuttedgameimg_median[cuttedgameimg_gray>=255]=255 #i would call this the strongest assistance, you can delete it and observe
cuttedgameimg_threshold=cv2.threshold(cuttedgameimg_median, 250,255,cv2.THRESH_BINARY)[1]
contours, hierarchy = cv2.findContours(cv2.Canny(cuttedgameimg_threshold,100,200),cv2.RETR_EXTERNAL,cv2.CHAIN_APPROX_SIMPLE)
cv2.drawContours(cuttedgameimg,contours,-1,(0,0,255),3)
'''
cuttedgameimg_gray=cv2.cvtColor(cuttedgameimg,cv2.COLOR_BGR2GRAY)
cuttedgameimg_threshold=cv2.threshold(cuttedgameimg_gray, 250,255,cv2.THRESH_BINARY)[1]
cuttedgameimg_dilate = cv2.dilate(cuttedgameimg_threshold, np.ones((7, 7), dtype=np.uint8), 40)
contours, hierarchy = cv2.findContours(cv2.Canny(cuttedgameimg_dilate,100,200),cv2.RETR_EXTERNAL,cv2.CHAIN_APPROX_SIMPLE)
contours = [FindWrapperRectangle(vecs.squeeze())[:,None,...] for vecs in contours if vecs.shape[0]>2]
contours = FilteWordContours(contours)
sorted_contours=SortWordContours(contours,(game_position[1][0]-game_position[0][0],game_position[1][1]-game_position[0][1]))
cv2.drawContours(cuttedgameimg,contours,-1,(0,0,255),3)
for i,contour in enumerate(sorted_contours,1):
cv2.putText(cuttedgameimg,str(i),contour[0][0],cv2.FONT_HERSHEY_SIMPLEX,0.5,(255,0,0),2)
cv2.imshow('Win of ROI', np.hstack((np.rollaxis(np.broadcast_to(cuttedgameimg_threshold,(cuttedgameimg.shape[2],*cuttedgameimg_threshold.shape)),0,3),cuttedgameimg)))
s_c=0
for contour in (np.random.permutation(sorted_contours) if np.random.rand()>0.6 else sorted_contours):
if s_c>=2:
break
t=CutImg(cuttedgameimg_threshold,contour[0][0],contour[2][0])
s=NormText(OCR.image_to_string(t))
if s!='':
s_c+=1
print(s)
[KeyClick(c) for c in s]
cv2.imwrite(os.path.join(os.path.dirname(os.path.realpath(__file__)),'words',f'{int(round(time.time()*1000000))}.png'),t)
cv2.destroyAllWindows()
|