# maptastic
Javascript/CSS projection mapping utility with zero dependencies. Put your internets on things!
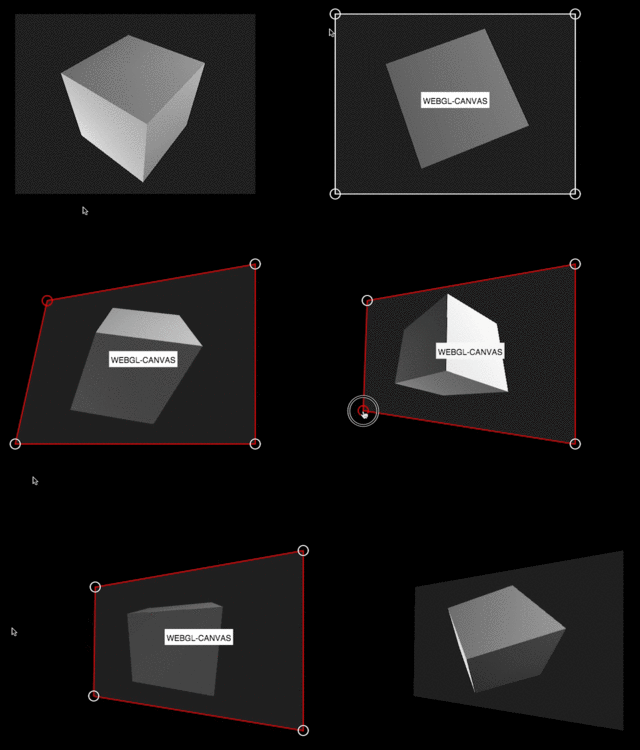
__note__:
The original author has been busy and non-responsive so this fork will serve as a way to keep the project updated.
If the author reaches out to me, I will be more than happy to go back to the [original repo](https://github.com/glowbox/maptasticjs).
## Usage
When you include `maptastic.js` in your page, a new class `maptastic.Maptastic` is defined. The first step is to instantiate Maptastic, which can be done a couple of different ways depending on your needs. For most simple cases, this only requires a _single line of code_.
[SHOW ME THE DEMO](https://glowbox.github.io/maptasticjs/example/index.html)
```html
This is pretty simple.
```
For more advanced needs, `Mapstastic` can also be imported as an ES2015 module.
```javascript
import { Maptastic } from 'maptastic';
const map = new Maptastic("so-simple");
```
## Controls
Since the idea is to have a projector aimed all crazy-like, the controls are all keyboard and mouse based since any UI would either get in the way, or would be impossible to see in most cases anyway.
`SHIFT` + `Space` Toggle edit mode
### While In Edit Mode
`click` or `drag` select and move quads/corner points
`SHIFT` + `drag` move selcted quad/corner point with 10x precision
`ALT` + `drag` rotate and scale selected quad
`SHIFT` + `ALT` + `drag` rotate and scale selected quad with 10x precision.
`Arrow keys` move selected quad/corner point
`SHIFT` + `Arrow keys` move selected quad/corner point by 10 pixels
`ALT` + `Arrow keys` rotate and scale selected quad
`'s'` Solo or unsolo the selected quad (hides all others). This helps to adjust quads when corner points are very close together.
`'c'` Toggle mouse cursor crosshairs
`'b'` Toggle display bounds/metrics
`'r'` Rotate selected layer 90 degrees clockwise
`'h'` Flip selected layer horizontally
`'v'` Flip selected layer vertically
## How about that code
### Constructor
The constructor can be used in two different ways depending on how you would like to integrate with Maptastic.
#### Option 1 - Simple Setup
Specify a list of HTML elements, element IDs, or a mix of both. These elements will all be set up as Maptastic layers and will be configurable in edit mode.
```javascript
const element2 = document.getElementById("element-id2");
new mapstastic.Maptastic("element-id1", element2, /* ... */);
```
#### Option 2 - Advanced Configuration
For more advanced useage, specify a configuration object. Available configuration properties are defined below.
```javascript
const configObject = {
autoSave: false,
autoLoad: false,
onchange: myChangeHandler,
layers: ["element-id1", "element-id2"]
};
const map = new mapstastic.Maptastic(configObject);
```
##### Configuration options
`layers` Array, default *empty*. Identical to Option 1 above, an array of IDs or HTML elements to be used as Maptastic layers.
`onchange` function, default *null*. A function to be invoked whenever the layer layout is changed (if you want to implement your own save/load functionality).
`crosshairs` boolean, default *false*. Set the default crosshairs setting for edit mode, this can be toggled at run time with the `c` key.
`labels` boolean, default *true*. When in edit mode, show the element ID as an overlay.
`autoSave` boolean, default *true*. Control the automatic saving of layer positions into local storage.
`autoLoad` boolean, default *true*. Control the automatic loading of layer positions from local storage.
### Methods
In most cases, simply instantiating Maptastic with an element or two should be fine. However, if you are doing something more complicated, the Maptastic instance exposes several methods for controlling things at run time.
#### getLayout
Returns an array of layer descriptor objects that represent the current mapping configuration. This can be helpful if you want to save the configuration to a remote database or something.
#### setLayout( _layoutData_ )
Sets the current mapping layout. The schema must match that returned from `getLayout` and is as follows:
```javascript
[
{
'id': 'some-element-id',
'sourcePoints': [
[x1, y1],
[x2, y2],
[x3, y3],
[x4, y4]
],
'targetPoints': [
[x1, y1],
[x2, y2],
[x3, y3],
[x4, y4]
]
},
// ...
]
```
#### addLayer( _target_, _coordinates_ )
Add a new HTML element to be mapped.
`target` required. HTML Element or a string representing an element ID.
`coordinates` optional. An array of four two-dimensional arrays specifying the corner points. This is the same structure as the `targetPoints` array used in `getLayout` and `setLayout`
#### setConfigEnabled( _enabled_ )
Sets the current Configuration Mode state.
`enabled` boolean, required.