# react + vite 模板项目

 [](https://github.com/thomas-void0/cta-template-admin/actions/workflows/publish.yml) [](https://github.com/thomas-void0/cta-template-admin/actions/workflows/docker.yml)
一个可以实现路由 keepAlive,具有类似浏览器访问页签功能的模板项目。
[阿里云在线预览](http://47.108.203.65) | [vercel online](https://th-template.vercel.app/)
# 模板下载使用
可以通过 npx 命令安装此项目
```shell
npx create-template-app my-app --template admin
```
# 一、权限管理
## 路由权限
1. 在`src/config/access.ts`中,同 umi 使用方式一致,配置对应权限对象。
```ts
import { InitialStateType } from "@/core/context/global";
export default function accessFactory(
initialState: InitialStateType
): Record {
// const { accessInfo } = initialState
return {
canNav1: false,
};
}
```
2. 在`src/routes/index.tsx`中,配置对应的 access key。
```ts
...
path: 'brandManage',
name: '品牌管理',
access: 'canNav1', // 对应的key
icon: ,
layout: {
topItemRender: false
},
...
```
## 组件权限
在`src/core/Access`中:
1. `Access`组件:用于判断返回的 key,是否包含在后端的权限列表中,进而是否渲染传入的`children`
```tsx
```
2. `useAccess`hook:返回对应的 access key 是否包含在后端返回的权限列表中。
```ts
const noticeUpdateAuth = useAccess("notice-update");
```
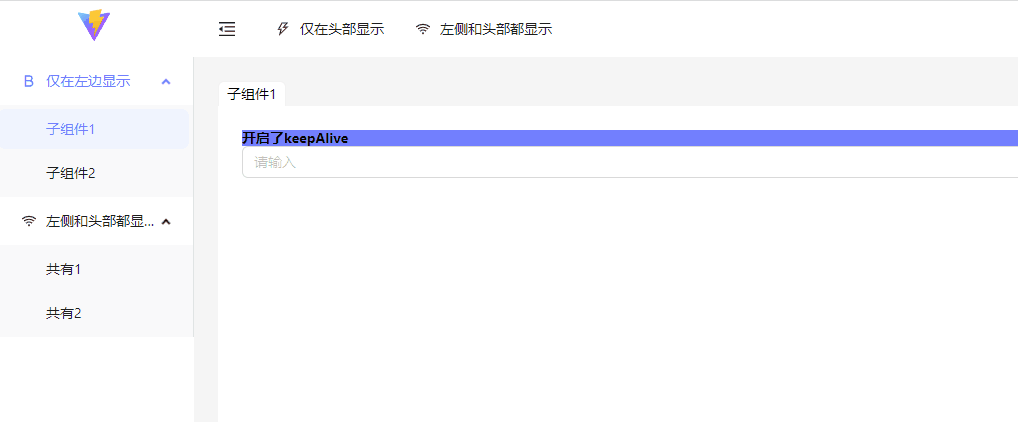
# 二、keepAlive
**注意:**
1. **为了稳定起见 keepAlive 仅仅针对路由级别生效。**
2. **默认不会开启 keepAlive**
3. **keepAlive 最多缓存的组件数,默认为 10 个,超过最大数量后会直接删除第一个缓存的组件。**(可以在 core.ts 中配置 maxLength 来扩大缓存容积)
开启方法:
在路由配置中增加`keepAlive:true`选项。
```ts
{
path: 'brandRule',
name: '品牌规则',
keepAlive: true, // 开启
element: lazyLoad(lazy(() => import('@/pages/BrandManage/BrandRule')))
},
```
# 三、页签功能
默认开启页签功能,如果需要关闭此功能。在`core.ts`中配置`isTab: false`。
页签支持拖拽,刷新,关闭等操作。
# 四、环境变量使用
访问: `getEnv()`
在项目根目录下,配置了三种环境文件`.env.development`,`.env.test`,`.env.production`。分别对应本地、测试、生产三个环境。里面已经配置了相应的环境变量和`gateway地址`。
如需更多配置,直接增加对应的字段即可。为了更加友好的提示,增加对应字段后,在`src/typings/vite-env.d.ts`中加入新增字段的类型。
```ts
interface ImportMetaEnv {
readonly VITE_NODE_ENV: "development" | "test" | "production";
readonly VITE_PREFIX_URL: string;
}
```
# 五、接口请求
在`src/core/service`中封装了`request`和`requestLegacy`两个请求实例。分别针对`gateway`接口和之前走`nginx`代理的接口。
# 六、开发代理
在`vite.config.ts`中增加自定义代理即可。
```js
...
server: {
host: '127.0.0.1',
port: 3000,
open: true,
proxy: {
'/api': {
target: proxyTarget.api,
changeOrigin: true
},
'/user': {
target: proxyTarget.nr,
changeOrigin: true
}
}
}
...
```
[](https://github.com/thomas-void0/cta-template-admin/actions/workflows/publish.yml) [](https://github.com/thomas-void0/cta-template-admin/actions/workflows/docker.yml)
一个可以实现路由 keepAlive,具有类似浏览器访问页签功能的模板项目。
[阿里云在线预览](http://47.108.203.65) | [vercel online](https://th-template.vercel.app/)

# 模板下载使用
可以通过 npx 命令安装此项目
```shell
npx create-template-app my-app --template admin
```
# 一、权限管理
## 路由权限
1. 在`src/config/access.ts`中,同 umi 使用方式一致,配置对应权限对象。
```ts
import { InitialStateType } from "@/core/context/global";
export default function accessFactory(
initialState: InitialStateType
): Record {
// const { accessInfo } = initialState
return {
canNav1: false,
};
}
```
2. 在`src/routes/index.tsx`中,配置对应的 access key。
```ts
...
path: 'brandManage',
name: '品牌管理',
access: 'canNav1', // 对应的key
icon: ,
layout: {
topItemRender: false
},
...
```
## 组件权限
在`src/core/Access`中:
1. `Access`组件:用于判断返回的 key,是否包含在后端的权限列表中,进而是否渲染传入的`children`
```tsx
```
2. `useAccess`hook:返回对应的 access key 是否包含在后端返回的权限列表中。
```ts
const noticeUpdateAuth = useAccess("notice-update");
```
# 二、keepAlive
**注意:**
1. **为了稳定起见 keepAlive 仅仅针对路由级别生效。**
2. **默认不会开启 keepAlive**
3. **keepAlive 最多缓存的组件数,默认为 10 个,超过最大数量后会直接删除第一个缓存的组件。**(可以在 core.ts 中配置 maxLength 来扩大缓存容积)
开启方法:
在路由配置中增加`keepAlive:true`选项。
```ts
{
path: 'brandRule',
name: '品牌规则',
keepAlive: true, // 开启
element: lazyLoad(lazy(() => import('@/pages/BrandManage/BrandRule')))
},
```
# 三、页签功能
默认开启页签功能,如果需要关闭此功能。在`core.ts`中配置`isTab: false`。
页签支持拖拽,刷新,关闭等操作。
# 四、环境变量使用
访问: `getEnv()`
在项目根目录下,配置了三种环境文件`.env.development`,`.env.test`,`.env.production`。分别对应本地、测试、生产三个环境。里面已经配置了相应的环境变量和`gateway地址`。
如需更多配置,直接增加对应的字段即可。为了更加友好的提示,增加对应字段后,在`src/typings/vite-env.d.ts`中加入新增字段的类型。
```ts
interface ImportMetaEnv {
readonly VITE_NODE_ENV: "development" | "test" | "production";
readonly VITE_PREFIX_URL: string;
}
```
# 五、接口请求
在`src/core/service`中封装了`request`和`requestLegacy`两个请求实例。分别针对`gateway`接口和之前走`nginx`代理的接口。
# 六、开发代理
在`vite.config.ts`中增加自定义代理即可。
```js
...
server: {
host: '127.0.0.1',
port: 3000,
open: true,
proxy: {
'/api': {
target: proxyTarget.api,
changeOrigin: true
},
'/user': {
target: proxyTarget.nr,
changeOrigin: true
}
}
}
...
```