---
title: Single Sign-On
description: >-
Facilitate greater security, easier account management, and accelerated
application onboarding and adoption.
showNextPage: true
originalPath: .tmp-workos-clone/packages/docs/content/sso/index.mdx
---
## Choose your integration approach
There are two ways to integrate Single Sign-On (SSO) with WorkOS:
### (A) With the standalone SSO API
The standalone API (covered in this document), is a standalone API for integrating into an existing auth stack.
### (B) Using WorkOS AuthKit
[AuthKit](/authkit) is a complete authentication platform which includes SSO out of the box.
## How Single Sign-On works
Single Sign-On is the most frequently asked for requirement by organizations looking to adopt new SaaS applications. SSO enables authentication via an organization’s [identity provider (IdP)](/glossary/idp).
This service is compatible with any IdP that supports either the [SAML](/glossary/saml) or [OIDC](/glossary/oidc) protocols. It’s modeled to meet the [OAuth 2.0](/glossary/oauth-2-0) framework specification, abstracting away the underlying authentication handshakes between different IdPs.
[border=false]
WorkOS SSO API acts as authentication middleware and intentionally does not handle user database management for your application.
## What you’ll build
In this guide, we’ll take you from learning about Single Sign-On and POC-ing all the way through to authenticating your first user via the WorkOS SSO API.
## Before getting started
To get the most out of this guide, you’ll need:
- A [WorkOS account](https://dashboard.workos.com/)
- A local app to integrate SSO with.
Reference these [example apps](/sso/example-apps) as you follow this guide.
## API object definitions
[Connection](/reference/sso/connection)
: The method by which a group of users (typically in a single organization) sign in to your application.
[Profile](/reference/sso/profile)
: Represents an authenticated user. The Profile object contains information relevant to a user in the form of normalized and raw attributes.
## (1) Add SSO to your app
Let’s build the SSO authentication workflow into your app.
### Install the WorkOS SDK
WorkOS offers native SDKs in several popular programming languages. Choose a language below to see instructions in your application’s language.
Install the SDK using the command below.
### Set secrets
To make calls to WorkOS, provide the API key and, in some cases, the client ID. Store these values as managed secrets, such as `WORKOS_API_KEY` and `WORKOS_CLIENT_ID`, and pass them to the SDKs either as environment variables or directly in your app’s configuration based on your preferences.
```plain title="Environment variables"
WORKOS_API_KEY='sk_example_123456789'
WORKOS_CLIENT_ID='client_123456789'
```
> The code examples use your staging API keys when [signed in](https://dashboard.workos.com)
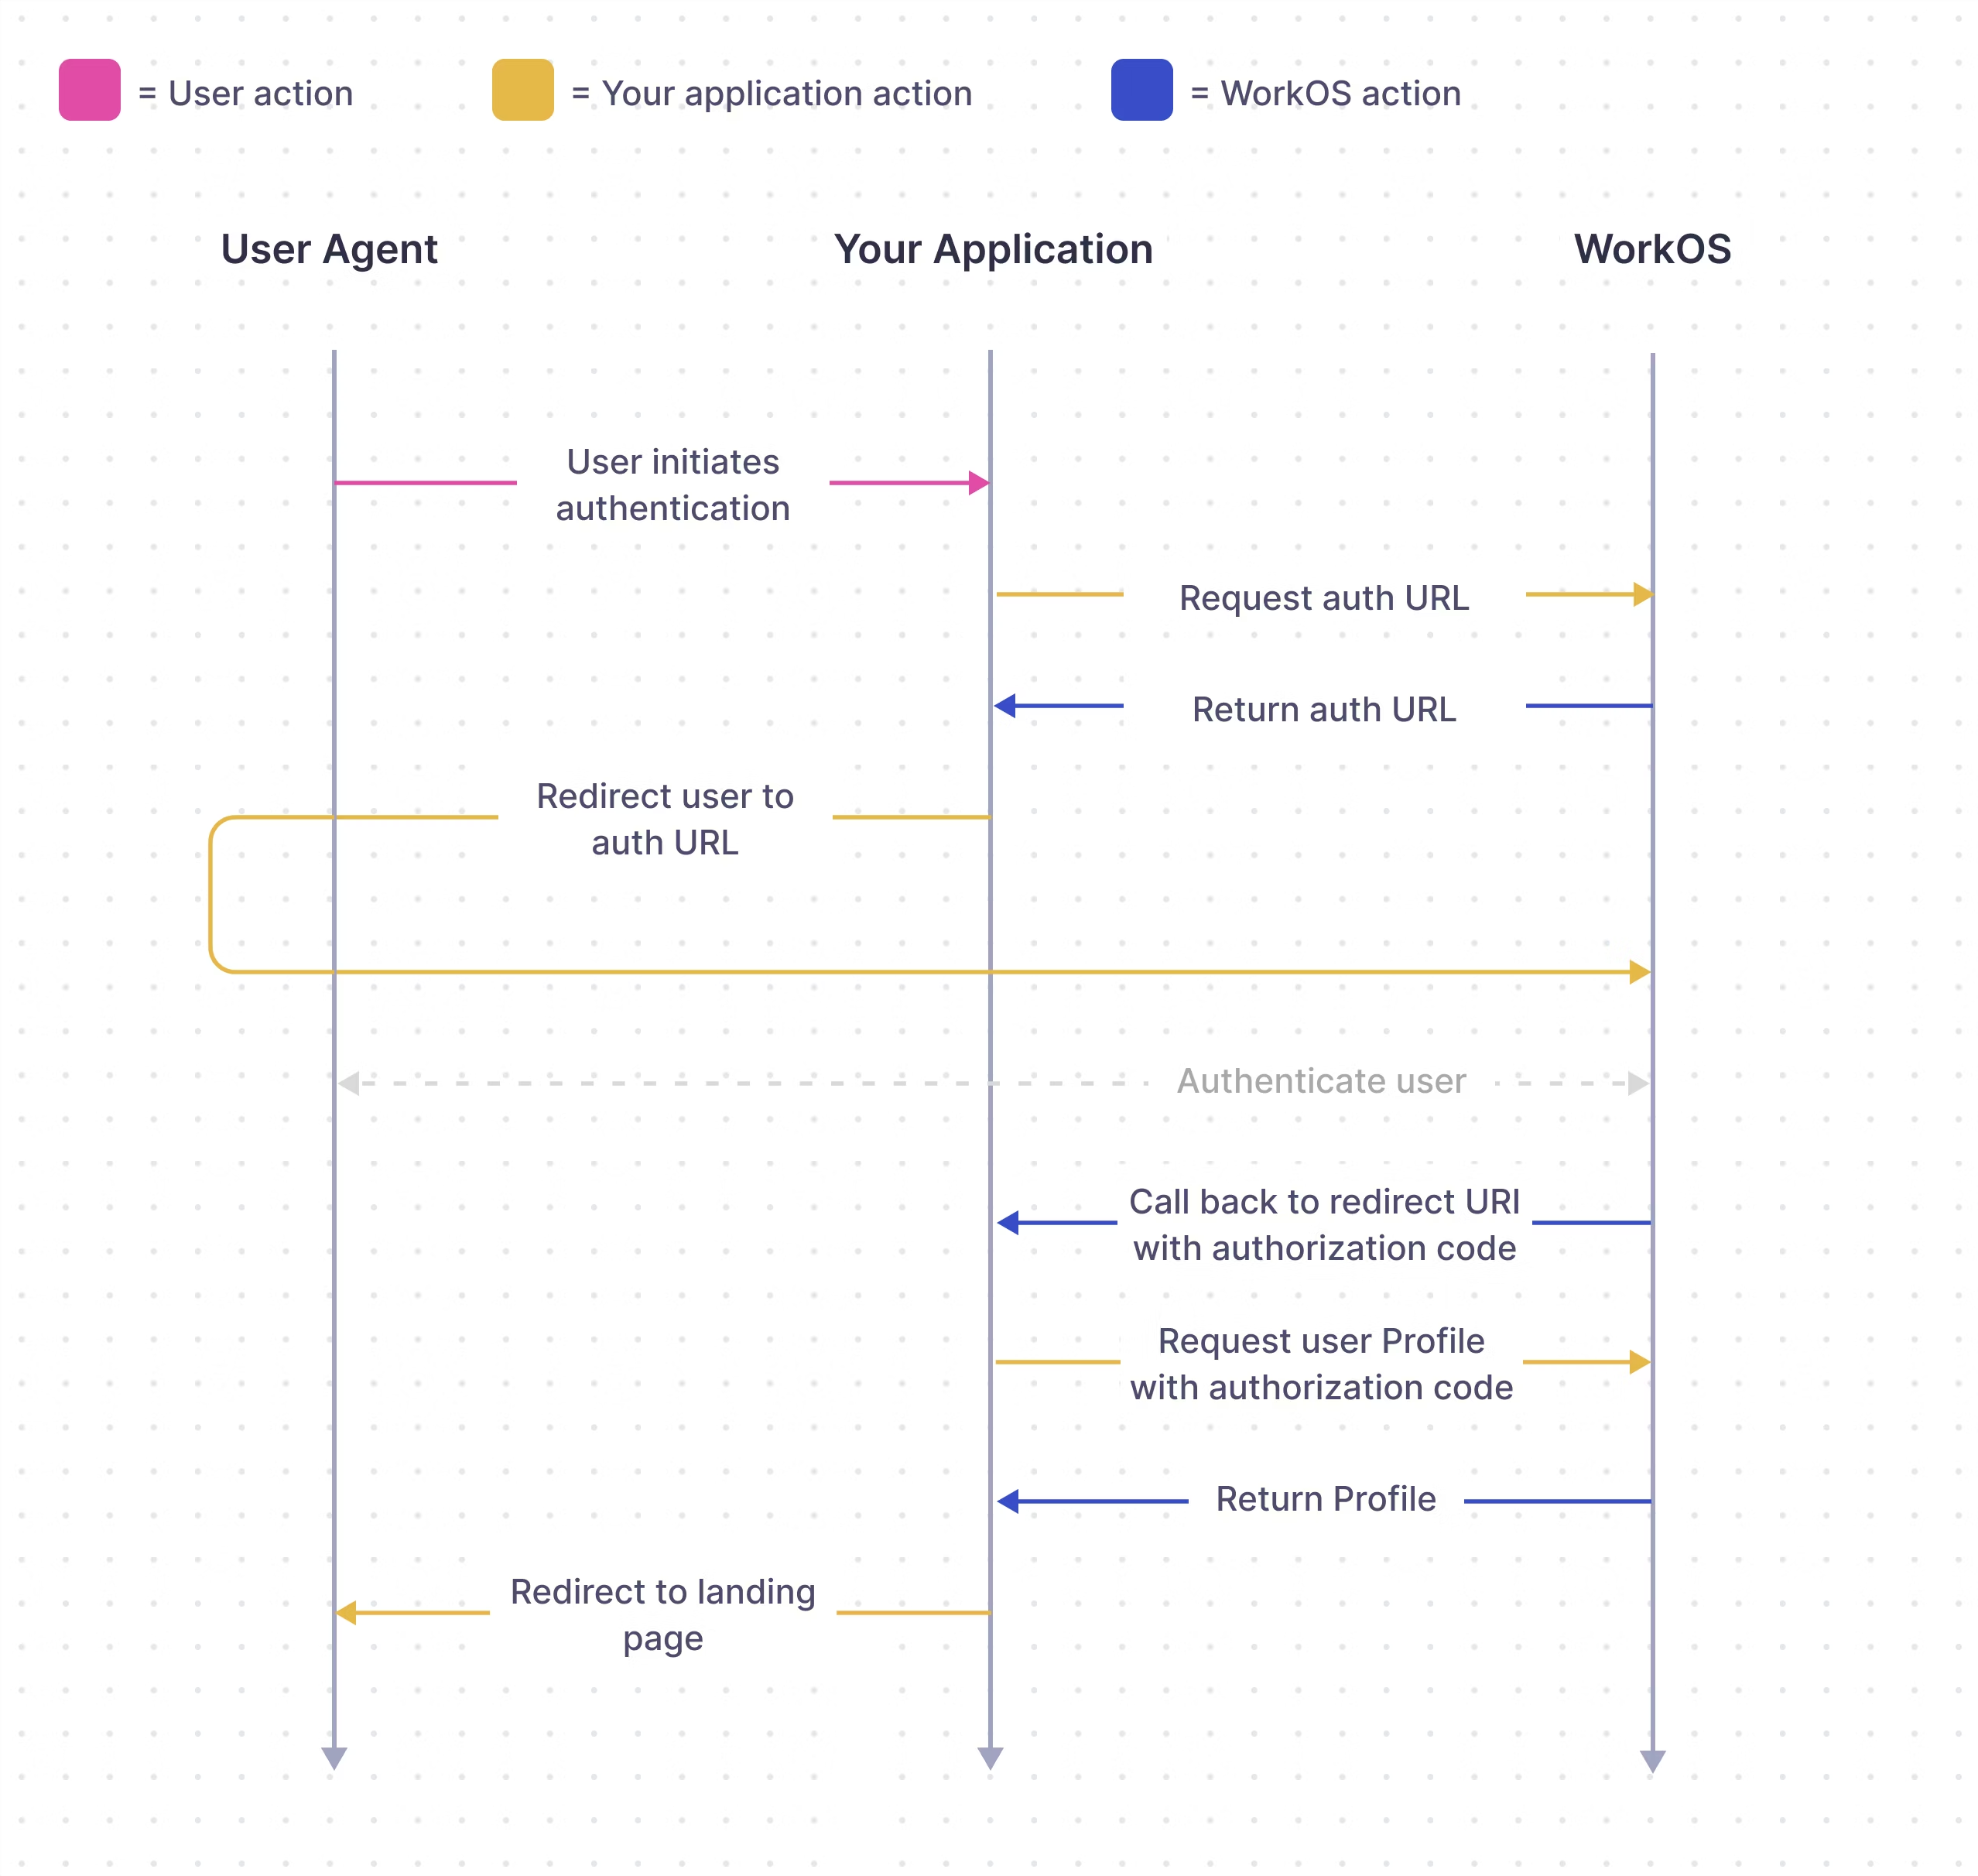
### Add an endpoint to initiate SSO
The endpoint to initiate SSO via the WorkOS API is responsible for handing off the rest of the authentication workflow to WorkOS. There are a couple configuration options shown below.
You can use the optional `state` parameter to encode arbitrary information to help restore application state between redirects.
- | Using organization ID
Use the organization parameter when authenticating a user by their specific organization. This is the preferred parameter for SAML and OIDC connections.
The example below uses the Test Organization that is available in your staging environment and uses a mock identity provider. It’s created to help you test your SSO integration without having to go through the process of setting up an account with a real identity provider.
- | Using connection ID
You can also use the connection parameter for SAML or OIDC connections when authenticating a user by their connection ID.
- | Using provider
The provider parameter is used for OAuth connections which are configured at the environment level.
> The supported `provider` values are `GoogleOAuth`, `MicrosoftOAuth`, `GitHubOAuth`, and `AppleOAuth`.
If there is an issue generating an authorization URL, WorkOS will return the redirect URI as is. Read the [API Reference](/reference/sso/get-authorization-url) for more details.
### Add a callback endpoint
Next, let’s add the redirect endpoint which will handle the callback from WorkOS after a user has authenticated with their identity provider. This endpoint should exchange the authorization code returned by WorkOS with the authenticated user’s profile. The authorization code is valid for 10 minutes.
When adding your callback endpoint, it is important to always validate the returned profile’s organization ID. It’s unsafe to validate using email domains as organizations might allow email addresses from outside their corporate domain (e.g. for guest users).
---
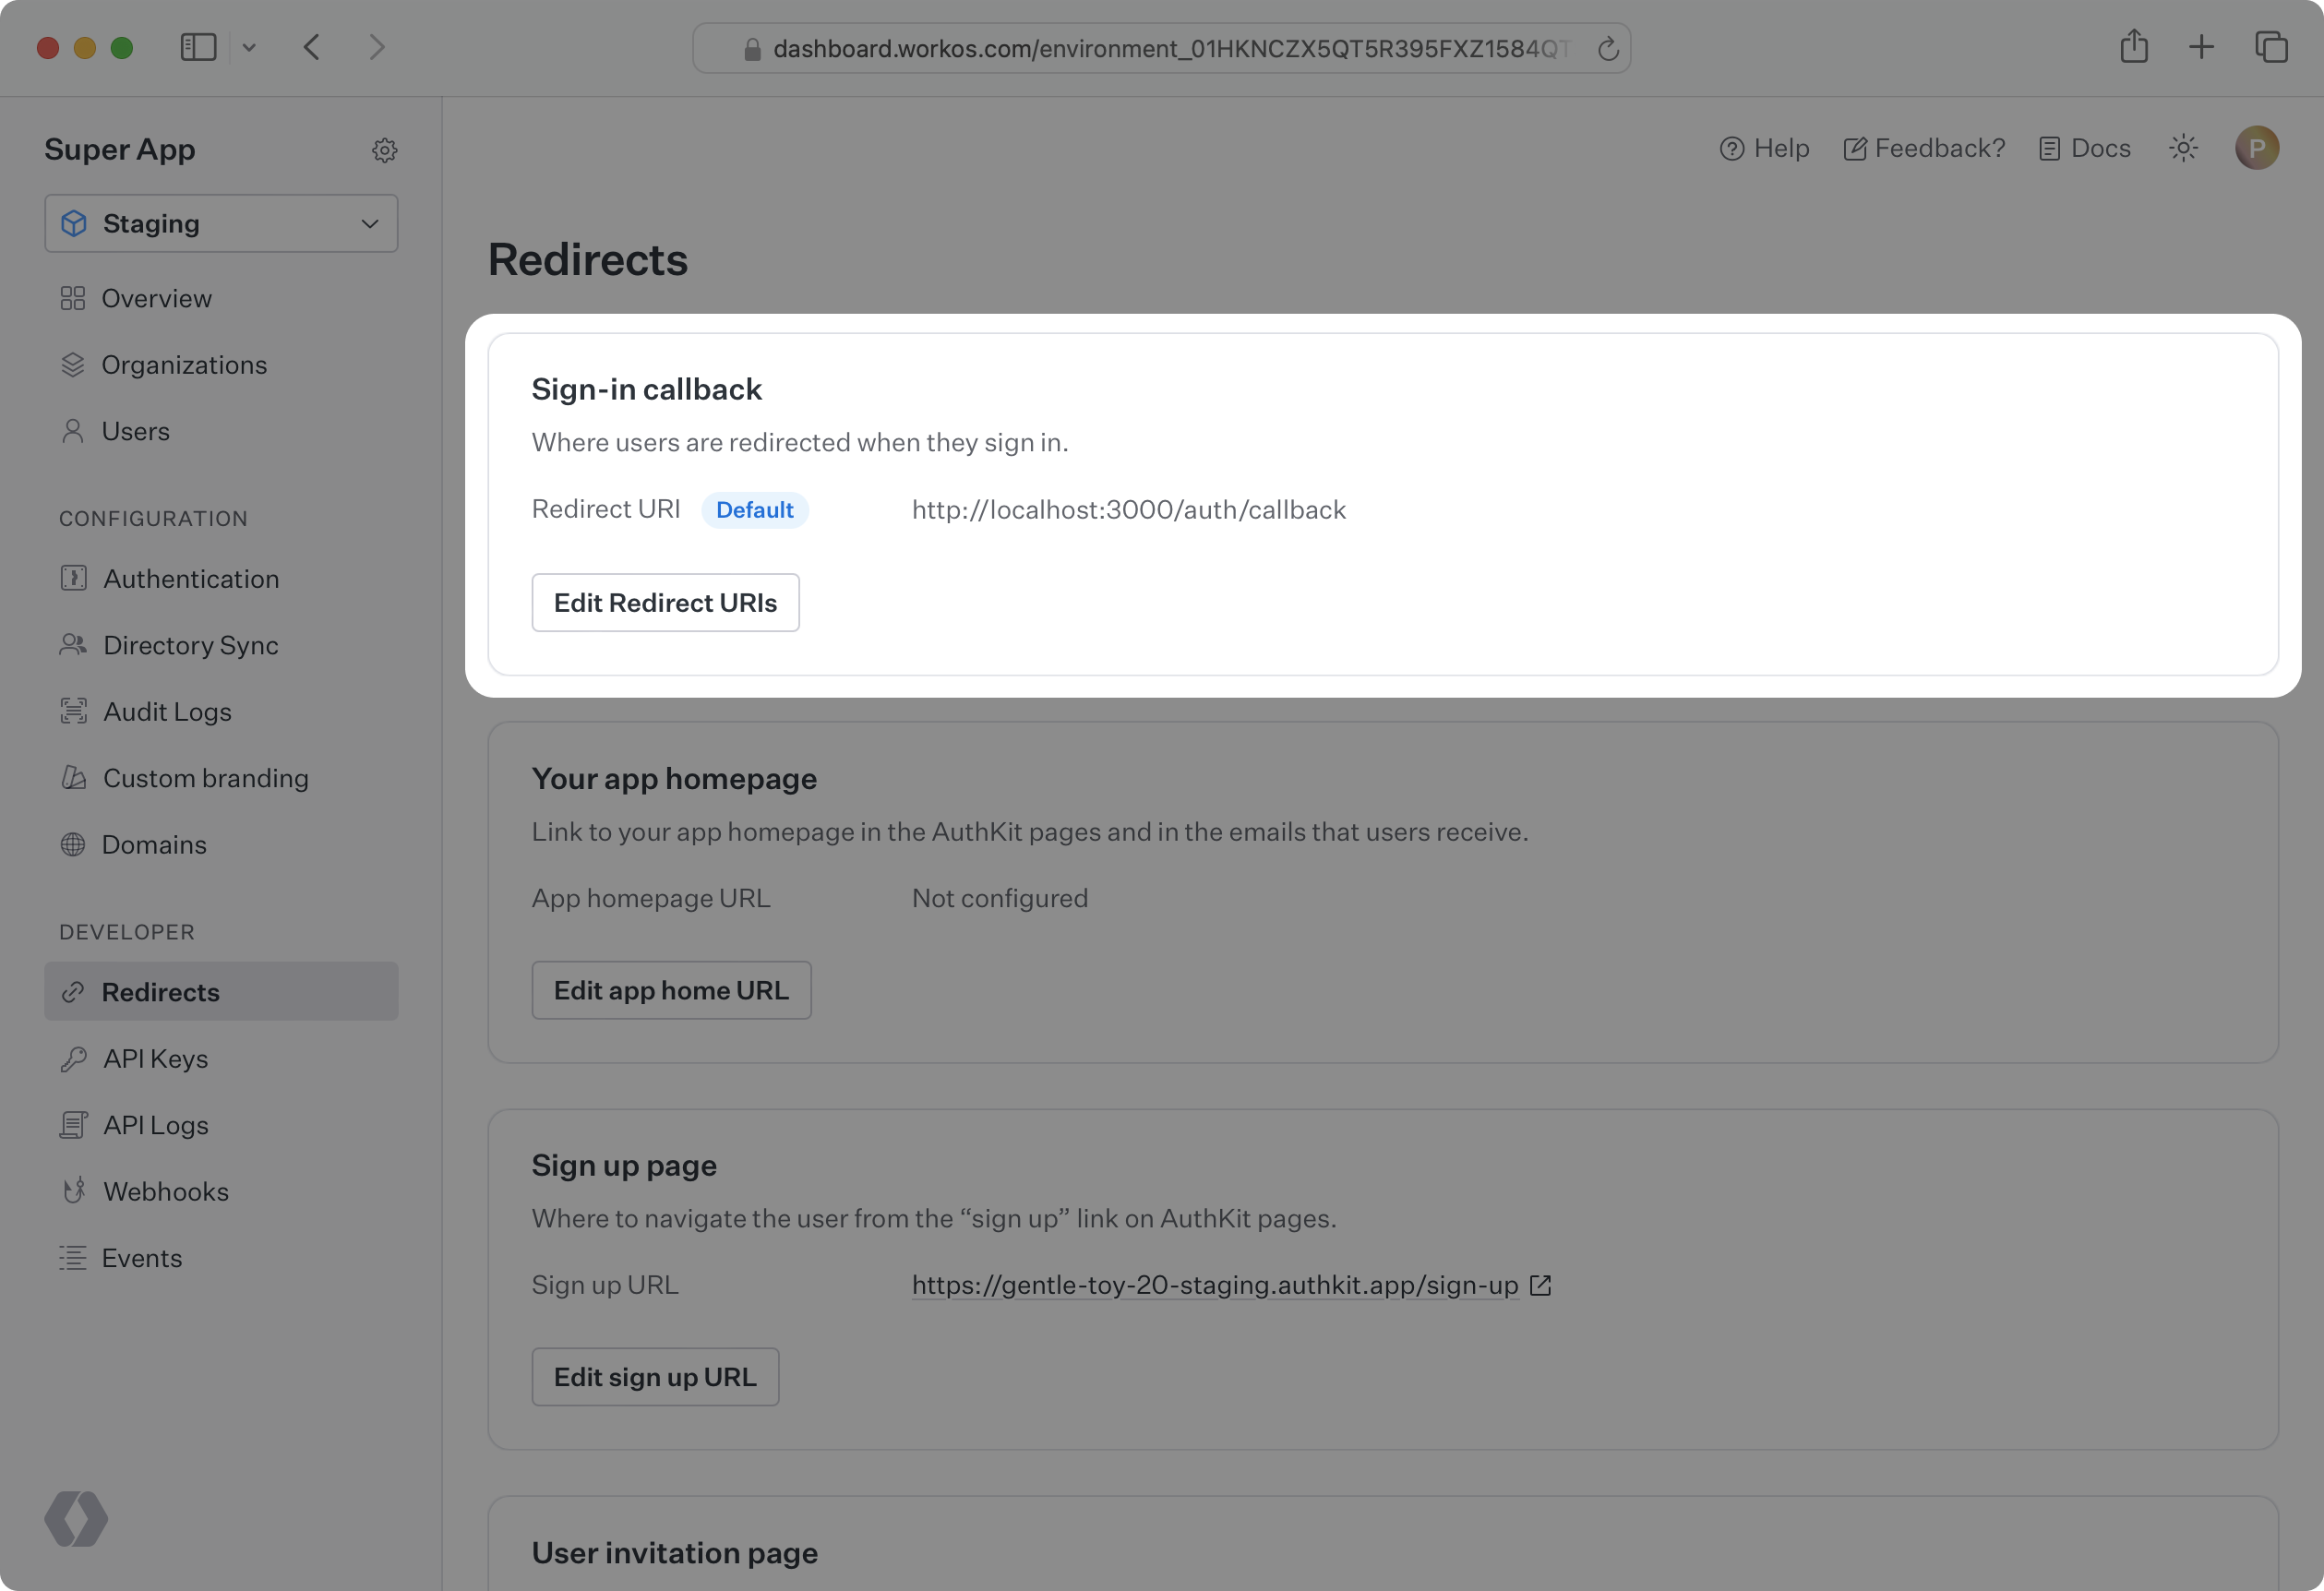
## (2) Configure a redirect URI
Go to the [Redirects](https://dashboard.workos.com/redirects) page in the dashboard to configure allowed redirect URIs. This is your callback endpoint you used in the previous section.
Multi-tenant apps will typically have a single redirect URI specified. You can set multiple redirect URIs for single-tenant apps. You’ll need to be sure to specify which redirect URI to use in the WorkOS client call to fetch the authorization URL.
> More information about wildcard characters support can be found in the [Redirect URIs](/sso/redirect-uris/wildcard-characters) guide.
### Identity provider-initiated SSO
Normally, the default redirect URI you configure in the WorkOS dashboard is going to be used for all identity provider-initiated SSO sessions. This is because the WorkOS client is not used to initiate the authentication flow.
However, your customer can specify a separate redirect URI to be used for all their IdP-initiated sessions as a `RelayState` parameter in the SAML settings on their side.
Learn more about configuring IdP-initiated SSO in the [Login Flows](/sso/login-flows/idp-initiated-sso/configure-idp-initiated-sso) guide.
---
## (3) Test end-to-end
If you followed this guide, you used the Test Organization available in your staging environment to initiate SSO. With that, you can already test your integration end-to-end.
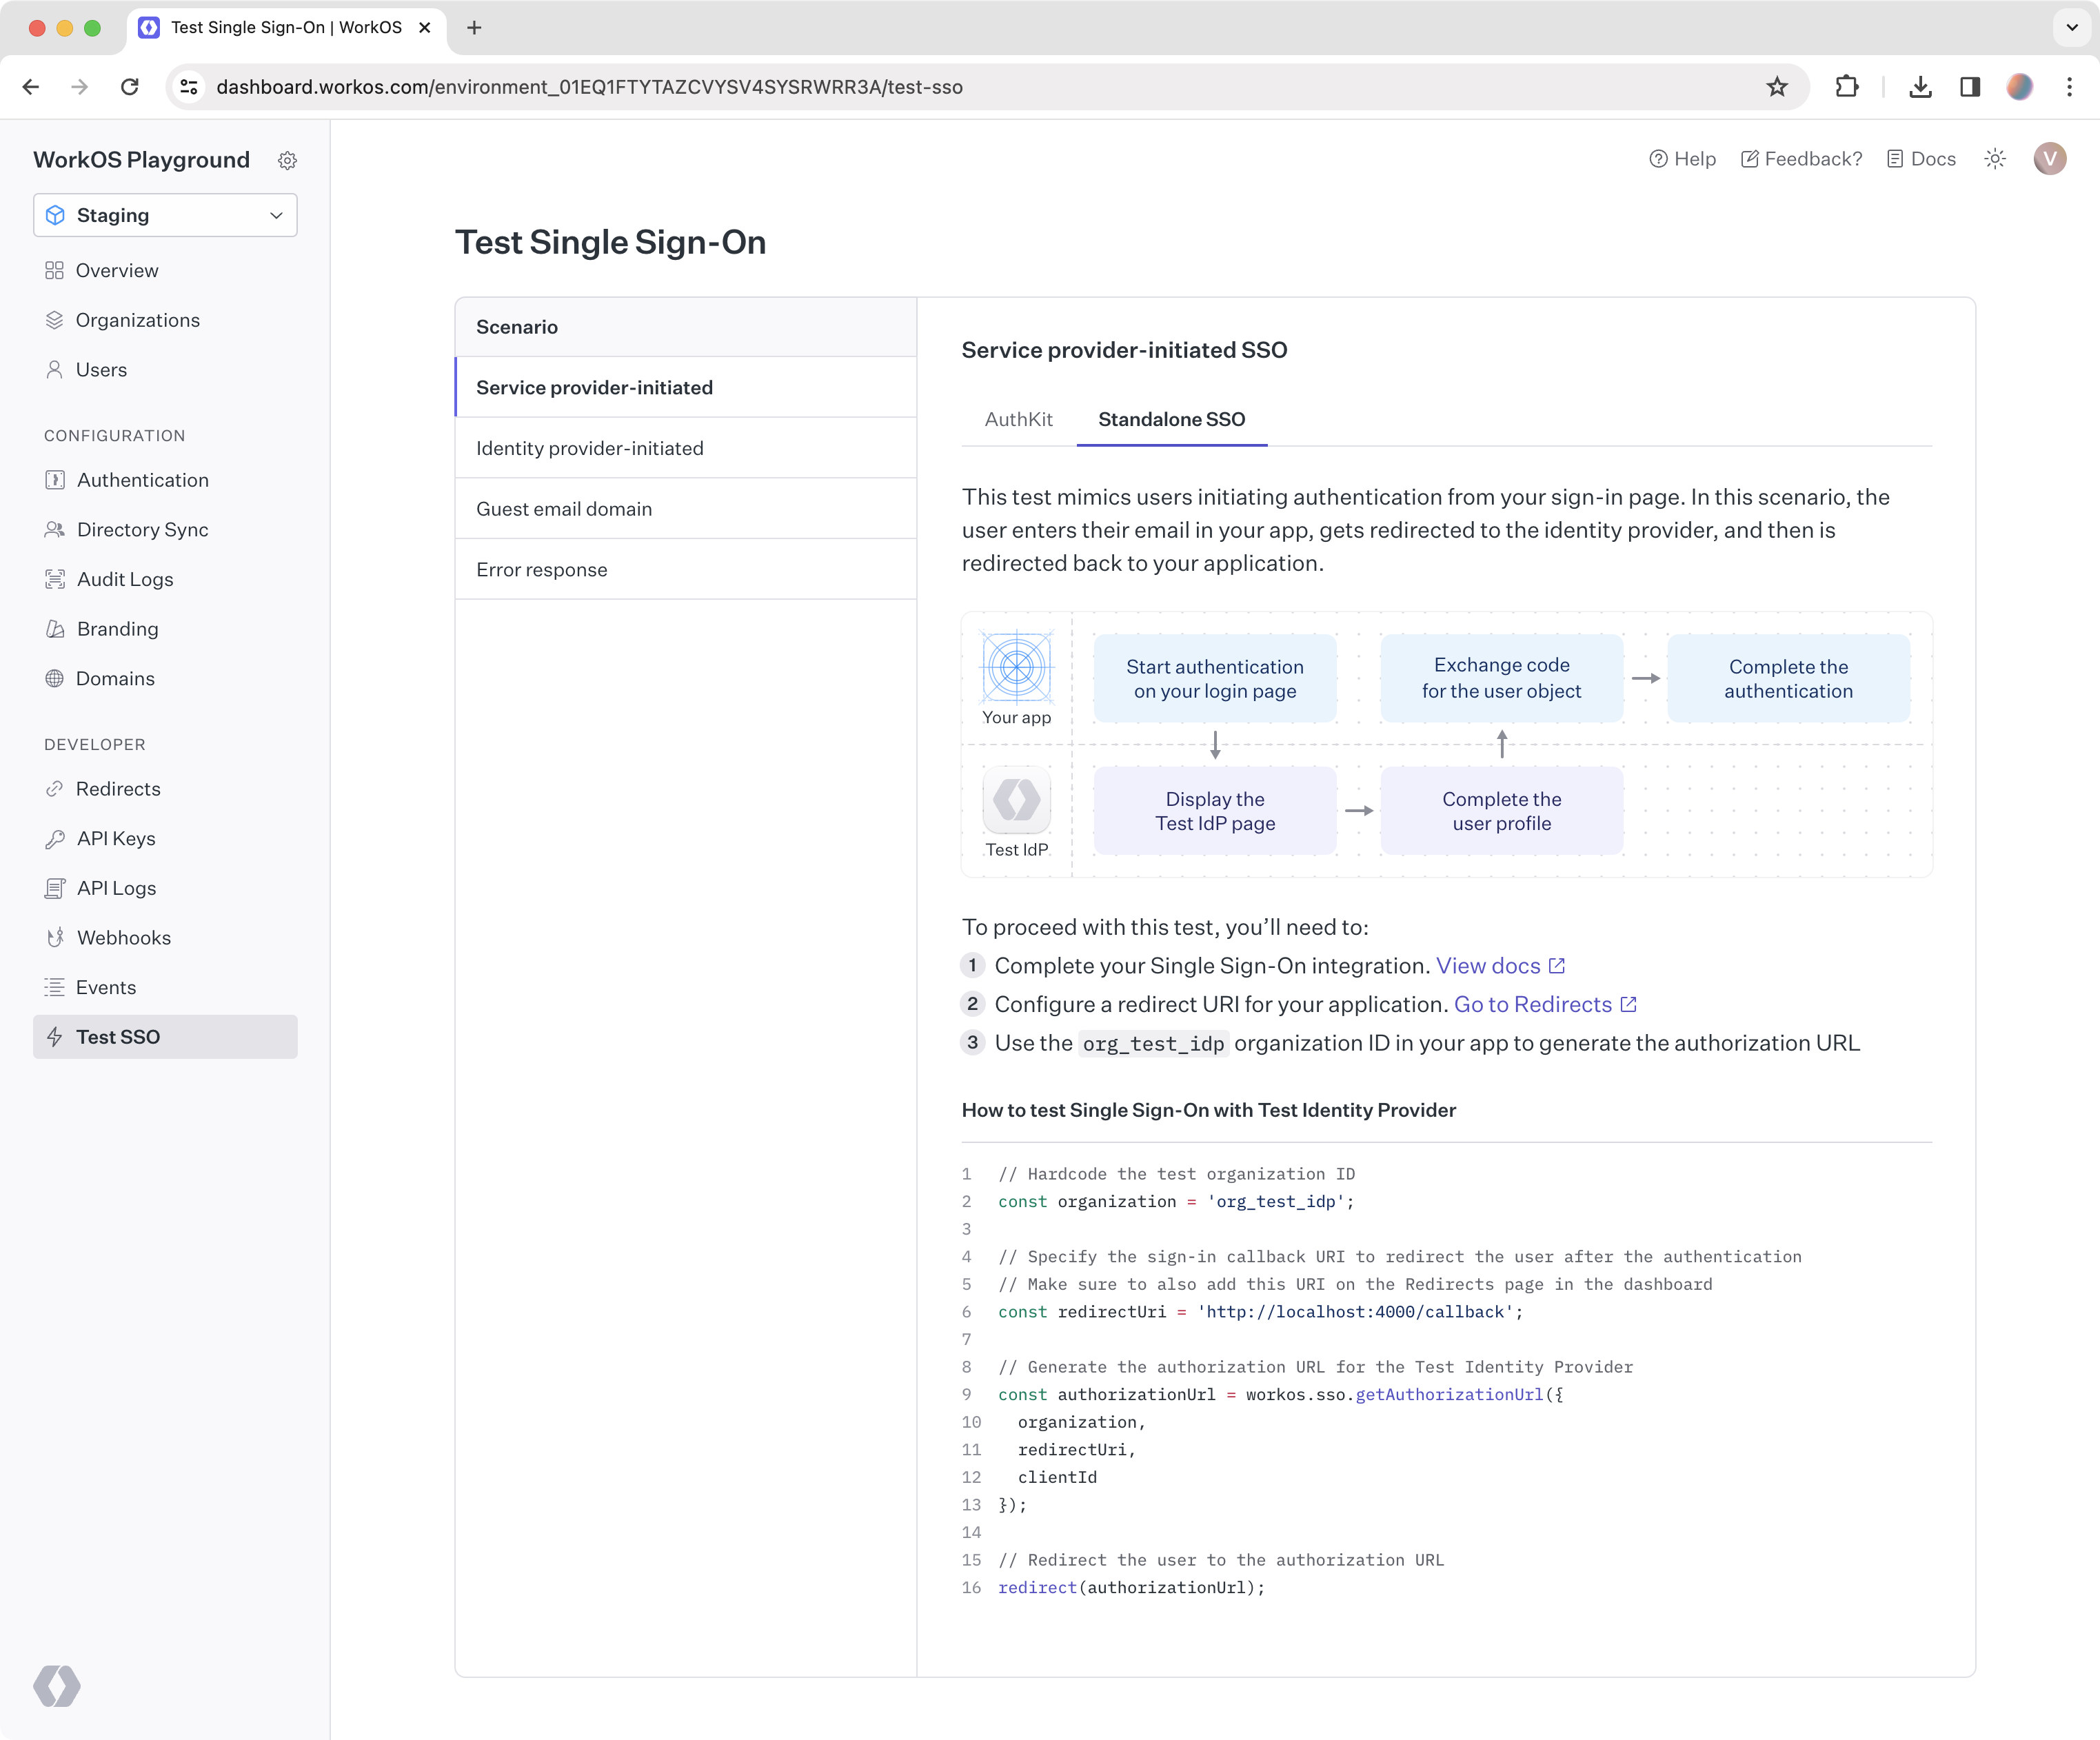
Head to the _Test SSO_ page in the [WorkOS Dashboard](https://dashboard.workos.com/) to get started with testing common login flows, or read on about that in detail in the next guide.