# Downstream Game Creation Tutorial 2
## Aim
We will follow the steps below to learn about
- Items
- Bags
- Enemies/Combat
- Gates
Once complete, your map should something look like this:
 # 1. Setup
Follow steps 1 through 4 of `tutorial-room-1` to get started. This will walk you through:
- Deploying the game
- Spawning a unit
- Creating a map
- Deploying new tiles
[tutorial-room-1/README.md](../tutorial-room-1/README.md)
The only change we want to make to these steps is in _Creating a map_. As this is the next room in the tutorial series, we will be creating our map at a different angle so it doesn't overlap with tutorial-room-1.
# 1. Setup
Follow steps 1 through 4 of `tutorial-room-1` to get started. This will walk you through:
- Deploying the game
- Spawning a unit
- Creating a map
- Deploying new tiles
[tutorial-room-1/README.md](../tutorial-room-1/README.md)
The only change we want to make to these steps is in _Creating a map_. As this is the next room in the tutorial series, we will be creating our map at a different angle so it doesn't overlap with tutorial-room-1.
 We're using this particular shape to demonstrate the functionality of the gate. We will use the bottleneck to ensure there is no way around the gate.
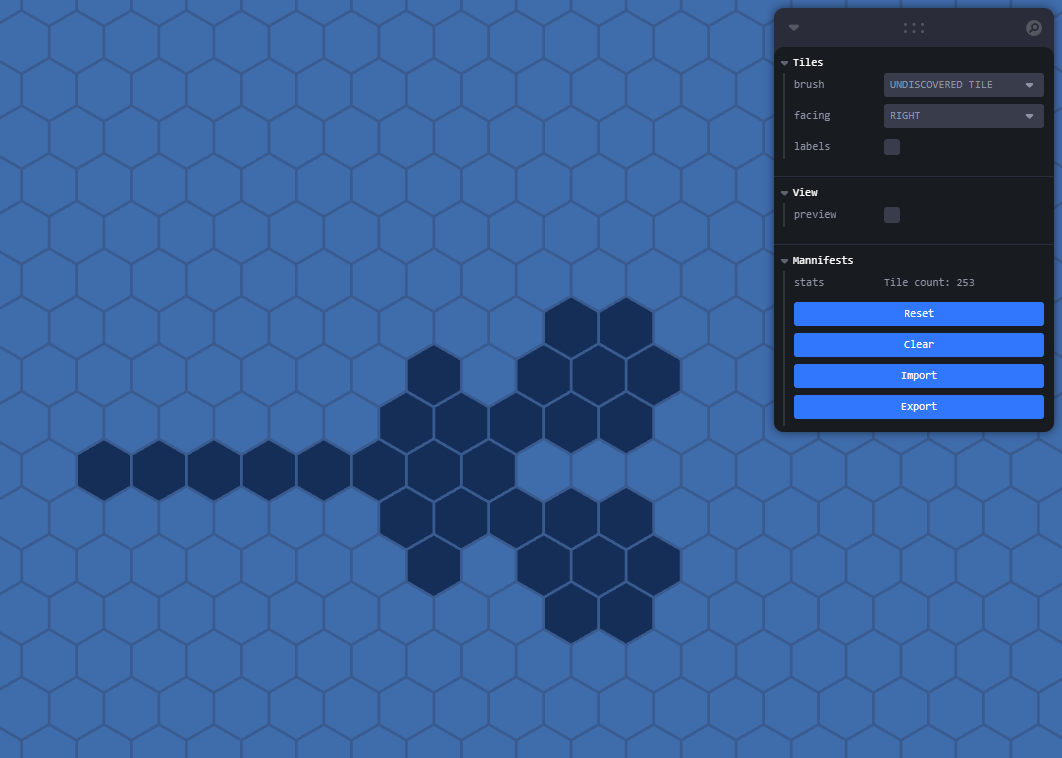
Run the game and use the [tile-fabricator](http://localhost:3000/tile-fabricator) to create tiles following the shape shown in the example above.
Once you've painted the tiles, click export, and save the output file as `Locations.yaml` in a new project folder on your computer.
# 2. Items
First, let's add a couple of items to the game. For this tutorial, we need to make:
- Door key
- Sword
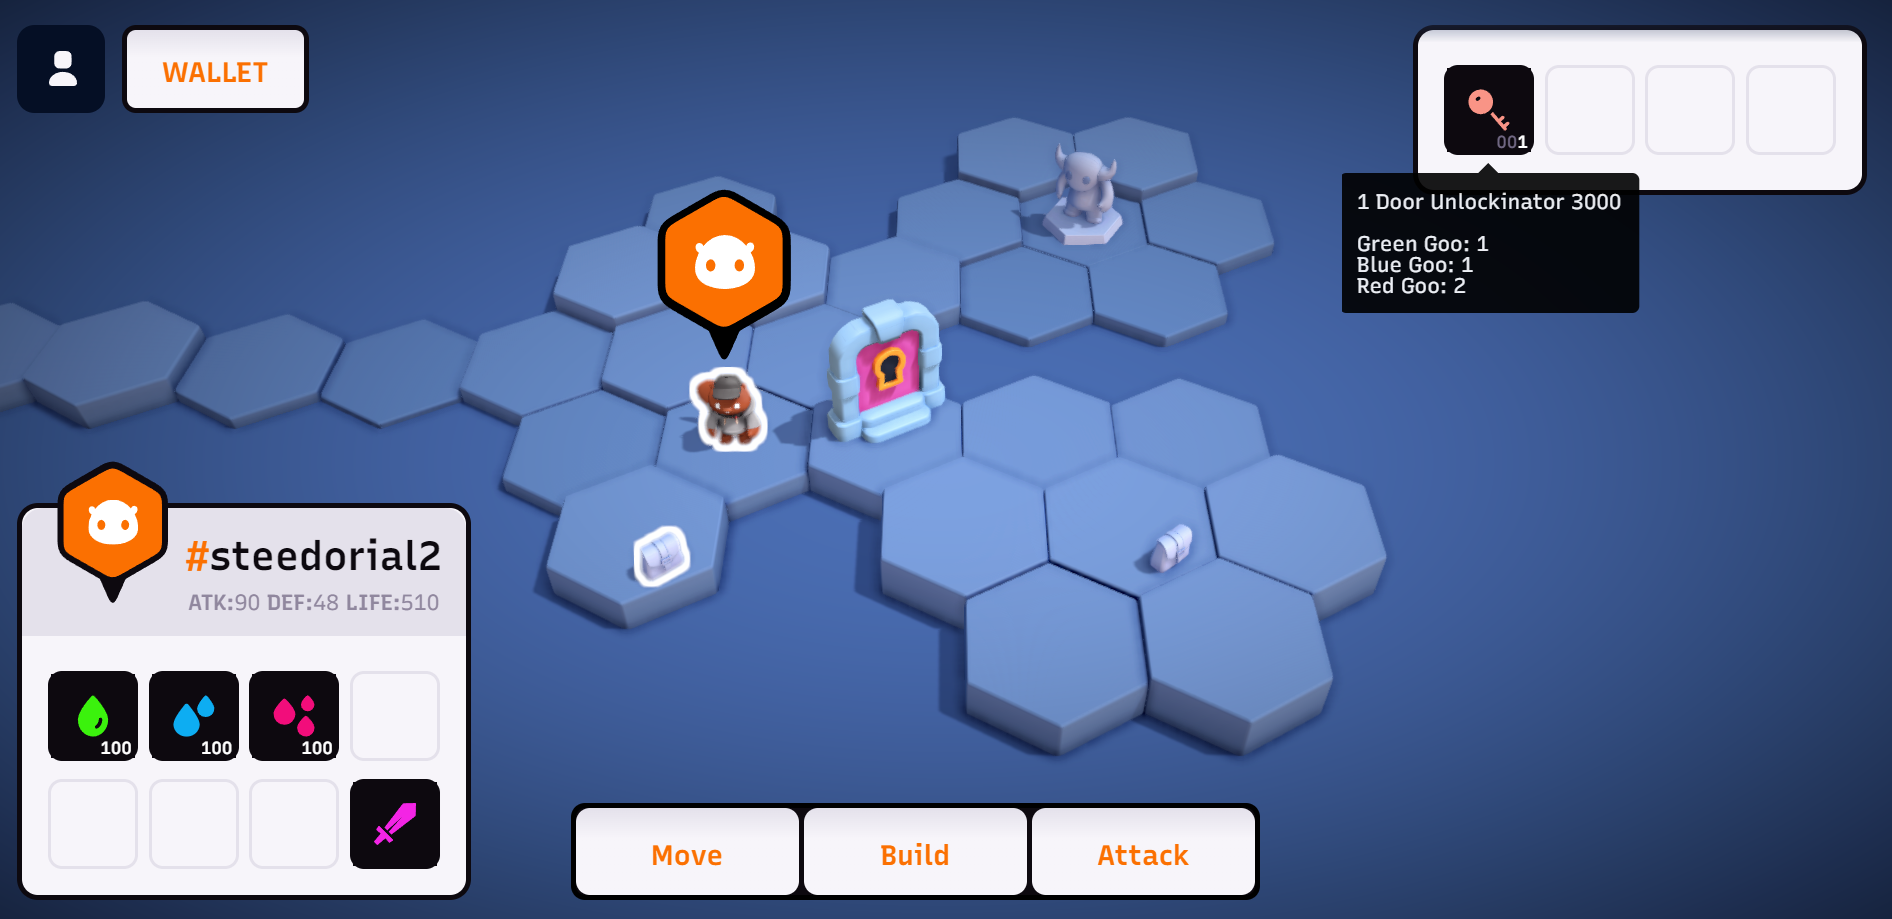
## Door key
We will start by making a new .yaml file in your map directory. The name technically doesn't matter, but we like use PascalCase of of the item name as the file name.
For example: if your item is named `"Door Unlockinator 3000"`, we would name the file `"DoorUnlockinator3000.yaml"`.
### Create file: DoorUnlockinator3000.yaml
```yaml
---
kind: Item
spec:
name: Door Unlockinator 3000
icon: 24-209
goo:
red: 2
green: 1
blue: 1
stackable: true
```
**Note:** later, we'll be using the item ID to verify the unit has the key in their inventory. If you're following along and want to use the same ID as we do, you should use the same name. Otherwise, you can run the command `ds get items -n local` while running the game to get a list of all the items in your world with their IDs.
One thing here that isn't clear is the icon. The best way to pick an icon is to open the [building-fabricator](http://localhost:3000/building-fabricator) where you can easily flick through the item icons available.
You can change how much goo it costs the unit to craft this item.
We're using this particular shape to demonstrate the functionality of the gate. We will use the bottleneck to ensure there is no way around the gate.
Run the game and use the [tile-fabricator](http://localhost:3000/tile-fabricator) to create tiles following the shape shown in the example above.
Once you've painted the tiles, click export, and save the output file as `Locations.yaml` in a new project folder on your computer.
# 2. Items
First, let's add a couple of items to the game. For this tutorial, we need to make:
- Door key
- Sword
## Door key
We will start by making a new .yaml file in your map directory. The name technically doesn't matter, but we like use PascalCase of of the item name as the file name.
For example: if your item is named `"Door Unlockinator 3000"`, we would name the file `"DoorUnlockinator3000.yaml"`.
### Create file: DoorUnlockinator3000.yaml
```yaml
---
kind: Item
spec:
name: Door Unlockinator 3000
icon: 24-209
goo:
red: 2
green: 1
blue: 1
stackable: true
```
**Note:** later, we'll be using the item ID to verify the unit has the key in their inventory. If you're following along and want to use the same ID as we do, you should use the same name. Otherwise, you can run the command `ds get items -n local` while running the game to get a list of all the items in your world with their IDs.
One thing here that isn't clear is the icon. The best way to pick an icon is to open the [building-fabricator](http://localhost:3000/building-fabricator) where you can easily flick through the item icons available.
You can change how much goo it costs the unit to craft this item.
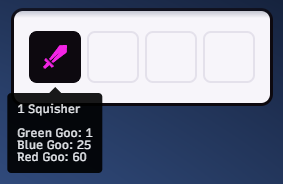
 ## Sword
Later we're going to add an enemy that requires the unit to have an item like a sword to defeat it, so now we'll add a sword.
### Create file: Squisher.yaml
```yaml
---
kind: Item
spec:
name: Squisher
icon: xx-01
goo:
red: 60
green: 1
blue: 25
stackable: false
```
Important things to note here:
- Non-stackable items effect your unit's stats
- red goo effects attack
- green goo effects life
- blue goo effects defence
# 3. Bags
We're going to use bags to introduce the items we made into the map.
### Create file: Bags.yaml
```yaml
---
kind: Bag
spec:
location: [ 7, -2, -5]
items:
- name: Door Unlockinator 3000
quantity: 1
---
kind: Bag
spec:
location: [ 10, -2, -8]
items:
- name: Squisher
quantity: 1
```
What we're doing here:
- We're using the `Bag` kind.
- We're entering the position of the bag in the world.
- In tutorial-room-1, you learned how to place things in the map using the tile-fabricator. Another convinent way is to simply click on a tile in-game, and enter the coordinates that appear in the tile-panel.
- You can list the items you want in the bag.
## Sword
Later we're going to add an enemy that requires the unit to have an item like a sword to defeat it, so now we'll add a sword.
### Create file: Squisher.yaml
```yaml
---
kind: Item
spec:
name: Squisher
icon: xx-01
goo:
red: 60
green: 1
blue: 25
stackable: false
```
Important things to note here:
- Non-stackable items effect your unit's stats
- red goo effects attack
- green goo effects life
- blue goo effects defence
# 3. Bags
We're going to use bags to introduce the items we made into the map.
### Create file: Bags.yaml
```yaml
---
kind: Bag
spec:
location: [ 7, -2, -5]
items:
- name: Door Unlockinator 3000
quantity: 1
---
kind: Bag
spec:
location: [ 10, -2, -8]
items:
- name: Squisher
quantity: 1
```
What we're doing here:
- We're using the `Bag` kind.
- We're entering the position of the bag in the world.
- In tutorial-room-1, you learned how to place things in the map using the tile-fabricator. Another convinent way is to simply click on a tile in-game, and enter the coordinates that appear in the tile-panel.
- You can list the items you want in the bag.
 # 4. Enemies
Let's add an enemy to our map.
### Create file: MrSquishy.yaml
```yaml
---
kind: BuildingKind
spec:
name: Mr. Squishy
description: Please don't kill me, I have a family!
category: blocker
model: enemy
color: 5
materials:
- name: Red Goo
quantity: 25
- name: Blue Goo
quantity: 50
- name: Green Goo
quantity: 100
```
Since you can enter combat with any building, the only difference with an enemy is the model: `model: enemy`.
### Create file: Buildings.yaml
Place the enemy in your map:
```yaml
---
kind: Building
spec:
name: Mr. Squishy
location: [ 8, 2, -10 ]
facingDirection: LEFT
```
Before continuing, you may want to use `ds apply` ([see tutorial-room-1](https://github.com/playmint/ds/blob/main/contracts/src/maps/tutorial-room-1/README.md#8-deploy-the-whole-map-folder)) to check your progress!
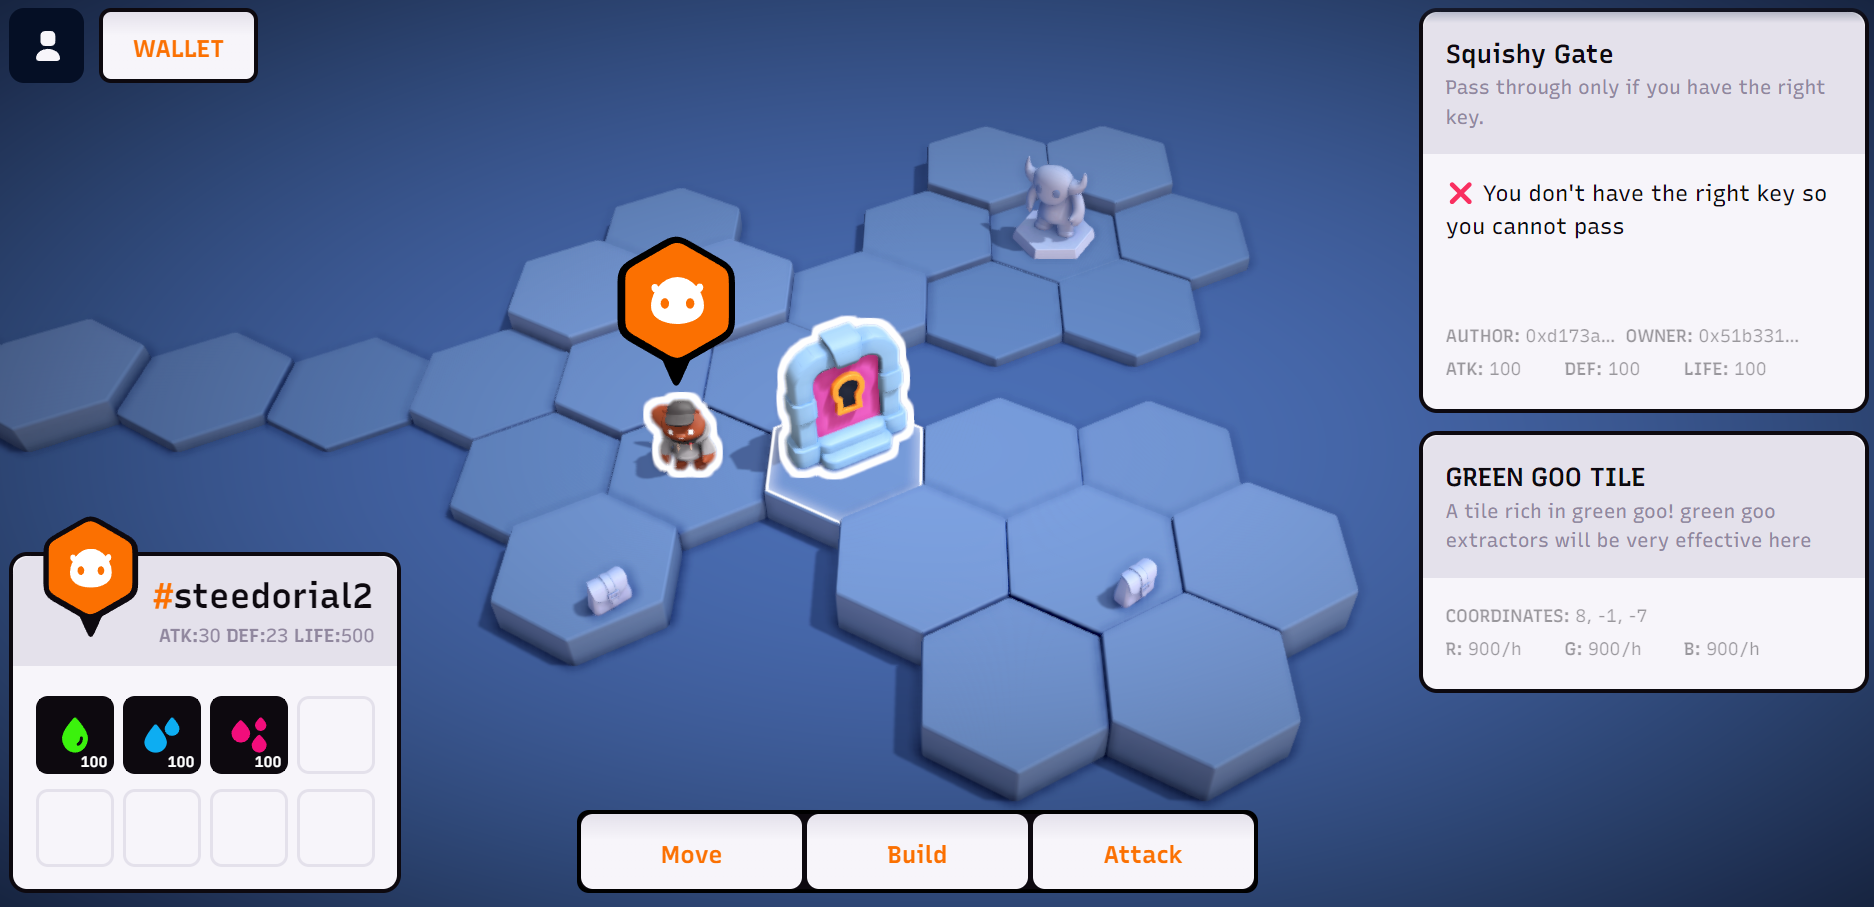
# 5. Gate
Our gate in this example checks that the unit is holding the required item, the key we made previously, and allows the unit to pass the tile if they are.
Secondly, we do on-chain validation to ensure the requested movement is allowed.
## 5.1 - YAML
First define the BuildingKind YAML for the gate.
### Create file: SquishyGate.yaml
```yaml
---
kind: BuildingKind
spec:
category: custom
name: Squishy Gate
description: Pass through only if you have the right key.
model: door-closed
color: 4
contract:
file: ./SquishyGate.sol
plugin:
file: ./SquishyGate.js
alwaysActive: true
materials:
- name: Red Goo
quantity: 100
- name: Green Goo
quantity: 100
- name: Blue Goo
quantity: 100
```
Notable differences here:
- `category: custom`
- The main difference with the `custom` category is that the crafting UI is removed
- `model: door-closed`
- This makes the door model closed by default
- Plugin logic
- solidity: on-chain logic
- javascript: client-side logic
```yaml
contract:
file: ./SquishyGate.sol
plugin:
file: ./SquishyGate.js
```
Let's start by looking at the on-chain logic.
## 5.2 - Solidity
### Create file: SquishyGate.sol
We start every solidity file with this line:
```solidity
pragma solidity ^0.8.13;
```
Make these imports:
```solidity
import {State} from "cog/IState.sol";
import {Schema} from "@ds/schema/Schema.sol";
import {Gate} from "./Gate.sol";
```
We're just using `SquishyGate.sol` to allow `Gate.sol` to check what item this gate requires:
```solidity
using Schema for State;
contract SquishyGate is Gate {
function getKeyId() internal pure override returns (bytes24) {
return 0x6a7a67f05e359ab500000001000000010000000100000002;
}
}
```
Doing it this way allows you to easily add new gates and reuse all the logic in `Gate.sol`, but passing in a different item ID for each gate.
**Note:** In our example it's returning `0x6a7a67f05e359ab500000001000000010000000100000002`. If your key has a different name to ours, your ID will be different. You can get your key ID by running `ds get item "YOUR ITEM NAME" -n local` while the game is running.
`SquishyGate.sol` should now look something like this:
```solidity
pragma solidity ^0.8.13;
import {State} from "cog/IState.sol";
import {Schema} from "@ds/schema/Schema.sol";
import {Gate} from "./Gate.sol";
using Schema for State;
contract SquishyGate is Gate {
function getKeyId() internal pure override returns (bytes24) {
return ;
}
}
```
### Create file: Gate.sol
This will handle most of the on-chain validation.
For this, we reference `BuildingKind`
```solidity
abstract contract Gate is BuildingKind
```
Let's implement `onUnitArrive` which is a movement rule. This is called when the unit steps on the tile the gate is on:
```solidity
function onUnitArrive(Game ds, bytes24 buildingInstanceID, bytes24 mobileUnitID) public override {
// Example of not allowing a unit to stand on the building tile unless they have the Gate Key item
( /*uint8 bagSlot*/ , /*uint8 itemSlot*/, uint64 keyBalance) =
_findItem(ds.getState(), mobileUnitID, getKeyId());
require(keyBalance > 0, "Gate: Unit does not have the right key");
}
```
The 3rd output of `_findItem` is the given item balance. If the unit doesn't have at least 1 of the required item, it will revert, therefore disallowing the unit to move on the tile.
the `_findItem` function searches through the unit's bag for the item:
```solidity
function _findItem(State state, bytes24 mobileUnitID, bytes24 itemId)
private
view
returns (uint8 bagSlot, uint8 itemSlot, uint64 balance)
{
for (bagSlot = 0; bagSlot < 2; bagSlot++) {
bytes24 bagId = state.getEquipSlot(mobileUnitID, bagSlot);
require(bytes4(bagId) == Kind.Bag.selector, "_findItem(): No bag found at equip slot");
for (itemSlot = 0; itemSlot < 4; itemSlot++) {
bytes24 bagItemId;
(bagItemId, balance) = state.getItemSlot(bagId, itemSlot);
if (bagItemId == itemId && balance > 0) {
// Found item
return (bagSlot, itemSlot, balance);
}
}
}
return (0, 0, 0);
}
```
**Note:** Take a look at `Gate.sol` in the example folder to see how the code has been structured.
## 5.3 - javascript
We're going to create the client-side plugin code. This code will handle what happens on the frontend of the game. Technically, the gate will function properly without any solidity code, but without on-chain validation, players would be able to cheat.
If you're starting from scratch, you should use the code from `maps/basic-factory/BasicFactory.js` for the javascript files you create. `BasicFactory` sets up up with the basic structure of a plugin.
### Create file: SquishyGate.js
First, define the key item name, and the name of the gate:
```js
const keyItemName = "Door Unlockinator 3000";
const gateName = "Squishy Gate";
```
Now, we're working on the update function:
```js
export default async function update(state) {
...
```
We can get data about the state of the world via `state`:
```js
const mobileUnit = state?.selected?.mobileUnit;
const bags = state?.world?.bags ?? [];
```
Here, we've used it to get the player's unit, and the player's bags, which is the inventory.
Check if the key is in the player's inventory:
```js
const hasGateKey = getItemBalance(mobileUnit, keyItemName, bags) > 0;
```
Here, we get the tile ID of all instances where the gate is placed on the map:
```js
const pluginBuildings = getBuildingsByKindName(state, gateName);
const pluginBuildingTileIDs = pluginBuildings.map(
(b) => b.location.tile.id,
);
```
Using that, we're going to build a `map` to tell the frontend:
- To make a tile a `blocker` if the unit is not holding the key:
```js
const blockerTileMapObjs = pluginBuildingTileIDs.map((t) => {
return {
type: "tile",
key: "blocker",
id: t,
value: `${!hasGateKey}`,
};
});
```
- To change the gate model to be either opened or closed:
```js
const buildingModelMapObjs = pluginBuildings.map((t) => {
return {
type: "building",
key: "model",
id: t.id,
value: hasGateKey ? "door-open-1" : "door-closed-1",
};
});
```
Finally, in the return block of the update function, we want to return `map` with the `map`(s) we created containing our logic:
```js
return {
version: 1,
map: blockerTileMapObjs.concat(buildingModelMapObjs),
...
```
Please review the example `SquishyGate.js` to see more details like some of the helper functions used, and the rest of the return block.
And with that, we have a functional gate!
To see it working, you should:
1. Add the gate to `"Buildings.yaml"`:
```yaml
---
kind: Building
spec:
name: Squishy Gate
location: [8, -1, -7]
facingDirection: RIGHT
```
2. Run `ds apply` ([see tutorial-room-1](https://github.com/playmint/ds/blob/main/contracts/src/maps/tutorial-room-1/README.md#8-deploy-the-whole-map-folder)) and refresh!
# You did it, good job! 🥳
At this point, everything should be working! Feel free to refer to the example files to learn more about the implementation.
# 4. Enemies
Let's add an enemy to our map.
### Create file: MrSquishy.yaml
```yaml
---
kind: BuildingKind
spec:
name: Mr. Squishy
description: Please don't kill me, I have a family!
category: blocker
model: enemy
color: 5
materials:
- name: Red Goo
quantity: 25
- name: Blue Goo
quantity: 50
- name: Green Goo
quantity: 100
```
Since you can enter combat with any building, the only difference with an enemy is the model: `model: enemy`.
### Create file: Buildings.yaml
Place the enemy in your map:
```yaml
---
kind: Building
spec:
name: Mr. Squishy
location: [ 8, 2, -10 ]
facingDirection: LEFT
```
Before continuing, you may want to use `ds apply` ([see tutorial-room-1](https://github.com/playmint/ds/blob/main/contracts/src/maps/tutorial-room-1/README.md#8-deploy-the-whole-map-folder)) to check your progress!
# 5. Gate
Our gate in this example checks that the unit is holding the required item, the key we made previously, and allows the unit to pass the tile if they are.
Secondly, we do on-chain validation to ensure the requested movement is allowed.
## 5.1 - YAML
First define the BuildingKind YAML for the gate.
### Create file: SquishyGate.yaml
```yaml
---
kind: BuildingKind
spec:
category: custom
name: Squishy Gate
description: Pass through only if you have the right key.
model: door-closed
color: 4
contract:
file: ./SquishyGate.sol
plugin:
file: ./SquishyGate.js
alwaysActive: true
materials:
- name: Red Goo
quantity: 100
- name: Green Goo
quantity: 100
- name: Blue Goo
quantity: 100
```
Notable differences here:
- `category: custom`
- The main difference with the `custom` category is that the crafting UI is removed
- `model: door-closed`
- This makes the door model closed by default
- Plugin logic
- solidity: on-chain logic
- javascript: client-side logic
```yaml
contract:
file: ./SquishyGate.sol
plugin:
file: ./SquishyGate.js
```
Let's start by looking at the on-chain logic.
## 5.2 - Solidity
### Create file: SquishyGate.sol
We start every solidity file with this line:
```solidity
pragma solidity ^0.8.13;
```
Make these imports:
```solidity
import {State} from "cog/IState.sol";
import {Schema} from "@ds/schema/Schema.sol";
import {Gate} from "./Gate.sol";
```
We're just using `SquishyGate.sol` to allow `Gate.sol` to check what item this gate requires:
```solidity
using Schema for State;
contract SquishyGate is Gate {
function getKeyId() internal pure override returns (bytes24) {
return 0x6a7a67f05e359ab500000001000000010000000100000002;
}
}
```
Doing it this way allows you to easily add new gates and reuse all the logic in `Gate.sol`, but passing in a different item ID for each gate.
**Note:** In our example it's returning `0x6a7a67f05e359ab500000001000000010000000100000002`. If your key has a different name to ours, your ID will be different. You can get your key ID by running `ds get item "YOUR ITEM NAME" -n local` while the game is running.
`SquishyGate.sol` should now look something like this:
```solidity
pragma solidity ^0.8.13;
import {State} from "cog/IState.sol";
import {Schema} from "@ds/schema/Schema.sol";
import {Gate} from "./Gate.sol";
using Schema for State;
contract SquishyGate is Gate {
function getKeyId() internal pure override returns (bytes24) {
return ;
}
}
```
### Create file: Gate.sol
This will handle most of the on-chain validation.
For this, we reference `BuildingKind`
```solidity
abstract contract Gate is BuildingKind
```
Let's implement `onUnitArrive` which is a movement rule. This is called when the unit steps on the tile the gate is on:
```solidity
function onUnitArrive(Game ds, bytes24 buildingInstanceID, bytes24 mobileUnitID) public override {
// Example of not allowing a unit to stand on the building tile unless they have the Gate Key item
( /*uint8 bagSlot*/ , /*uint8 itemSlot*/, uint64 keyBalance) =
_findItem(ds.getState(), mobileUnitID, getKeyId());
require(keyBalance > 0, "Gate: Unit does not have the right key");
}
```
The 3rd output of `_findItem` is the given item balance. If the unit doesn't have at least 1 of the required item, it will revert, therefore disallowing the unit to move on the tile.
the `_findItem` function searches through the unit's bag for the item:
```solidity
function _findItem(State state, bytes24 mobileUnitID, bytes24 itemId)
private
view
returns (uint8 bagSlot, uint8 itemSlot, uint64 balance)
{
for (bagSlot = 0; bagSlot < 2; bagSlot++) {
bytes24 bagId = state.getEquipSlot(mobileUnitID, bagSlot);
require(bytes4(bagId) == Kind.Bag.selector, "_findItem(): No bag found at equip slot");
for (itemSlot = 0; itemSlot < 4; itemSlot++) {
bytes24 bagItemId;
(bagItemId, balance) = state.getItemSlot(bagId, itemSlot);
if (bagItemId == itemId && balance > 0) {
// Found item
return (bagSlot, itemSlot, balance);
}
}
}
return (0, 0, 0);
}
```
**Note:** Take a look at `Gate.sol` in the example folder to see how the code has been structured.
## 5.3 - javascript
We're going to create the client-side plugin code. This code will handle what happens on the frontend of the game. Technically, the gate will function properly without any solidity code, but without on-chain validation, players would be able to cheat.
If you're starting from scratch, you should use the code from `maps/basic-factory/BasicFactory.js` for the javascript files you create. `BasicFactory` sets up up with the basic structure of a plugin.
### Create file: SquishyGate.js
First, define the key item name, and the name of the gate:
```js
const keyItemName = "Door Unlockinator 3000";
const gateName = "Squishy Gate";
```
Now, we're working on the update function:
```js
export default async function update(state) {
...
```
We can get data about the state of the world via `state`:
```js
const mobileUnit = state?.selected?.mobileUnit;
const bags = state?.world?.bags ?? [];
```
Here, we've used it to get the player's unit, and the player's bags, which is the inventory.
Check if the key is in the player's inventory:
```js
const hasGateKey = getItemBalance(mobileUnit, keyItemName, bags) > 0;
```
Here, we get the tile ID of all instances where the gate is placed on the map:
```js
const pluginBuildings = getBuildingsByKindName(state, gateName);
const pluginBuildingTileIDs = pluginBuildings.map(
(b) => b.location.tile.id,
);
```
Using that, we're going to build a `map` to tell the frontend:
- To make a tile a `blocker` if the unit is not holding the key:
```js
const blockerTileMapObjs = pluginBuildingTileIDs.map((t) => {
return {
type: "tile",
key: "blocker",
id: t,
value: `${!hasGateKey}`,
};
});
```
- To change the gate model to be either opened or closed:
```js
const buildingModelMapObjs = pluginBuildings.map((t) => {
return {
type: "building",
key: "model",
id: t.id,
value: hasGateKey ? "door-open-1" : "door-closed-1",
};
});
```
Finally, in the return block of the update function, we want to return `map` with the `map`(s) we created containing our logic:
```js
return {
version: 1,
map: blockerTileMapObjs.concat(buildingModelMapObjs),
...
```
Please review the example `SquishyGate.js` to see more details like some of the helper functions used, and the rest of the return block.
And with that, we have a functional gate!
To see it working, you should:
1. Add the gate to `"Buildings.yaml"`:
```yaml
---
kind: Building
spec:
name: Squishy Gate
location: [8, -1, -7]
facingDirection: RIGHT
```
2. Run `ds apply` ([see tutorial-room-1](https://github.com/playmint/ds/blob/main/contracts/src/maps/tutorial-room-1/README.md#8-deploy-the-whole-map-folder)) and refresh!
# You did it, good job! 🥳
At this point, everything should be working! Feel free to refer to the example files to learn more about the implementation.