# Spec Workflow MCP
[](https://www.npmjs.com/package/@pimzino/spec-workflow-mcp)
[](https://marketplace.visualstudio.com/items?itemName=Pimzino.spec-workflow-mcp)
Ein Model Context Protocol (MCP) Server für strukturierte, spezifikationsgetriebene Entwicklung mit Echtzeit-Dashboard und VSCode Extension.
## ☕ Unterstützen Sie dieses Projekt
## 📺 Showcase
### 🔄 Freigabesystem in Aktion
*Sehen Sie, wie das Freigabesystem funktioniert: Dokumente erstellen, Freigabe über das Dashboard anfordern, Feedback geben und Revisionen verfolgen.*
### 📊 Dashboard & Spec-Verwaltung
*Entdecken Sie das Echtzeit-Dashboard: Specs anzeigen, Fortschritt verfolgen, Dokumente navigieren und Ihren Entwicklungsworkflow überwachen.*
## ✨ Hauptfunktionen
- **Strukturierter Entwicklungsworkflow** - Sequenzielle Spec-Erstellung (Anforderungen → Design → Aufgaben)
- **Echtzeit-Web-Dashboard** - Überwachen Sie Specs, Aufgaben und Fortschritt mit Live-Updates
- **VSCode Extension** - Integriertes Sidebar-Dashboard für VSCode-Benutzer
- **Freigabe-Workflow** - Vollständiger Freigabeprozess mit Revisionen
- **Aufgabenfortschritt-Verfolgung** - Visuelle Fortschrittsbalken und detaillierter Status
- **Implementierungs-Logs** - Durchsuchbare Logs aller Aufgabenimplementierungen mit Code-Statistiken
- **Mehrsprachige Unterstützung** - Verfügbar in 11 Sprachen
## 🌍 Unterstützte Sprachen
🇺🇸 English • 🇯🇵 日本語 • 🇨🇳 中文 • 🇪🇸 Español • 🇧🇷 Português • 🇩🇪 Deutsch • 🇫🇷 Français • 🇷🇺 Русский • 🇮🇹 Italiano • 🇰🇷 한국어 • 🇸🇦 العربية
## 🚀 Schnellstart
### Schritt 1: Zu Ihrem AI-Tool hinzufügen
Fügen Sie dies zu Ihrer MCP-Konfiguration hinzu (siehe clientspezifische Einrichtung unten):
```json
{
"mcpServers": {
"spec-workflow": {
"command": "npx",
"args": ["-y", "@pimzino/spec-workflow-mcp@latest", "/pfad/zu/ihrem/projekt"]
}
}
}
```
### Schritt 2: Wählen Sie Ihre Oberfläche
**Option A: Web-Dashboard** (Erforderlich für CLI-Benutzer)
Starten Sie das Dashboard (läuft standardmäßig auf Port 5000):
```bash
npx -y @pimzino/spec-workflow-mcp@latest --dashboard
```
Das Dashboard ist erreichbar unter: http://localhost:5000
> **Hinweis:** Nur eine Dashboard-Instanz wird benötigt. Alle Ihre Projekte verbinden sich mit demselben Dashboard.
**Option B: VSCode Extension** (Empfohlen für VSCode-Benutzer)
Installieren Sie die [Spec Workflow MCP Extension](https://marketplace.visualstudio.com/items?itemName=Pimzino.spec-workflow-mcp) aus dem VSCode-Marketplace.
## 📝 Verwendung
Erwähnen Sie einfach spec-workflow in Ihrem Gespräch:
- **"Erstelle eine Spec für Benutzerauthentifizierung"** - Erstellt vollständigen Spec-Workflow
- **"Liste meine Specs auf"** - Zeigt alle Specs und ihren Status
- **"Führe Aufgabe 1.2 in Spec user-auth aus"** - Führt eine bestimmte Aufgabe aus
[Mehr Beispiele anzeigen →](docs/PROMPTING-GUIDE.de.md)
## 🔧 MCP-Client-Einrichtung
Augment Code
Konfigurieren Sie in Ihren Augment-Einstellungen:
```json
{
"mcpServers": {
"spec-workflow": {
"command": "npx",
"args": ["-y", "@pimzino/spec-workflow-mcp@latest", "/pfad/zu/ihrem/projekt"]
}
}
}
```
Claude Code CLI
Fügen Sie zu Ihrer MCP-Konfiguration hinzu:
```bash
claude mcp add spec-workflow npx @pimzino/spec-workflow-mcp@latest -- /pfad/zu/ihrem/projekt
```
**Wichtige Hinweise:**
- Das `-y` Flag umgeht npm-Eingabeaufforderungen für eine reibungslosere Installation
- Der `--` Separator stellt sicher, dass der Pfad an das spec-workflow-Skript übergeben wird, nicht an npx
- Ersetzen Sie `/pfad/zu/ihrem/projekt` durch Ihren tatsächlichen Projektverzeichnispfad
**Alternative für Windows (falls das oben nicht funktioniert):**
```bash
claude mcp add spec-workflow cmd.exe /c "npx @pimzino/spec-workflow-mcp@latest /pfad/zu/ihrem/projekt"
```
Claude Desktop
Fügen Sie zu `claude_desktop_config.json` hinzu:
```json
{
"mcpServers": {
"spec-workflow": {
"command": "npx",
"args": ["-y", "@pimzino/spec-workflow-mcp@latest", "/pfad/zu/ihrem/projekt"]
}
}
}
```
> **Wichtig:** Führen Sie das Dashboard separat mit `--dashboard` aus, bevor Sie den MCP-Server starten.
Cline/Claude Dev
Fügen Sie zu Ihrer MCP-Server-Konfiguration hinzu:
```json
{
"mcpServers": {
"spec-workflow": {
"command": "npx",
"args": ["-y", "@pimzino/spec-workflow-mcp@latest", "/pfad/zu/ihrem/projekt"]
}
}
}
```
Continue IDE Extension
Fügen Sie zu Ihrer Continue-Konfiguration hinzu:
```json
{
"mcpServers": {
"spec-workflow": {
"command": "npx",
"args": ["-y", "@pimzino/spec-workflow-mcp@latest", "/pfad/zu/ihrem/projekt"]
}
}
}
```
Cursor IDE
Fügen Sie zu Ihren Cursor-Einstellungen (`settings.json`) hinzu:
```json
{
"mcpServers": {
"spec-workflow": {
"command": "npx",
"args": ["-y", "@pimzino/spec-workflow-mcp@latest", "/pfad/zu/ihrem/projekt"]
}
}
}
```
OpenCode
Fügen Sie zu Ihrer `opencode.json` Konfigurationsdatei hinzu:
```json
{
"$schema": "https://opencode.ai/config.json",
"mcp": {
"spec-workflow": {
"type": "local",
"command": ["npx", "-y", "@pimzino/spec-workflow-mcp@latest", "/pfad/zu/ihrem/projekt"],
"enabled": true
}
}
}
```
Windsurf
Fügen Sie zu Ihrer `~/.codeium/windsurf/mcp_config.json` Konfigurationsdatei hinzu:
```json
{
"mcpServers": {
"spec-workflow": {
"command": "npx",
"args": ["-y", "@pimzino/spec-workflow-mcp@latest", "/pfad/zu/ihrem/projekt"]
}
}
}
```
Codex
Fügen Sie zu Ihrer `~/.codex/config.toml` Konfigurationsdatei hinzu:
```toml
[mcp_servers.spec-workflow]
command = "npx"
args = ["-y", "@pimzino/spec-workflow-mcp@latest", "/pfad/zu/ihrem/projekt"]
```
## 🐳 Docker-Deployment
Führen Sie das Dashboard in einem Docker-Container für isoliertes Deployment aus:
```bash
# Mit Docker Compose (empfohlen)
cd containers
docker-compose up --build
# Oder mit Docker CLI
docker build -f containers/Dockerfile -t spec-workflow-mcp .
docker run -p 5000:5000 -v "./workspace/.spec-workflow:/workspace/.spec-workflow:rw" spec-workflow-mcp
```
Das Dashboard ist verfügbar unter: http://localhost:5000
[Siehe Docker-Setup-Anleitung →](containers/README.md)
## 🔒 Sandbox-Umgebungen
Für Sandbox-Umgebungen (z.B. Codex CLI mit `sandbox_mode=workspace-write`), in denen `$HOME` schreibgeschützt ist, verwenden Sie die Umgebungsvariable `SPEC_WORKFLOW_HOME`, um globale Zustandsdateien an einen beschreibbaren Ort umzuleiten:
```bash
SPEC_WORKFLOW_HOME=/workspace/.spec-workflow-mcp npx -y @pimzino/spec-workflow-mcp@latest /workspace
```
[Siehe Konfigurationsanleitung →](docs/CONFIGURATION.de.md#umgebungsvariablen)
## 📚 Dokumentation
- [Konfigurationsanleitung](docs/CONFIGURATION.de.md) - Befehlszeilenoptionen, Konfigurationsdateien
- [Benutzerhandbuch](docs/USER-GUIDE.de.md) - Umfassende Verwendungsbeispiele
- [Workflow-Prozess](docs/WORKFLOW.de.md) - Entwicklungsworkflow und Best Practices
- [Oberflächen-Leitfaden](docs/INTERFACES.de.md) - Dashboard- und VSCode-Extension-Details
- [Prompting-Leitfaden](docs/PROMPTING-GUIDE.de.md) - Erweiterte Prompting-Beispiele
- [Tools-Referenz](docs/TOOLS-REFERENCE.de.md) - Vollständige Tools-Dokumentation
- [Entwicklung](docs/DEVELOPMENT.de.md) - Mitwirken und Entwicklungseinrichtung
- [Fehlerbehebung](docs/TROUBLESHOOTING.de.md) - Häufige Probleme und Lösungen
## 📁 Projektstruktur
```
ihr-projekt/
.spec-workflow/
approvals/
archive/
specs/
steering/
templates/
user-templates/
config.example.toml
```
## 🛠️ Entwicklung
```bash
# Abhängigkeiten installieren
npm install
# Projekt erstellen
npm run build
# Im Entwicklungsmodus ausführen
npm run dev
```
[Siehe Entwicklungsanleitung →](docs/DEVELOPMENT.de.md)
## 📄 Lizenz
GPL-3.0
## ⭐ Star-Verlauf

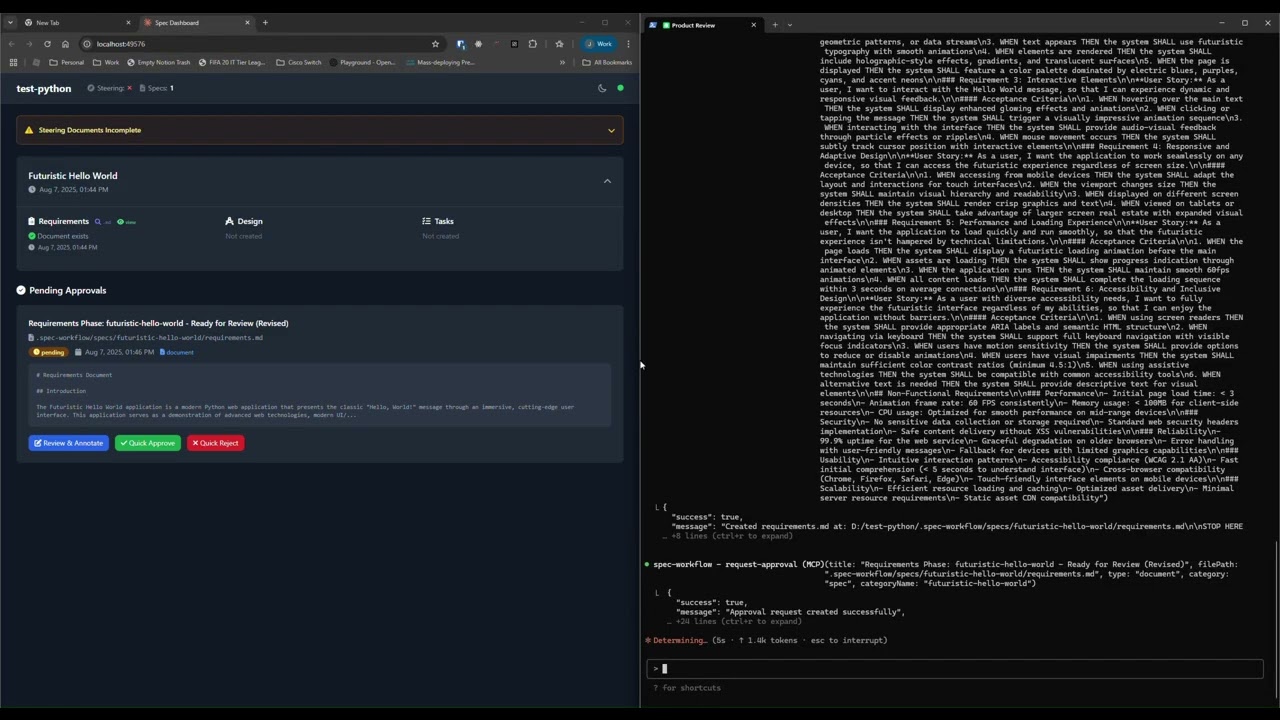 *Sehen Sie, wie das Freigabesystem funktioniert: Dokumente erstellen, Freigabe über das Dashboard anfordern, Feedback geben und Revisionen verfolgen.*
### 📊 Dashboard & Spec-Verwaltung
*Sehen Sie, wie das Freigabesystem funktioniert: Dokumente erstellen, Freigabe über das Dashboard anfordern, Feedback geben und Revisionen verfolgen.*
### 📊 Dashboard & Spec-Verwaltung
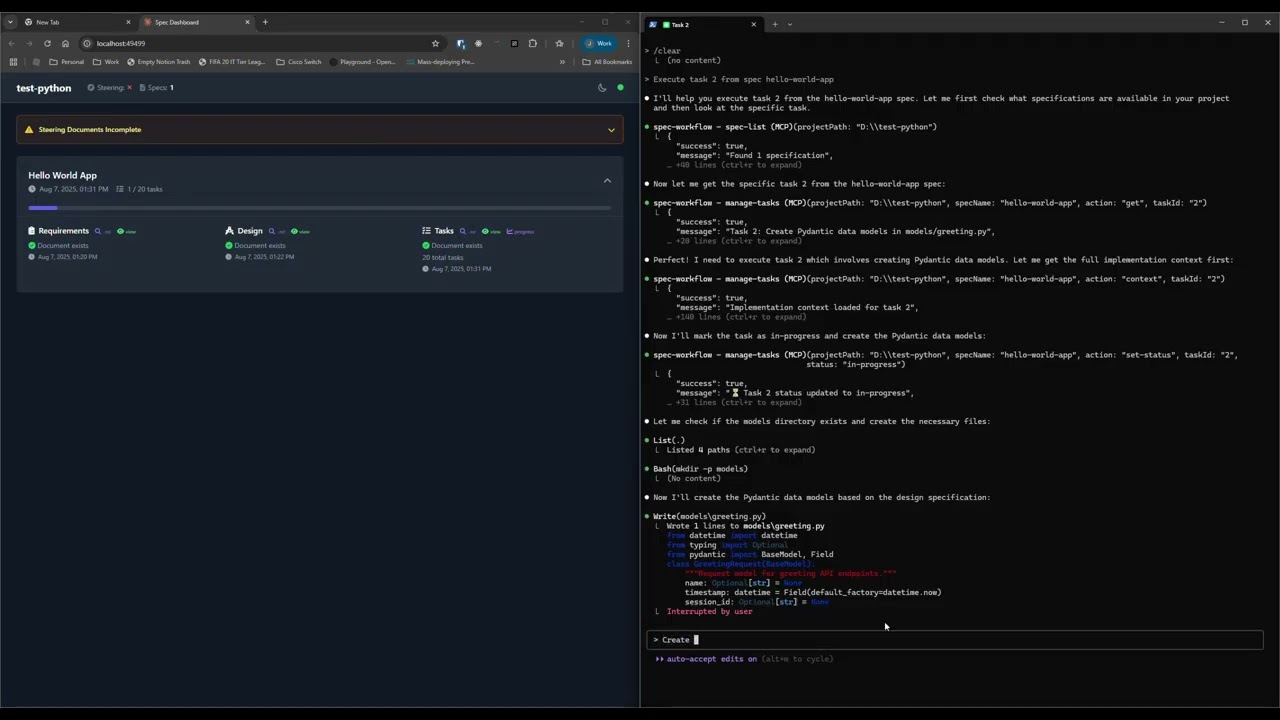 *Entdecken Sie das Echtzeit-Dashboard: Specs anzeigen, Fortschritt verfolgen, Dokumente navigieren und Ihren Entwicklungsworkflow überwachen.*
## ✨ Hauptfunktionen
- **Strukturierter Entwicklungsworkflow** - Sequenzielle Spec-Erstellung (Anforderungen → Design → Aufgaben)
- **Echtzeit-Web-Dashboard** - Überwachen Sie Specs, Aufgaben und Fortschritt mit Live-Updates
- **VSCode Extension** - Integriertes Sidebar-Dashboard für VSCode-Benutzer
- **Freigabe-Workflow** - Vollständiger Freigabeprozess mit Revisionen
- **Aufgabenfortschritt-Verfolgung** - Visuelle Fortschrittsbalken und detaillierter Status
- **Implementierungs-Logs** - Durchsuchbare Logs aller Aufgabenimplementierungen mit Code-Statistiken
- **Mehrsprachige Unterstützung** - Verfügbar in 11 Sprachen
## 🌍 Unterstützte Sprachen
🇺🇸 English • 🇯🇵 日本語 • 🇨🇳 中文 • 🇪🇸 Español • 🇧🇷 Português • 🇩🇪 Deutsch • 🇫🇷 Français • 🇷🇺 Русский • 🇮🇹 Italiano • 🇰🇷 한국어 • 🇸🇦 العربية
## 🚀 Schnellstart
### Schritt 1: Zu Ihrem AI-Tool hinzufügen
Fügen Sie dies zu Ihrer MCP-Konfiguration hinzu (siehe clientspezifische Einrichtung unten):
```json
{
"mcpServers": {
"spec-workflow": {
"command": "npx",
"args": ["-y", "@pimzino/spec-workflow-mcp@latest", "/pfad/zu/ihrem/projekt"]
}
}
}
```
### Schritt 2: Wählen Sie Ihre Oberfläche
**Option A: Web-Dashboard** (Erforderlich für CLI-Benutzer)
Starten Sie das Dashboard (läuft standardmäßig auf Port 5000):
```bash
npx -y @pimzino/spec-workflow-mcp@latest --dashboard
```
Das Dashboard ist erreichbar unter: http://localhost:5000
> **Hinweis:** Nur eine Dashboard-Instanz wird benötigt. Alle Ihre Projekte verbinden sich mit demselben Dashboard.
**Option B: VSCode Extension** (Empfohlen für VSCode-Benutzer)
Installieren Sie die [Spec Workflow MCP Extension](https://marketplace.visualstudio.com/items?itemName=Pimzino.spec-workflow-mcp) aus dem VSCode-Marketplace.
## 📝 Verwendung
Erwähnen Sie einfach spec-workflow in Ihrem Gespräch:
- **"Erstelle eine Spec für Benutzerauthentifizierung"** - Erstellt vollständigen Spec-Workflow
- **"Liste meine Specs auf"** - Zeigt alle Specs und ihren Status
- **"Führe Aufgabe 1.2 in Spec user-auth aus"** - Führt eine bestimmte Aufgabe aus
[Mehr Beispiele anzeigen →](docs/PROMPTING-GUIDE.de.md)
## 🔧 MCP-Client-Einrichtung
*Entdecken Sie das Echtzeit-Dashboard: Specs anzeigen, Fortschritt verfolgen, Dokumente navigieren und Ihren Entwicklungsworkflow überwachen.*
## ✨ Hauptfunktionen
- **Strukturierter Entwicklungsworkflow** - Sequenzielle Spec-Erstellung (Anforderungen → Design → Aufgaben)
- **Echtzeit-Web-Dashboard** - Überwachen Sie Specs, Aufgaben und Fortschritt mit Live-Updates
- **VSCode Extension** - Integriertes Sidebar-Dashboard für VSCode-Benutzer
- **Freigabe-Workflow** - Vollständiger Freigabeprozess mit Revisionen
- **Aufgabenfortschritt-Verfolgung** - Visuelle Fortschrittsbalken und detaillierter Status
- **Implementierungs-Logs** - Durchsuchbare Logs aller Aufgabenimplementierungen mit Code-Statistiken
- **Mehrsprachige Unterstützung** - Verfügbar in 11 Sprachen
## 🌍 Unterstützte Sprachen
🇺🇸 English • 🇯🇵 日本語 • 🇨🇳 中文 • 🇪🇸 Español • 🇧🇷 Português • 🇩🇪 Deutsch • 🇫🇷 Français • 🇷🇺 Русский • 🇮🇹 Italiano • 🇰🇷 한국어 • 🇸🇦 العربية
## 🚀 Schnellstart
### Schritt 1: Zu Ihrem AI-Tool hinzufügen
Fügen Sie dies zu Ihrer MCP-Konfiguration hinzu (siehe clientspezifische Einrichtung unten):
```json
{
"mcpServers": {
"spec-workflow": {
"command": "npx",
"args": ["-y", "@pimzino/spec-workflow-mcp@latest", "/pfad/zu/ihrem/projekt"]
}
}
}
```
### Schritt 2: Wählen Sie Ihre Oberfläche
**Option A: Web-Dashboard** (Erforderlich für CLI-Benutzer)
Starten Sie das Dashboard (läuft standardmäßig auf Port 5000):
```bash
npx -y @pimzino/spec-workflow-mcp@latest --dashboard
```
Das Dashboard ist erreichbar unter: http://localhost:5000
> **Hinweis:** Nur eine Dashboard-Instanz wird benötigt. Alle Ihre Projekte verbinden sich mit demselben Dashboard.
**Option B: VSCode Extension** (Empfohlen für VSCode-Benutzer)
Installieren Sie die [Spec Workflow MCP Extension](https://marketplace.visualstudio.com/items?itemName=Pimzino.spec-workflow-mcp) aus dem VSCode-Marketplace.
## 📝 Verwendung
Erwähnen Sie einfach spec-workflow in Ihrem Gespräch:
- **"Erstelle eine Spec für Benutzerauthentifizierung"** - Erstellt vollständigen Spec-Workflow
- **"Liste meine Specs auf"** - Zeigt alle Specs und ihren Status
- **"Führe Aufgabe 1.2 in Spec user-auth aus"** - Führt eine bestimmte Aufgabe aus
[Mehr Beispiele anzeigen →](docs/PROMPTING-GUIDE.de.md)
## 🔧 MCP-Client-Einrichtung