# ng-superclass
A library of classes to extend from - for simplifying writing reactive Angular components/directives and custom controls that implement ControlValueAccessor
[]()
[]()
[]()
[](https://github.com/prettier/prettier)
## Features
- ✅ Simple syntax that reduces boilerplate
- ✅ FormComponentSuperclass - for creating simple or complex custom form controls
- ✅ DirectiveSuperclass - for getting stream of @Input values
- ✅ SubscribeSink - for automatic managing subscriptions
## Installation
### NPM
```sh
npm install @ngspot/ng-superclass
```
### Yarn
```sh
yarn add @ngspot/ng-superclass
```
## Overview
This library provides a set of classes that can be used to extend from when writing application components. Each class in this library actually extends from another class in this library in the following order:
> `FormComponentSuperclass`
> extends `DirectiveSuperclass`
> extends `SubscribeSink`
So if extending the component from `FormComponentSuperclass`, the component will inherit the functionality of `DirectiveSuperclass` and `SubscribeSink` classes.
Choose the class to extend from based on what is needed.
Now, here is more about the unique functionality of each class:
### **FormComponentSuperclass**
Writing a custom control in Angular requires [quite a bit of boilerplate](https://blog.angular-university.io/angular-custom-form-controls/#demoofafullyfunctionalcustomformcontrol). It requires a developer to implement a `ControlValueAccessor` and provide some additional metadata in the `@Component` decorator. It gets trickier when your component needs to provide built-in custom validation. If you've ever been down this road, you might have run into some weird edge-cases.
`FormComponentSuperclass` class takes care of all the boilerplate, smoothens out edge-cases, and frees the developer up to concentrate strictly on the handling of control values.
Take a look at the comparison of implementations of the same component without the `FormComponentSuperclass` (left) and with it (right):
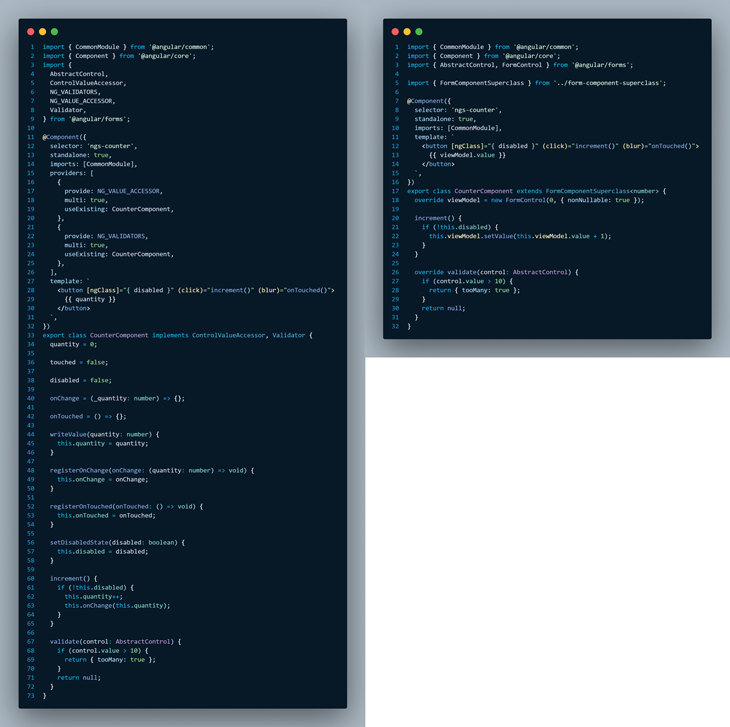
`FormComponentSuperclass` does not put any restrictions on the type of UI that drives the model value. There are two ways of using this class.
#### 1. using `ngControl.control`
Using `ngControl.control` is best for simple use-cases when the template of your custom control requires a single `FormControl` binding.
The property `ngControl.control` is a direct reference to the control bound to the custom control you're building on the outside. For example, this could be the `[formControl]="myControl"` binding or `[(ngModel)]="myValue"` binding. The `ngControl.control` lets you use the control bound outside inside of your custom component. For more information on this technique, see an article by Netanel Basal: ["Forwarding Form Controls to Custom Control Components in Angular"](https://medium.com/netanelbasal/forwarding-form-controls-to-custom-control-components-in-angular-701e8406cc55).
##### Usage:
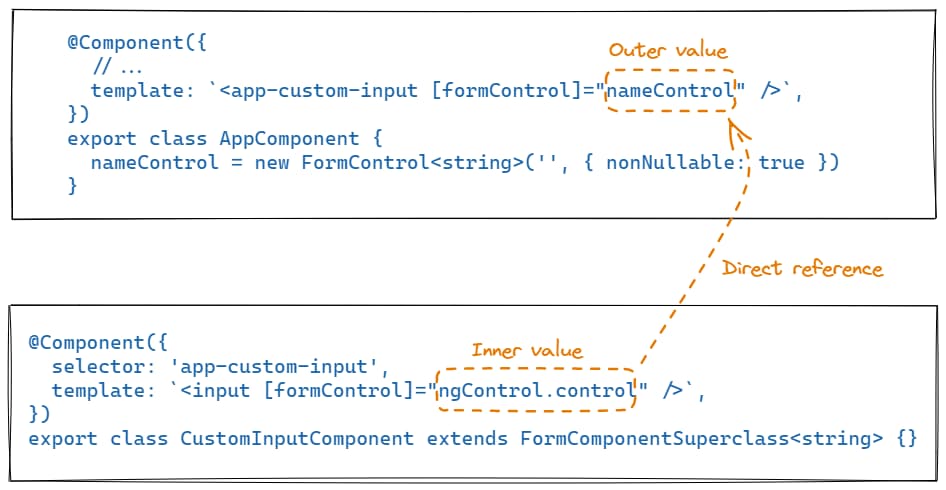
#### 2. using `viewModel`
This is useful when there is a need for a custom internal state of your component. For example, consider a `CounterComponent`:
```ts
@Component({
selector: 'app-counter',
template: `
`,
})
export class CounterComponent extends FormComponentSuperclass {
override viewModel = new FormControl(0, { nonNullable: true });
increment() {
this.viewModel.setValue(this.viewModel.value + 1);
}
}
```
Its' template consists of a single button that displays number of clicks. Each time the button is clicked, the count number increments.
`FormComponentSuperclass` comes with an abstract `viewModel` property that can be instantiated with a `FormControl`, `FormGroup`, or `FormArray`. `viewModel` is designed to represent the internal state of your custom component. That state ("inner" value) is automatically synchronized with the "outer" value of the control.
However, because the inner model type might be different from the outer model type, there is an optional step in the middle that the value goes through to convert outer type to the inner type and wise-versa. The counter example does not require any conversions. Both, the outer type and the inner type are `number`:
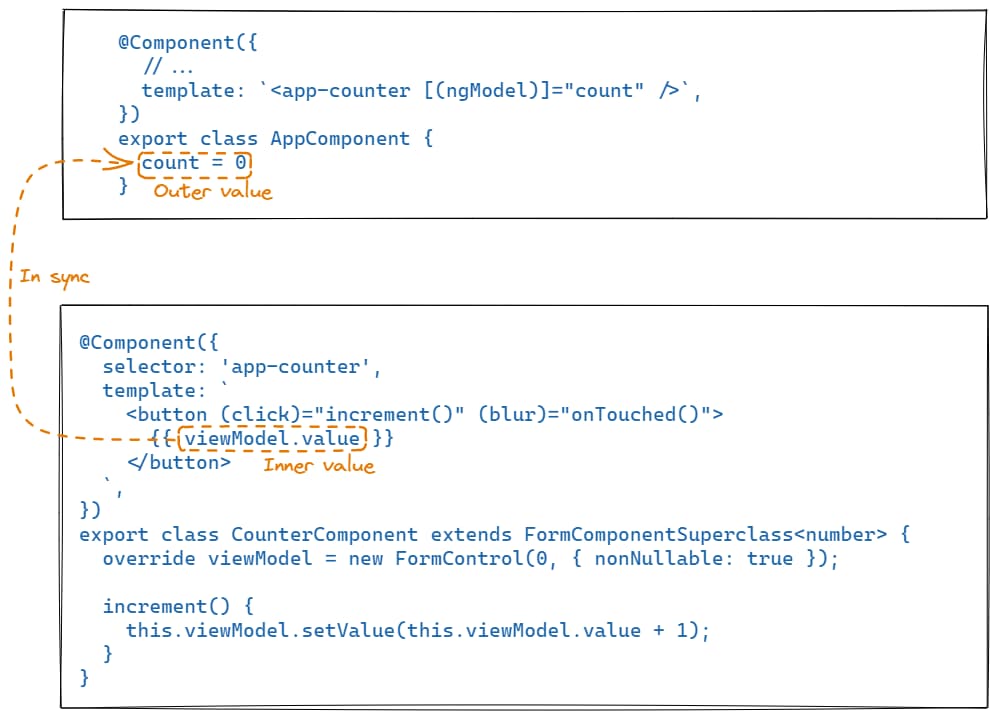
See the [demo of this component](https://dmitryefimenko.github.io/ngspot/ng-superclass#counter).
#### viewModel and transforming outer to inner values
Let's take a look at a `FullNameComponent` example. Let's assume that the component expects `OuterType` to be a `string` in the format `[firstName] [lastName]`. Internally, the component should split the incoming string by _space_ and use two inputs to render the results and allow editing of the full name.
For this use-case internally, it's easiest to instantiate `viewModel` as a `FormGroup` with two controls: for first name and last name. Since the `OuterType` and `InnerType` are not the same, we override `outerToInner` and `innerToOuter` props to convert between two types:
```ts
@Component({
selector: 'app-full-name',
standalone: true,
imports: [ReactiveFormsModule],
template: `
`,
})
export class FullNameReactiveComponent extends FormComponentSuperclass<
OuterType,
InnerType
> {
override viewModel = new FormGroup({
firstName: new FormControl('', { nonNullable: true }),
lastName: new FormControl('', { nonNullable: true }),
});
override outerToInner = (fullName$: Observable) =>
fullName$.pipe(
map((fullName) => {
const [firstName, lastName] = (fullName ?? '').split(' ');
const inner: InnerType = {
firstName: firstName ?? '',
lastName: lastName ?? '',
};
return inner;
})
);
override innerToOuter = (innerValues$: Observable) =>
innerValues$.pipe(
map(({ firstName, lastName }) => {
let result = '';
if (firstName) {
result += firstName;
}
if (lastName) {
result += ` ${lastName}`;
}
return result;
})
);
}
```
The data flow approximately looks like this:
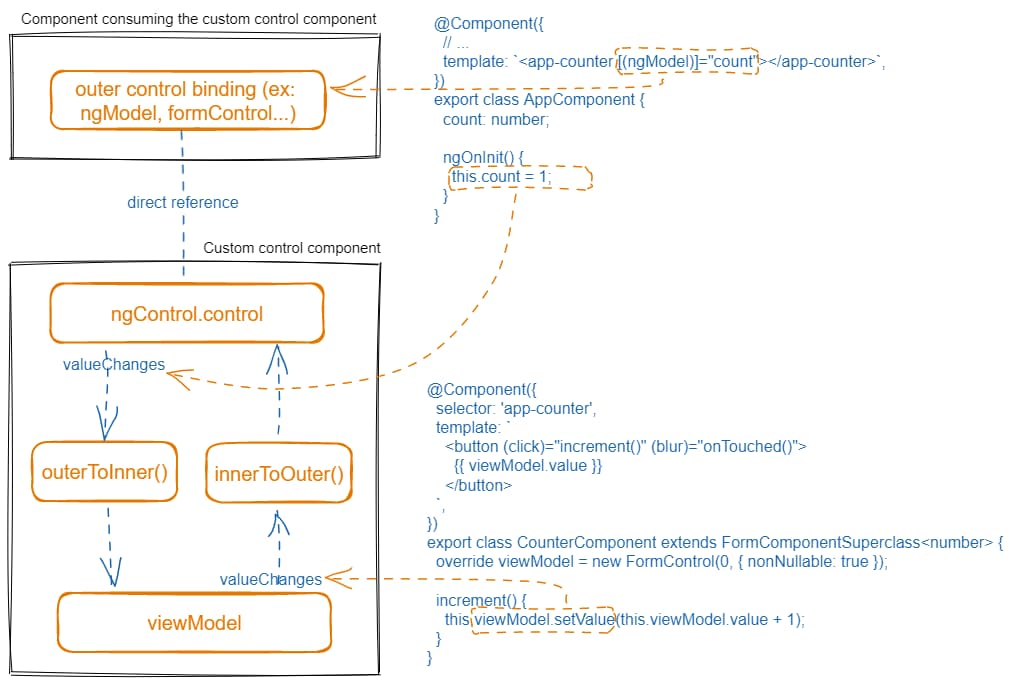
Notice, that both `outerToInner` and `innerToOuter` operate with observables. This is important since it enables all kinds async behaviors. You could even chose to set the viewModel, but due to some condition forbid the value from synching to the consumer:
```ts
override innerToOuter = (innerValues$: Observable) =>
innerValues$.pipe(
switchMap((innerValue) => /* maybe some http call */),
filter(conditionForValidValues), // prevents some values from synching to the outside
map(convertInnerToOuter)
);
```
#### Built-in validation
The `FormComponentSuperclass` also provides an easy way to include built-in validation logic. Simply `override` the `validate()` method, provide your logic and return `ValidationErrors | null` - just like with any angular validation function.
Here's an example with the `CounterComponent` prohibiting any value greater than 5:
```ts
export class CounterComponent extends FormComponentSuperclass {
override viewModel = new FormControl(0, { nonNullable: true });
increment() {
this.viewModel.setValue(this.viewModel.value + 1);
}
override validate(control: AbstractControl) {
if (control.value > 5) {
return {
max: {
actual: control.value,
max: 5,
},
};
}
return null;
}
}
```
It's helpful to understand how the built-in validation works under the hood. Remember, `ngControl.control` is the direct reference to the control bound by the consumer. If `validate` method is provided in the custom control component, it's simply added as a validator to the `ngControl.control`. When component is destroyed, the validator is removed.
### **DirectiveSuperclass**
This class is useful for enabling Reactive programming in Angular components/directives/pipes when needing to track changes to Inputs or to know if changes have run.
#### **1. `getInput$`**
Gets the value of an `@Input()` as an observable stream:
##### Usage:
```ts
class MyComponent extends DirectiveSuperclass {
@Input() color: string;
color$ = this.getInput$('color');
}
```
#### **2. `onChangesRan$`**
An Observable that emits when the component `ngOnChanges` lifecycle hook has run. Late subscriptions are also supported since it uses `BehaviorSubject` under the hood.
##### Usage:
```ts
class MyComponent extends DirectiveSuperclass {
valueAfterChangesRun$ = this.onChangesRan$.pipe(switchMapTo('Dima'));
}
```
#### **3. `inputChanges$`**
Emits the set of `@Input()` property names that change during each call to `ngOnChanges()`.
##### Usage:
```ts
class MyComponent extends DirectiveSuperclass {
@Input() color: string;
valueAfterChangesRun$ = this.inputChanges$.pipe(
tap((inputName) => {
console.log(`${inputName} changed`);
})
);
}
```
### **SubscribeSink**
```ts
@Component({
/* ... */
})
class MyComponent extends SubscribeSink {}
```
Class provides two methods:
#### **1. `subscribeTo`**
Use this method for hassle-free subscribing to observables. Under the hood, this class tracks the component destruction lifecycle hook and automatically unsubscribes from the observable when component destroys.
##### Usage:
```ts
class MyComponent extends SubscribeSink {
this.subscribeTo(myObservable$);
}
```
#### **2. `createEffect`**
Creating side effects in a reactive Angular components is a common task. This method is just that - a way to create a side effect. Internally, this class will manage the subscription according to the component lifecycle.
##### Usage:
```ts
@Component({
template: ` `,
})
class MyComponent extends SubscribeSink {
saveData = this.createEffect((myData$) =>
myData$.pipe(
// your choice of flattening operator
switchMap((myData) => this.api.saveMyData(myData))
)
);
}
```
## Previous Art
The library was originally inspired by [https://simontonsoftware.github.io/s-libs/ng-core/](@s-libs/ng-core). HUGE kudos to the authors of s-libs!
The most recent version of this library uses technique of "forwarding the ngControl" described in an article by Netanel Basal: ["Forwarding Form Controls to Custom Control Components in Angular"](https://medium.com/netanelbasal/forwarding-form-controls-to-custom-control-components-in-angular-701e8406cc55)
## License
MIT © [Dmitry Efimenko](mailto:dmitrief@gmail.com)