import hash from 'object-hash';
import React, {
type ForwardedRef,
forwardRef,
useEffect,
useImperativeHandle,
useMemo,
useRef,
} from 'react';
import {
type ColorValue,
type NativeSyntheticEvent,
Platform,
processColor,
type ViewProps,
} from 'react-native';
import type { Double } from 'react-native/Libraries/Types/CodegenTypes';
import {
cameraChangeReasonFromNumber,
cameraEasingToNumber,
convertJsImagePropToNativeProp,
createCameraInstance,
} from '../internal/Util';
import { Const } from '../internal/util/Const';
import { useStableCallback } from '../internal/util/useStableCallback';
import {
Commands,
type NativeClusterProp,
type NativeClustersProp,
type NativeLocationOverlayProp,
default as NativeNaverMapView,
} from '../spec/RNCNaverMapViewNativeComponent';
import type { Camera } from '../types/Camera';
import type { CameraAnimationEasing } from '../types/CameraAnimationEasing';
import type { CameraChangeReason } from '../types/CameraChangeReason';
import type { CameraMoveBaseParams } from '../types/CameraMoveBaseParams';
import type { ClusterMarkerProp } from '../types/ClusterMarkerProp';
import type { Coord } from '../types/Coord';
import type { LocationTrackingMode } from '../types/LocationTrackingMode';
import type { LogoAlign } from '../types/LogoAlign';
import type { MapImageProp } from '../types/MapImageProp';
import type { MapType } from '../types/MapType';
import type { Rect } from '../types/Rect';
import type { Region } from '../types/Region';
export interface NaverMapViewProps extends ViewProps {
/**
* mapType 속성을 지정하면 지도의 유형을 변경할 수 있습니다.
* 지도의 유형을 변경하면 가장 바닥에 나타나는 배경 지도의 스타일이 변경됩니다.
*
* @see {@link MapType}
* @group Map Look & Feel
* @default Basic
*/
mapType?: MapType;
/**
* 바닥 지도 위에 부가적인 정보를 나타내는 레이어 그룹을 노출할 수 있습니다.
*
* 레이어 그룹은 지도 유형과 달리 동시에 두 개 이상을 활성화할 수 있습니다.
* 단, 지도 유형에 따라 표현 가능한 레이어 그룹이 정해져 있습니다.
* 지도 유형이 특정 레이어 그룹을 지원하지 않으면 활성화하더라도 해당하는 요소가 노출되지 않습니다.
*
* default값은 BUILDING만 활성화되어있는 상태입니다.
*
* @see [references](https://navermaps.github.io/android-map-sdk/guide-ko/2-3.html)
* @group Map Look & Feel
*
* @default ['BUILDING']
*/
layerGroups?: {
/** 건물 그룹입니다. 활성화할 경우 건물 형상, 주소 심벌 등 건물과 관련된 요소가 노출됩니다. 기본적으로 활성화됩니다. */
BUILDING: boolean;
/** 실시간 교통정보 그룹입니다. 활성화할 경우 실시간 교통정보가 노출됩니다. */
TRAFFIC: boolean;
/** 대중교통 그룹입니다. 활성화할 경우 철도, 지하철 노선, 버스정류장 등 대중교통과 관련된 요소가 노출됩니다. */
TRANSIT: boolean;
/** 자전거 그룹입니다. 활성화할 경우 자전거 도로, 자전거 주차대 등 자전거와 관련된 요소가 노출됩니다. */
BICYCLE: boolean;
/** 등산로 그룹입니다. 활성화할 경우 등산로, 등고선 등 등산과 관련된 요소가 노출됩니다. */
MOUNTAIN: boolean;
/** 지적편집도 그룹입니다. 활성화할 경우 지적편집도가 노출됩니다. */
CADASTRAL: boolean;
};
/**
* 카메라의 위치를 조절합니다. `region`이 존재해도 `camera`가 설정되면 동작하지 않습니다.
*
* [Reference](https://navermaps.github.io/ios-map-sdk/guide-ko/3-1.html)
*
* @see {@link Camera}
* @see {@link initialCamera}
* @group Camera
*/
camera?: Camera;
/**
* 맵이 생성된 후 첫 카메라 설정입니다.
*
* `camera`를 사용하지 않을 때만 사용해야합니다.
*
* 컴포넌트가 mount되고 변경해도 동작하지 않습니다.
*
* @see {@link Camera}
* @see {@link camera}
* @group Camera
*/
initialCamera?: Camera;
/**
* 해당 영역이 완전히 보이는 좌표와 최대 줌 레벨로 카메라가 이동합니다.
*
* `camera`가 존재한다면 동작하지 않습니다.
*
* `latitude`, `longtidue`는 지도의 south-west(위도, 경도가 낮은 부분)를 의미합니다.
*
* `latitudeDelta`, `longitudeDelta`는 각 위도 경도로 얼마만큼의 범위를 가질 것인지를 의미합니다.
* 항상 양수입니다.
*
* 예를 들어, `latitudeDelta`가 0.1이라면 위도가 지도의 보이는 곳의 끝과 끝에서 0.1이 차이난다는 것을 의미합니다.
* 하지만 `longitudeDelta`가 특정 값보다 커서 최대 줌 레벨이 더 작아진다면 0.1보다 더 차이나게 될 수도 있고 반대도 같습니다.
*
* @see {@link Region}
* @see {@link initialRegion}
* @group Camera
*/
region?: Region;
/**
* 맵이 생성된 후 첫 위치 설정입니다.
*
* `region`를 사용하지 않을 때만 사용해야합니다.
*
* 컴포넌트가 mount되고 변경해도 동작하지 않습니다.
*
* @see {@link Region}
* @see {@link region}
* @group Camera
*/
initialRegion?: Region;
/**
* `camera`, `region`이 변경될 때 카메라 이동의 애니메이션 지속시간, milliseconds
* 0일 때는 애니메이션이 작동하지 않습니다.
*
* @group Animation
* @see {@link animationEasing}
* @default 0
*/
animationDuration?: number;
/**
*
* `camera`, `region`이 변경될 때 카메라 이동의 애니메이션 Easing
*
* @group Animation
* @see {@link animationDuration}
* @default EaseOut
*/
animationEasing?: CameraAnimationEasing;
/**
* indoorMapEnabled 속성을 사용하면 실내지도를 활성화할 수 있습니다.
* 실내지도가 활성화되면 줌 레벨이 일정 수준 이상이고 실내지도가 있는 영역에 지도의 중심이 위치할 경우 자동으로 해당 영역에 대한 실내지도가 나타납니다.
* 단, 지도 유형이 실내지도를 지원하지 않으면 실내지도를 활성화하더라도 아무런 변화가 일어나지 않습니다.
* Basic, Terrain 지도 유형만이 실내지도를 지원합니다.
*
* @default false
*/
isIndoorEnabled?: boolean;
/**
* nightModeEnabled 속성을 사용하면 야간 모드를 활성화할 수 있습니다.
* 야간 모드가 활성화되면 지도의 전반적인 스타일이 어두운 톤으로 변경됩니다.
* 단, 지도 유형이 야간 모드를 지원하지 않을 경우 야간 모드를 활성화하더라도 아무런 변화가 일어나지 않습니다.
* Navi 지도 유형만이 야간 모드를 지원합니다.
*
* @default false
*/
isNightModeEnabled?: boolean;
/**
* 이 속성을 사용하면 라이트 모드를 활성화할 수 있습니다.
* 라이트 모드가 활성화되면 지도의 로딩이 빨라지고 메모리 소모가 줄어듭니다.
* 그러나 다음과 같은 제약이 생깁니다.
*
* - 지도의 전반적인 화질이 하락합니다.
* - Navi 지도 유형을 사용할 수 없습니다.
* - 레이어 그룹을 활성화할 수 없습니다.
* - 실내지도, 야간 모드를 사용할 수 없습니다.
* - 디스플레이 옵션을 변경할 수 없습니다.
* - 카메라가 회전하거나 기울어지면 지도 심벌도 함께 회전하거나 기울어집니다.
* - 줌 레벨이 커지거나 작아지면 지도 심벌도 일정 정도 함께 커지거나 작아집니다.
* - 지도 심벌의 클릭 이벤트를 처리할 수 없습니다.
* - 마커와 지도 심벌 간 겹침을 처리할 수 없습니다.
*
* 따라서 라이트 모드는 꼭 필요한 상황에만 제한적으로 사용하는 것이 좋습니다.
*
* @default false
*/
isLiteModeEnabled?: boolean;
/**
* lightness 속성을 사용하면 지도의 밝기를 지정할 수 있습니다.
* 지도의 밝기를 지정하더라도 오버레이의 밝기는 변경되지 않으므로 오버레이를 강조하고자 할 때 사용할 수 있습니다.
* 값은 -1~1의 비율로 지정할 수 있으며, -1에 가까울수록 어두워지고 1에 가까울수록 밝아집니다.
*
* @default 0
*/
lightness?: number;
/**
* 지도가 기울어지면 건물이 입체적으로 표시됩니다.
* buildingHeight 속성을 사용하면 입체적으로 표현되는 건물의 높이를 지정할 수 있습니다.
* 값은 0~1의 비율로 지정할 수 있으며, 0으로 지정하면 지도가 기울어지더라도 건물이 입체적으로 표시되지 않습니다.
*
* @default 1
*/
buildingHeight?: number;
/**
* symbolScale 속성을 사용하면 심벌의 크기를 변경할 수 있습니다.
* 0~2의 비율로 지정할 수 있으며, 값이 클수록 심벌이 커집니다.
*
* @default 1
*/
symbolScale?: number;
/**
* 지도를 기울이면 가까이 있는 심벌은 크게, 멀리 있는 심벌은 작게 그려집니다.
* symbolPerspectiveRatio 속성을 사용하면 심벌의 원근 효과를 조절할 수 있습니다.
* 0~1의 비율로 지정할 수 있으며, 값이 작을수록 원근감이 줄어들어 0이 되면 원근 효과가 완전히 사라집니다.
*
* @default 1
*/
symbolPerspectiveRatio?: number;
/**
* 콘텐츠 패딩을 지정할 수 있습니다.
* 다음 그림과 같이 UI 요소가 지도의 일부를 덮을 경우, 카메라는 지도 뷰의 중심에 위치하므로 실제로 보이는 지도의 중심과 카메라의 위치가 불일치하게 됩니다.
*
* 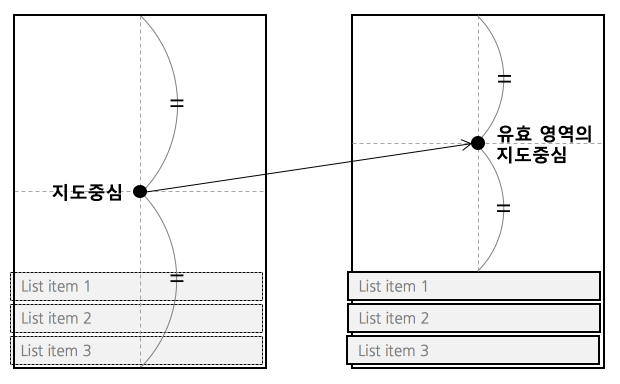 */
mapPadding?: Partial;
/**
* 나침반: 카메라의 회전 및 틸트 상태를 표현합니다.
* 탭하면 카메라의 헤딩과 틸트가 0으로 초기화됩니다.
* 헤딩과 틸트가 0이 되면 자동으로 사라집니다.
*/
isShowCompass?: boolean;
/**
* 축척 바: 지도의 축척을 표현합니다. 지도를 조작하는 기능은 없습니다.
*/
isShowScaleBar?: boolean;
/**
* 줌 버튼: 탭하면 지도의 줌 레벨을 1씩 증가 또는 감소합니다.
*/
isShowZoomControls?: boolean;
/**
* 실내지도 층 피커: 노출 중인 실내지도 구역의 층 정보를 표현합니다
* 층을 선택하면 해당 층의 실내지도가 노출됩니다.
* 실내지도가 보이는 상황에만 나타납니다.
*/
isShowIndoorLevelPicker?: boolean;
/**
* 현위치 버튼: 위치 추적 모드를 표현합니다. 탭하면 모드가 변경됩니다.
*/
isShowLocationButton?: boolean;
/**
* 카메라의 최소 줌 레벨입니다.
*/
minZoom?: number;
/**
* 카메라의 최대 줌 레벨입니다.
*/
maxZoom?: number;
/**
* extent 속성을 지정하면 카메라의 대상 지점을 영역 내로 제한할 수 있습니다.
* 카메라가 제한 영역을 벗어나도록 API를 호출하더라도 대상 지점이 영역 내로 조정됩니다.
*
* 카메라 영역을 제한할 때 최소 줌 레벨도 함께 제한하는 것이 좋습니다.
* 그렇지 않으면 지도가 축소되었을 때 제한 영역이 너무 작게 나타날 수 있습니다.
*/
extent?: Region;
/**
* 한반도로 `extent`를 제한합니다. `extent`가 존재한다면 동작하지 않습니다.
*/
isExtentBoundedInKorea?: boolean;
/**
* 네이버 로고의 위치입니다.
*
* @see {@link LogoAlign}
* @group Logo
*/
logoAlign?: LogoAlign;
/**
* 네이버 로고의 마진입니다.
*
* @see {@link Rect}
* @group Logo
*/
logoMargin?: Partial;
/**
* 탭 활성화 여부를 지정할 수 있습니다.
* 로고 탭을 비활성화한 앱은 반드시 앱 내에 네이버 지도 SDK의
* 법적 공지(-showLegalNotice) 및 오픈소스 라이선스(-showOpenSourceLicense)뷰를 보여주는 메뉴를 만들어야 합니다.
*/
// isLogoInteractionEnabled?: boolean;
/**
* 스크롤: 한 개 또는 두 개 이상의 손가락으로 지도를 드래그하면 카메라가 손가락을 따라 이동합니다.
*
* @group Gesture
*/
isScrollGesturesEnabled?: boolean;
/**
* 줌: 지도를 더블 탭하면 줌 레벨이 한 단계 확대됩니다. 두 손가락 탭하면 한 단계 축소됩니다.
* 핀치와 스트레치 또는 한 손가락 줌 제스처로도 지도의 줌 레벨을 변경할 수 있습니다.
*
* @group Gesture
*/
isZoomGesturesEnabled?: boolean;
/**
* 틸트: 두 개의 손가락으로 지도를 위아래로 드래그하면 기울임 각도가 바뀝니다.
*
* @group Gesture
*/
isTiltGesturesEnabled?: boolean;
/**
* 회전: 두 개의 손가락으로 지도를 돌리면 베어링 각도가 바뀝니다.
*
* @group Gesture
*/
isRotateGesturesEnabled?: boolean;
/**
* 스톱: 카메라 애니메이션이 진행 중일 때 지도를 탭하면 애니메이션이 취소되고 카메라가 현재 위치에 멈춥니다.
*
* @group Gesture
*/
isStopGesturesEnabled?: boolean;
/**
* 안드로이드에서 SurfaceView대신 TextureView를 사용합니다.
*
* 컴포넌트가 mount되고 변경해도 동작하지 않습니다.
*/
isUseTextureViewAndroid?: boolean;
/**
* 지도의 언어를 지정합니다.
*
* @example `ko`, `ja`, `en`
* @default system locale
*/
locale?: string;
/**
* 한 화면에 대량의 마커가 노출되면 성능이 저하될 뿐만 아니라 여러 마커가 겹쳐 나타나므로 시인성이 떨어집니다.
* 마커의 겹침 처리 기능을 사용하면 시인성을 일부 향상시킬 수 있으나 겹침 처리로 인해 가려진 마커의 정보를 알 수 없으며, 성능도 여전히 저하됩니다.
* 마커 클러스터링 기능을 이용하면 카메라의 줌 레벨에 따라 근접한 마커를 클러스터링해 성능과 시인성을 모두 향상시킬 수 있습니다.
*/
clusters?: {
/**
* 클러스터 마커의 넓이
*/
width?: number;
/**
* 클러스터 마커의 높이
*/
height?: number;
markers: ClusterMarkerProp[];
screenDistance?: number;
/**
* 클러스터링할 최소 줌 레벨.
*
* 카메라의 줌 레벨이 최소 줌 레벨보다 낮다면 두 데이터가 화면상 기준 거리보다 가깝더라도 더 이상 클러스터링되지 않습니다.
* 예를 들어, 클러스터링할 최소 줌 레벨이 4라면, 카메라의 줌 레벨을 3레벨 이하로 축소하더라도 4레벨의 클러스터가 더 이상 클러스터링되지 않고 그대로 유지됩니다.
*
* @default 0
*/
minZoom?: number;
/**
* 클러스터링할 최대 줌 레벨.
*
* 카메라의 줌 레벨이 최대 줌 레벨보다 높다면 두 데이터가 화면상 기준 거리보다 가깝더라도 더 이상 클러스터링되지 않습니다.
* 예를 들어, 클러스터링할 최대 줌 레벨이 16이라면, 카메라의 줌 레벨을 17레벨 이상으로 확대하면 모든 데이터가 클러스터링되지 않고 낱개로 나타납니다. 따라서 클러스터링할 최대 줌 레벨이 지도의 최대 줌 레벨보다 크거나 같다면 카메라를 최대 줌 레벨로 확대하더라도 일부 데이터는 여전히 클러스터링된 채 더 이상 펼쳐지지 않을 수 있습니다.
*
* @default 21
*/
maxZoom?: number;
/**
* 카메라 확대/축소시 클러스터가 펼쳐지는/합쳐지는 애니메이션을 적용할지 여부.
*
* @default true
*/
animate?: boolean;
}[];
/**
* 지도의 최대 초당 프레임 수(FPS, frames per second)를 지정합니다.
*
* 지도 객체가 생길때의 초기값만 동작하고 동적으로 바꿀 수 없습니다.
*
* 안드로이드에서만 동작합니다.
*
* 기본값은 제한을 두지 않음을 의미하는 0입니다.
*
* @default 0
*/
fpsLimit?: number;
/**
* Custom style ID from Naver Style Editor
*
* 네이버 스타일 에디터에서 생성한 커스텀 스타일 ID를 지정하면 해당 스타일이 지도에 적용됩니다.
*
* @see https://style-editor.map.naver.com
*/
customStyleId?: string;
/**
* Called when custom style is successfully loaded
*
* 커스텀 스타일이 성공적으로 로드되었을 때 호출되는 콜백입니다.
*
* @event
*/
onCustomStyleLoaded?: () => void;
/**
* Called when custom style loading fails
*
* 커스텀 스타일 로딩이 실패했을 때 호출되는 콜백입니다.
*
* @event
*/
onCustomStyleLoadFailed?: (params: { message: string }) => void;
/**
* 위치 오버레이 설정입니다.
*
* 위치 오버레이는 사용자의 현재 위치를 나타내는 특수한 오버레이입니다.
* 지도당 하나만 존재하며, 직접 생성할 수 없고 지도에서 제공하는 오버레이를 사용해야 합니다.
*
* @see {@link MapImageProp}
* @group Location
*/
locationOverlay?: {
/**
* 위치 오버레이의 가시성 여부
* @default false
*/
isVisible?: boolean;
/**
* 위치 오버레이의 좌표
*/
position?: Coord;
/**
* 위치 오버레이의 방향 (각도)
* @default 0
*/
bearing?: Double;
/**
* 메인 아이콘 이미지
*/
image?: MapImageProp;
/**
* 메인 아이콘의 너비
* @default SIZE_AUTO
*/
imageWidth?: Double;
/**
* 메인 아이콘의 높이
* @default SIZE_AUTO
*/
imageHeight?: Double;
/**
* 메인 아이콘의 앵커 포인트 (0~1 사이의 값)
* @default { x: 0.5, y: 0.5 }
*/
anchor?: Readonly<{ x: Double; y: Double }>;
/**
* 서브 아이콘 이미지 (메인 아이콘 뒤에 표시)
*/
subImage?: MapImageProp;
/**
* 서브 아이콘의 너비
* @default SIZE_AUTO
*/
subImageWidth?: Double;
/**
* 서브 아이콘의 높이
* @default SIZE_AUTO
*/
subImageHeight?: Double;
/**
* 서브 아이콘의 앵커 포인트 (0~1 사이의 값)
* @default { x: 0.5, y: 0.5 }
*/
subAnchor?: Readonly<{ x: Double; y: Double }>;
/**
* 강조 원의 반경 (픽셀 단위)
* @default 0
*/
circleRadius?: Double;
/**
* 강조 원의 색상
*/
circleColor?: ColorValue;
/**
* 강조 원 테두리의 너비
* @default 0
*/
circleOutlineWidth?: Double;
/**
* 강조 원 테두리의 색상
*/
circleOutlineColor?: ColorValue;
};
/**
* 지도 객체가 초기화가 완료된 뒤에 호출됩니다.
*
* @group Events
*/
onInitialized?: () => void;
/**
* 지도 유형, 디스플레이 옵션 등 지도와 관련된 옵션이 변경되면 이벤트가 발생합니다.
* 지도의 옵션이 변경되면 콜백 메서드가 호출됩니다.
*
* 이 이벤트는 지도의 옵션에 따라 UI나 다른 속성을 변경하고자 할 때 유용합니다.
* 예를 들어 지도가 야간 모드로 변경되면 마커의 색상도 어두운 색으로 변경해야 자연스러운데,
* 이런 경우에 옵션 변경 이벤트를 사용할 수 있습니다.
*
* @event
*/
onOptionChanged?: (params: {
locationTrackingMode: LocationTrackingMode;
}) => void;
/**
* 어떤 이유에 의해서건 카메라가 움직이면 카메라 변경 이벤트가 발생합니다.
*
* reason은 이벤트를 발생시킨 카메라 이동의 원인입니다.
* reason을 이용해 카메라 이동의 원인을 지정할 수 있으며, 이벤트 리스너 내에서 이 값을 이용해 어떤 원인에 의해 발생한 이벤트인지 판단할 수 있습니다.
*
* latitude, longitude, zoom, tilt, bearing은 카메라와 관련된 속성이며, 카메라 변경 이벤트에 대한 Region을 이벤트로 받으려면 region인자를 사용할 수 있습니다.
*
* @see {@link CameraChangeReason}
* @see {@link Camera}
* @event
*/
onCameraChanged?: (
params: Camera & {
reason: CameraChangeReason;
region: Region;
}
) => void;
/**
* 카메라의 움직임이 끝나 대기 상태가 되면 카메라 대기 이벤트가 발생합니다.
*
* 카메라는 다음과 같은 시점에 대기 상태가 된 것으로 간주되어 이벤트가 발생합니다.
*
* - 카메라가 애니메이션 없이 움직일 때. 단, 사용자가 제스처로 지도를 움직이는 경우 제스처가 완전히 끝날 때까지는 연속적인 이동으로 간주되어 이벤트가 발생하지 않습니다.
* - 카메라 애니메이션이 완료될 때.
* - NaverMap.cancelTransitions()가 호출되어 카메라 애니메이션이 명시적으로 취소될 때.
* @see {@link Camera}
* @see {@link Region}
* @event
*/
onCameraIdle?: (params: Camera & { region: Region }) => void;
/**
* 맵을 클릭했을 때 발생하는 이벤트입니다.
*
* @see {@link Coord}
* @event
*/
onTapMap?: (params: Coord & { x: number; y: number }) => void;
/**
* 클러스터 Leaf 마커를 클릭했을 때 발생하는 이벤트입니다.
*
* @event
*/
onTapClusterLeaf?: (params: { markerIdentifier: string }) => void;
}
export interface NaverMapViewRef {
/**
* 카메라를 애니메이션과 함께 이동시킵니다.
*/
animateCameraTo: (
params: Coord & CameraMoveBaseParams & { zoom?: number }
) => void;
/**
* 카메라를 특정 위치만큼 델타값으로 애니메이션과 함께 이동시킵니다.
*/
animateCameraBy: (
params: {
x: number;
y: number;
} & CameraMoveBaseParams
) => void;
/**
* 카메라를 특정 Region으로 애니메이션과 함께 이동시킵니다.
*/
animateRegionTo: (params: Region & CameraMoveBaseParams) => void;
/**
* 카메라를 두 좌표가 모두 보이는 최대 줌 레벨로 애니메이션과 함께 이동시킵니다.
*
* 카메라의 중심은 두 좌표의 중심이며 `pivot`으로 조절할 수 있습니다.
* `pivot`은 기본 0.5(중앙)이며 0 ~ 1 값으로 설정할 수 있습니다.
*/
animateCameraWithTwoCoords: (
params: {
coord1: Coord;
coord2: Coord;
} & CameraMoveBaseParams
) => void;
/**
* 카메라의 애니메이션을 취소합니다.
*/
cancelAnimation: () => void;
/**
* 위치 추적 모드를 변경합니다.
*
* {@link LocationTrackingMode}
*/
setLocationTrackingMode: (mode: LocationTrackingMode) => void;
/**
* 지도에서 특정 부분을 위도 경도값으로 반환합니다.
*
* `screenX`, `screenY`는 DP, PT 단위입니다.
*
* `isValid`가 `false`이면 항상 `latitude`, `longitude`는 0입니다.
*/
screenToCoordinate: (params: {
screenX: number;
screenY: number;
}) => Promise<{
isValid: boolean;
latitude: number;
longitude: number;
}>;
/**
* 지도에서 특정 위도 부분을 화면에서의 특정 위치로 반환합니다.
*
* `screenX`, `screenY`는 DP, PT 단위입니다.
*
* `isValid`가 `false`이면 항상 `screenX`, `screenY`는 0입니다.
*/
coordinateToScreen: (params: {
latitude: number;
longitude: number;
}) => Promise<{
isValid: boolean;
screenX: number;
screenY: number;
}>;
}
function clamp(v: number, min: number, max: number): number {
return Math.min(max, Math.max(min, v));
}
const southKoreaExtent: Region = {
latitude: 31.43,
longitude: 122.37,
latitudeDelta: 44.35 - 31.43,
longitudeDelta: 132 - 122.37,
};
const nullRegion: Region = {
latitude: Const.NULL_NUMBER,
longitude: Const.NULL_NUMBER,
latitudeDelta: Const.NULL_NUMBER,
longitudeDelta: Const.NULL_NUMBER,
};
const nullCamera: Camera = {
latitude: Const.NULL_NUMBER,
longitude: Const.NULL_NUMBER,
zoom: Const.NULL_NUMBER,
tilt: Const.NULL_NUMBER,
bearing: Const.NULL_NUMBER,
};
export const NaverMapView = forwardRef(
(
{
camera,
initialCamera,
region,
initialRegion,
animationDuration = 0,
animationEasing = Const.DEFAULT_EASING,
mapType = 'Basic',
layerGroups = {
BUILDING: true,
BICYCLE: false,
CADASTRAL: false,
MOUNTAIN: false,
TRAFFIC: false,
TRANSIT: false,
},
isIndoorEnabled,
isNightModeEnabled,
isLiteModeEnabled,
lightness = 0,
buildingHeight = 1,
symbolScale = 1,
symbolPerspectiveRatio = 1,
mapPadding,
isShowCompass,
isShowIndoorLevelPicker,
isShowLocationButton,
isShowScaleBar,
isShowZoomControls,
minZoom,
maxZoom,
extent,
isExtentBoundedInKorea,
logoAlign,
logoMargin,
onCameraChanged: onCameraChangedProp,
onCameraIdle: onCameraIdleProp,
onTapMap: onTapMapProp,
onInitialized,
onOptionChanged: onOptionChangedProp,
customStyleId,
onCustomStyleLoaded: onCustomStyleLoadedProp,
onCustomStyleLoadFailed: onCustomStyleLoadFailedProp,
isScrollGesturesEnabled,
isZoomGesturesEnabled,
isTiltGesturesEnabled,
isRotateGesturesEnabled,
isStopGesturesEnabled,
isUseTextureViewAndroid,
locale,
clusters,
fpsLimit = 0,
locationOverlay,
onTapClusterLeaf,
...rest
}: NaverMapViewProps,
ref: ForwardedRef
) => {
const innerRef = useRef(null);
const isLeafTapCallbackExist: boolean = !!onTapClusterLeaf;
const _clusters = useMemo(() => {
if (!clusters || clusters.length === 0) {
return { key: '', clusters: [], isLeafTapCallbackExist };
}
let propKey = '';
const ret: NativeClusterProp[] = [];
for (const {
animate = true,
markers,
// eslint-disable-next-line @typescript-eslint/no-shadow
minZoom = Const.MIN_ZOOM,
// eslint-disable-next-line @typescript-eslint/no-shadow
maxZoom = Const.MAX_ZOOM,
screenDistance = Const.DEFAULT_SCREEN_DISTANCE,
width,
height,
} of clusters) {
const key = hash([
animate,
maxZoom,
minZoom,
screenDistance,
markers,
width,
height,
]);
ret.push({
key,
animate,
markers: markers.map((m) => ({
...m,
image: convertJsImagePropToNativeProp(
m.image ?? { symbol: 'green' }
),
})),
maxZoom,
minZoom,
screenDistance,
width,
height,
});
propKey += `${key}---`;
}
return {
key: hash(propKey),
clusters: ret,
isLeafTapCallbackExist,
};
}, [clusters, isLeafTapCallbackExist]);
const _locationOverlay: NativeLocationOverlayProp | undefined =
useMemo(() => {
if (!locationOverlay)
return Platform.OS === 'ios'
? { circleOutlineWidth: Const.NULL_NUMBER }
: undefined;
return {
isVisible: locationOverlay.isVisible,
position: locationOverlay.position,
bearing: locationOverlay.bearing,
image: locationOverlay.image
? convertJsImagePropToNativeProp(locationOverlay.image)
: undefined,
imageWidth: locationOverlay.imageWidth,
imageHeight: locationOverlay.imageHeight,
anchor: locationOverlay.anchor,
subImage: locationOverlay.subImage
? convertJsImagePropToNativeProp(locationOverlay.subImage)
: undefined,
subImageWidth: locationOverlay.subImageWidth,
subImageHeight: locationOverlay.subImageHeight,
subAnchor: locationOverlay.subAnchor,
circleRadius: locationOverlay.circleRadius,
circleColor: locationOverlay.circleColor
? (processColor(locationOverlay.circleColor) as number)
: undefined,
circleOutlineWidth: locationOverlay.circleOutlineWidth,
circleOutlineColor: locationOverlay.circleOutlineColor
? (processColor(locationOverlay.circleOutlineColor) as number)
: undefined,
} satisfies NativeLocationOverlayProp;
}, [locationOverlay]);
const onCameraChanged = useStableCallback(
({
nativeEvent: {
bearing,
latitude,
longitude,
reason,
tilt,
zoom,
regionLatitude,
regionLatitudeDelta,
regionLongitude,
regionLongitudeDelta,
},
}: NativeSyntheticEvent<
Camera & {
reason: number;
regionLatitude: Double;
regionLongitude: Double;
regionLatitudeDelta: Double;
regionLongitudeDelta: Double;
}
>) => {
onCameraChangedProp?.({
zoom,
tilt,
reason: cameraChangeReasonFromNumber(reason),
latitude,
longitude,
bearing,
region: {
latitude: regionLatitude,
longitude: regionLongitude,
latitudeDelta: regionLatitudeDelta,
longitudeDelta: regionLongitudeDelta,
},
});
}
);
const onCameraIdle = useStableCallback(
({
nativeEvent: {
bearing,
latitude,
longitude,
tilt,
zoom,
regionLatitude,
regionLatitudeDelta,
regionLongitude,
regionLongitudeDelta,
},
}: NativeSyntheticEvent<
Camera & {
regionLatitude: Double;
regionLongitude: Double;
regionLatitudeDelta: Double;
regionLongitudeDelta: Double;
}
>) => {
onCameraIdleProp?.({
zoom,
tilt,
latitude,
longitude,
bearing,
region: {
latitude: regionLatitude,
longitude: regionLongitude,
latitudeDelta: regionLatitudeDelta,
longitudeDelta: regionLongitudeDelta,
},
});
}
);
const onTapMap = useStableCallback(
({
nativeEvent: { longitude, latitude, x, y },
}: NativeSyntheticEvent) => {
onTapMapProp?.({
longitude,
latitude,
x,
y,
});
}
);
const screenToCoordinatePromise = useRef<{
resolve: (params: {
isValid: boolean;
latitude: number;
longitude: number;
}) => void;
reject: (e: any) => void;
}>(undefined);
const coordinateToScreenPromise = useRef<{
resolve: (params: {
isValid: boolean;
screenX: number;
screenY: number;
}) => void;
reject: (e: any) => void;
}>(undefined);
useEffect(() => {
return () => {
screenToCoordinatePromise.current?.resolve({
isValid: false,
latitude: 0,
longitude: 0,
});
screenToCoordinatePromise.current = undefined;
coordinateToScreenPromise.current?.resolve({
isValid: false,
screenX: 0,
screenY: 0,
});
coordinateToScreenPromise.current = undefined;
};
}, []);
const onScreenToCoordinate = useStableCallback(
({
nativeEvent,
}: NativeSyntheticEvent<{
isValid: boolean;
latitude: number;
longitude: number;
}>) => {
screenToCoordinatePromise.current?.resolve(nativeEvent);
screenToCoordinatePromise.current = undefined;
}
);
const onCoordinateToScreen = useStableCallback(
({
nativeEvent,
}: NativeSyntheticEvent<{
isValid: boolean;
screenX: number;
screenY: number;
}>) => {
coordinateToScreenPromise.current?.resolve(nativeEvent);
coordinateToScreenPromise.current = undefined;
}
);
const onCustomStyleLoaded = useStableCallback(() => {
onCustomStyleLoadedProp?.();
});
const onCustomStyleLoadFailed = useStableCallback(
({
nativeEvent: { message },
}: NativeSyntheticEvent<{ message: string }>) => {
onCustomStyleLoadFailedProp?.({ message });
}
);
useImperativeHandle(
ref,
() => ({
animateCameraTo: ({
duration,
easing,
latitude,
longitude,
pivot,
zoom = Const.NULL_NUMBER,
}) => {
if (innerRef.current) {
Commands.animateCameraTo(
innerRef.current,
latitude,
longitude,
duration ?? Const.DEFAULT_ANIM_DURATION,
cameraEasingToNumber(easing ?? Const.DEFAULT_EASING),
pivot?.x ?? 0.5,
pivot?.y ?? 0.5,
zoom
);
}
},
animateCameraBy: ({ duration, easing, x, y, pivot }) => {
if (innerRef.current) {
Commands.animateCameraBy(
innerRef.current,
x,
y,
duration ?? Const.DEFAULT_ANIM_DURATION,
cameraEasingToNumber(easing ?? Const.DEFAULT_EASING),
pivot?.x ?? 0.5,
pivot?.y ?? 0.5
);
}
},
animateRegionTo: ({
easing,
longitude,
latitude,
duration,
latitudeDelta,
longitudeDelta,
pivot,
}) => {
if (innerRef.current) {
Commands.animateRegionTo(
innerRef.current,
latitude,
longitude,
latitudeDelta,
longitudeDelta,
duration ?? Const.DEFAULT_ANIM_DURATION,
cameraEasingToNumber(easing ?? Const.DEFAULT_EASING),
pivot?.x ?? 0.5,
pivot?.y ?? 0.5
);
}
},
animateCameraWithTwoCoords: ({
duration,
easing,
coord1,
coord2,
pivot,
}) => {
if (innerRef.current) {
const latitude = Math.min(coord1.latitude, coord2.latitude);
const longitude = Math.min(coord1.longitude, coord2.longitude);
const latitudeDelta = Math.abs(coord1.latitude - coord2.latitude);
const longitudeDelta = Math.abs(
coord1.longitude - coord2.longitude
);
Commands.animateRegionTo(
innerRef.current,
latitude,
longitude,
latitudeDelta,
longitudeDelta,
duration ?? Const.DEFAULT_ANIM_DURATION,
cameraEasingToNumber(easing ?? Const.DEFAULT_EASING),
pivot?.x ?? 0.5,
pivot?.y ?? 0.5
);
}
},
cancelAnimation: () => {
if (innerRef.current) {
Commands.cancelAnimation(innerRef.current);
}
},
setLocationTrackingMode: (mode: LocationTrackingMode) => {
if (innerRef.current) {
Commands.setLocationTrackingMode(innerRef.current, mode);
}
},
screenToCoordinate: ({ screenX, screenY }) => {
screenToCoordinatePromise.current?.resolve({
isValid: false,
latitude: 0,
longitude: 0,
});
screenToCoordinatePromise.current = undefined;
if (innerRef.current) {
const newPromise = new Promise((resolve, reject) => {
screenToCoordinatePromise.current = { resolve, reject };
});
Commands.screenToCoordinate(innerRef.current, screenX, screenY);
return newPromise;
} else {
return new Promise((_, reject) =>
reject(new Error('ref not set yet'))
);
}
},
coordinateToScreen: ({ latitude, longitude }) => {
coordinateToScreenPromise.current?.resolve({
isValid: false,
screenX: 0,
screenY: 0,
});
coordinateToScreenPromise.current = undefined;
if (innerRef.current) {
const newPromise = new Promise((resolve, reject) => {
coordinateToScreenPromise.current = { resolve, reject };
});
Commands.coordinateToScreen(innerRef.current, latitude, longitude);
return newPromise;
} else {
return new Promise((_, reject) =>
reject(new Error('ref not set yet'))
);
}
},
}),
[]
);
return (
onOptionChangedProp({
locationTrackingMode:
locationTrackingMode as LocationTrackingMode,
})
: undefined
}
mapPadding={mapPadding}
isShowCompass={isShowCompass}
isShowIndoorLevelPicker={isShowIndoorLevelPicker}
isShowLocationButton={isShowLocationButton}
isShowScaleBar={isShowScaleBar}
isShowZoomControls={isShowZoomControls}
minZoom={minZoom}
maxZoom={maxZoom}
extent={
extent
? extent
: isExtentBoundedInKorea
? southKoreaExtent
: undefined
}
logoAlign={logoAlign}
logoMargin={logoMargin}
isScrollGesturesEnabled={isScrollGesturesEnabled}
isZoomGesturesEnabled={isZoomGesturesEnabled}
isTiltGesturesEnabled={isTiltGesturesEnabled}
isRotateGesturesEnabled={isRotateGesturesEnabled}
isStopGesturesEnabled={isStopGesturesEnabled}
isUseTextureViewAndroid={isUseTextureViewAndroid}
locale={locale}
clusters={_clusters}
onScreenToCoordinate={onScreenToCoordinate}
onCoordinateToScreen={onCoordinateToScreen}
fpsLimit={fpsLimit}
customStyleId={customStyleId}
onCustomStyleLoaded={
onCustomStyleLoadedProp ? onCustomStyleLoaded : undefined
}
onCustomStyleLoadFailed={
onCustomStyleLoadFailedProp ? onCustomStyleLoadFailed : undefined
}
locationOverlay={_locationOverlay}
onTapClusterLeaf={
onTapClusterLeaf
? ({ nativeEvent: { markerIdentifier } }) =>
onTapClusterLeaf({ markerIdentifier })
: undefined
}
{...rest}
/>
);
}
);
*/
mapPadding?: Partial;
/**
* 나침반: 카메라의 회전 및 틸트 상태를 표현합니다.
* 탭하면 카메라의 헤딩과 틸트가 0으로 초기화됩니다.
* 헤딩과 틸트가 0이 되면 자동으로 사라집니다.
*/
isShowCompass?: boolean;
/**
* 축척 바: 지도의 축척을 표현합니다. 지도를 조작하는 기능은 없습니다.
*/
isShowScaleBar?: boolean;
/**
* 줌 버튼: 탭하면 지도의 줌 레벨을 1씩 증가 또는 감소합니다.
*/
isShowZoomControls?: boolean;
/**
* 실내지도 층 피커: 노출 중인 실내지도 구역의 층 정보를 표현합니다
* 층을 선택하면 해당 층의 실내지도가 노출됩니다.
* 실내지도가 보이는 상황에만 나타납니다.
*/
isShowIndoorLevelPicker?: boolean;
/**
* 현위치 버튼: 위치 추적 모드를 표현합니다. 탭하면 모드가 변경됩니다.
*/
isShowLocationButton?: boolean;
/**
* 카메라의 최소 줌 레벨입니다.
*/
minZoom?: number;
/**
* 카메라의 최대 줌 레벨입니다.
*/
maxZoom?: number;
/**
* extent 속성을 지정하면 카메라의 대상 지점을 영역 내로 제한할 수 있습니다.
* 카메라가 제한 영역을 벗어나도록 API를 호출하더라도 대상 지점이 영역 내로 조정됩니다.
*
* 카메라 영역을 제한할 때 최소 줌 레벨도 함께 제한하는 것이 좋습니다.
* 그렇지 않으면 지도가 축소되었을 때 제한 영역이 너무 작게 나타날 수 있습니다.
*/
extent?: Region;
/**
* 한반도로 `extent`를 제한합니다. `extent`가 존재한다면 동작하지 않습니다.
*/
isExtentBoundedInKorea?: boolean;
/**
* 네이버 로고의 위치입니다.
*
* @see {@link LogoAlign}
* @group Logo
*/
logoAlign?: LogoAlign;
/**
* 네이버 로고의 마진입니다.
*
* @see {@link Rect}
* @group Logo
*/
logoMargin?: Partial;
/**
* 탭 활성화 여부를 지정할 수 있습니다.
* 로고 탭을 비활성화한 앱은 반드시 앱 내에 네이버 지도 SDK의
* 법적 공지(-showLegalNotice) 및 오픈소스 라이선스(-showOpenSourceLicense)뷰를 보여주는 메뉴를 만들어야 합니다.
*/
// isLogoInteractionEnabled?: boolean;
/**
* 스크롤: 한 개 또는 두 개 이상의 손가락으로 지도를 드래그하면 카메라가 손가락을 따라 이동합니다.
*
* @group Gesture
*/
isScrollGesturesEnabled?: boolean;
/**
* 줌: 지도를 더블 탭하면 줌 레벨이 한 단계 확대됩니다. 두 손가락 탭하면 한 단계 축소됩니다.
* 핀치와 스트레치 또는 한 손가락 줌 제스처로도 지도의 줌 레벨을 변경할 수 있습니다.
*
* @group Gesture
*/
isZoomGesturesEnabled?: boolean;
/**
* 틸트: 두 개의 손가락으로 지도를 위아래로 드래그하면 기울임 각도가 바뀝니다.
*
* @group Gesture
*/
isTiltGesturesEnabled?: boolean;
/**
* 회전: 두 개의 손가락으로 지도를 돌리면 베어링 각도가 바뀝니다.
*
* @group Gesture
*/
isRotateGesturesEnabled?: boolean;
/**
* 스톱: 카메라 애니메이션이 진행 중일 때 지도를 탭하면 애니메이션이 취소되고 카메라가 현재 위치에 멈춥니다.
*
* @group Gesture
*/
isStopGesturesEnabled?: boolean;
/**
* 안드로이드에서 SurfaceView대신 TextureView를 사용합니다.
*
* 컴포넌트가 mount되고 변경해도 동작하지 않습니다.
*/
isUseTextureViewAndroid?: boolean;
/**
* 지도의 언어를 지정합니다.
*
* @example `ko`, `ja`, `en`
* @default system locale
*/
locale?: string;
/**
* 한 화면에 대량의 마커가 노출되면 성능이 저하될 뿐만 아니라 여러 마커가 겹쳐 나타나므로 시인성이 떨어집니다.
* 마커의 겹침 처리 기능을 사용하면 시인성을 일부 향상시킬 수 있으나 겹침 처리로 인해 가려진 마커의 정보를 알 수 없으며, 성능도 여전히 저하됩니다.
* 마커 클러스터링 기능을 이용하면 카메라의 줌 레벨에 따라 근접한 마커를 클러스터링해 성능과 시인성을 모두 향상시킬 수 있습니다.
*/
clusters?: {
/**
* 클러스터 마커의 넓이
*/
width?: number;
/**
* 클러스터 마커의 높이
*/
height?: number;
markers: ClusterMarkerProp[];
screenDistance?: number;
/**
* 클러스터링할 최소 줌 레벨.
*
* 카메라의 줌 레벨이 최소 줌 레벨보다 낮다면 두 데이터가 화면상 기준 거리보다 가깝더라도 더 이상 클러스터링되지 않습니다.
* 예를 들어, 클러스터링할 최소 줌 레벨이 4라면, 카메라의 줌 레벨을 3레벨 이하로 축소하더라도 4레벨의 클러스터가 더 이상 클러스터링되지 않고 그대로 유지됩니다.
*
* @default 0
*/
minZoom?: number;
/**
* 클러스터링할 최대 줌 레벨.
*
* 카메라의 줌 레벨이 최대 줌 레벨보다 높다면 두 데이터가 화면상 기준 거리보다 가깝더라도 더 이상 클러스터링되지 않습니다.
* 예를 들어, 클러스터링할 최대 줌 레벨이 16이라면, 카메라의 줌 레벨을 17레벨 이상으로 확대하면 모든 데이터가 클러스터링되지 않고 낱개로 나타납니다. 따라서 클러스터링할 최대 줌 레벨이 지도의 최대 줌 레벨보다 크거나 같다면 카메라를 최대 줌 레벨로 확대하더라도 일부 데이터는 여전히 클러스터링된 채 더 이상 펼쳐지지 않을 수 있습니다.
*
* @default 21
*/
maxZoom?: number;
/**
* 카메라 확대/축소시 클러스터가 펼쳐지는/합쳐지는 애니메이션을 적용할지 여부.
*
* @default true
*/
animate?: boolean;
}[];
/**
* 지도의 최대 초당 프레임 수(FPS, frames per second)를 지정합니다.
*
* 지도 객체가 생길때의 초기값만 동작하고 동적으로 바꿀 수 없습니다.
*
* 안드로이드에서만 동작합니다.
*
* 기본값은 제한을 두지 않음을 의미하는 0입니다.
*
* @default 0
*/
fpsLimit?: number;
/**
* Custom style ID from Naver Style Editor
*
* 네이버 스타일 에디터에서 생성한 커스텀 스타일 ID를 지정하면 해당 스타일이 지도에 적용됩니다.
*
* @see https://style-editor.map.naver.com
*/
customStyleId?: string;
/**
* Called when custom style is successfully loaded
*
* 커스텀 스타일이 성공적으로 로드되었을 때 호출되는 콜백입니다.
*
* @event
*/
onCustomStyleLoaded?: () => void;
/**
* Called when custom style loading fails
*
* 커스텀 스타일 로딩이 실패했을 때 호출되는 콜백입니다.
*
* @event
*/
onCustomStyleLoadFailed?: (params: { message: string }) => void;
/**
* 위치 오버레이 설정입니다.
*
* 위치 오버레이는 사용자의 현재 위치를 나타내는 특수한 오버레이입니다.
* 지도당 하나만 존재하며, 직접 생성할 수 없고 지도에서 제공하는 오버레이를 사용해야 합니다.
*
* @see {@link MapImageProp}
* @group Location
*/
locationOverlay?: {
/**
* 위치 오버레이의 가시성 여부
* @default false
*/
isVisible?: boolean;
/**
* 위치 오버레이의 좌표
*/
position?: Coord;
/**
* 위치 오버레이의 방향 (각도)
* @default 0
*/
bearing?: Double;
/**
* 메인 아이콘 이미지
*/
image?: MapImageProp;
/**
* 메인 아이콘의 너비
* @default SIZE_AUTO
*/
imageWidth?: Double;
/**
* 메인 아이콘의 높이
* @default SIZE_AUTO
*/
imageHeight?: Double;
/**
* 메인 아이콘의 앵커 포인트 (0~1 사이의 값)
* @default { x: 0.5, y: 0.5 }
*/
anchor?: Readonly<{ x: Double; y: Double }>;
/**
* 서브 아이콘 이미지 (메인 아이콘 뒤에 표시)
*/
subImage?: MapImageProp;
/**
* 서브 아이콘의 너비
* @default SIZE_AUTO
*/
subImageWidth?: Double;
/**
* 서브 아이콘의 높이
* @default SIZE_AUTO
*/
subImageHeight?: Double;
/**
* 서브 아이콘의 앵커 포인트 (0~1 사이의 값)
* @default { x: 0.5, y: 0.5 }
*/
subAnchor?: Readonly<{ x: Double; y: Double }>;
/**
* 강조 원의 반경 (픽셀 단위)
* @default 0
*/
circleRadius?: Double;
/**
* 강조 원의 색상
*/
circleColor?: ColorValue;
/**
* 강조 원 테두리의 너비
* @default 0
*/
circleOutlineWidth?: Double;
/**
* 강조 원 테두리의 색상
*/
circleOutlineColor?: ColorValue;
};
/**
* 지도 객체가 초기화가 완료된 뒤에 호출됩니다.
*
* @group Events
*/
onInitialized?: () => void;
/**
* 지도 유형, 디스플레이 옵션 등 지도와 관련된 옵션이 변경되면 이벤트가 발생합니다.
* 지도의 옵션이 변경되면 콜백 메서드가 호출됩니다.
*
* 이 이벤트는 지도의 옵션에 따라 UI나 다른 속성을 변경하고자 할 때 유용합니다.
* 예를 들어 지도가 야간 모드로 변경되면 마커의 색상도 어두운 색으로 변경해야 자연스러운데,
* 이런 경우에 옵션 변경 이벤트를 사용할 수 있습니다.
*
* @event
*/
onOptionChanged?: (params: {
locationTrackingMode: LocationTrackingMode;
}) => void;
/**
* 어떤 이유에 의해서건 카메라가 움직이면 카메라 변경 이벤트가 발생합니다.
*
* reason은 이벤트를 발생시킨 카메라 이동의 원인입니다.
* reason을 이용해 카메라 이동의 원인을 지정할 수 있으며, 이벤트 리스너 내에서 이 값을 이용해 어떤 원인에 의해 발생한 이벤트인지 판단할 수 있습니다.
*
* latitude, longitude, zoom, tilt, bearing은 카메라와 관련된 속성이며, 카메라 변경 이벤트에 대한 Region을 이벤트로 받으려면 region인자를 사용할 수 있습니다.
*
* @see {@link CameraChangeReason}
* @see {@link Camera}
* @event
*/
onCameraChanged?: (
params: Camera & {
reason: CameraChangeReason;
region: Region;
}
) => void;
/**
* 카메라의 움직임이 끝나 대기 상태가 되면 카메라 대기 이벤트가 발생합니다.
*
* 카메라는 다음과 같은 시점에 대기 상태가 된 것으로 간주되어 이벤트가 발생합니다.
*
* - 카메라가 애니메이션 없이 움직일 때. 단, 사용자가 제스처로 지도를 움직이는 경우 제스처가 완전히 끝날 때까지는 연속적인 이동으로 간주되어 이벤트가 발생하지 않습니다.
* - 카메라 애니메이션이 완료될 때.
* - NaverMap.cancelTransitions()가 호출되어 카메라 애니메이션이 명시적으로 취소될 때.
* @see {@link Camera}
* @see {@link Region}
* @event
*/
onCameraIdle?: (params: Camera & { region: Region }) => void;
/**
* 맵을 클릭했을 때 발생하는 이벤트입니다.
*
* @see {@link Coord}
* @event
*/
onTapMap?: (params: Coord & { x: number; y: number }) => void;
/**
* 클러스터 Leaf 마커를 클릭했을 때 발생하는 이벤트입니다.
*
* @event
*/
onTapClusterLeaf?: (params: { markerIdentifier: string }) => void;
}
export interface NaverMapViewRef {
/**
* 카메라를 애니메이션과 함께 이동시킵니다.
*/
animateCameraTo: (
params: Coord & CameraMoveBaseParams & { zoom?: number }
) => void;
/**
* 카메라를 특정 위치만큼 델타값으로 애니메이션과 함께 이동시킵니다.
*/
animateCameraBy: (
params: {
x: number;
y: number;
} & CameraMoveBaseParams
) => void;
/**
* 카메라를 특정 Region으로 애니메이션과 함께 이동시킵니다.
*/
animateRegionTo: (params: Region & CameraMoveBaseParams) => void;
/**
* 카메라를 두 좌표가 모두 보이는 최대 줌 레벨로 애니메이션과 함께 이동시킵니다.
*
* 카메라의 중심은 두 좌표의 중심이며 `pivot`으로 조절할 수 있습니다.
* `pivot`은 기본 0.5(중앙)이며 0 ~ 1 값으로 설정할 수 있습니다.
*/
animateCameraWithTwoCoords: (
params: {
coord1: Coord;
coord2: Coord;
} & CameraMoveBaseParams
) => void;
/**
* 카메라의 애니메이션을 취소합니다.
*/
cancelAnimation: () => void;
/**
* 위치 추적 모드를 변경합니다.
*
* {@link LocationTrackingMode}
*/
setLocationTrackingMode: (mode: LocationTrackingMode) => void;
/**
* 지도에서 특정 부분을 위도 경도값으로 반환합니다.
*
* `screenX`, `screenY`는 DP, PT 단위입니다.
*
* `isValid`가 `false`이면 항상 `latitude`, `longitude`는 0입니다.
*/
screenToCoordinate: (params: {
screenX: number;
screenY: number;
}) => Promise<{
isValid: boolean;
latitude: number;
longitude: number;
}>;
/**
* 지도에서 특정 위도 부분을 화면에서의 특정 위치로 반환합니다.
*
* `screenX`, `screenY`는 DP, PT 단위입니다.
*
* `isValid`가 `false`이면 항상 `screenX`, `screenY`는 0입니다.
*/
coordinateToScreen: (params: {
latitude: number;
longitude: number;
}) => Promise<{
isValid: boolean;
screenX: number;
screenY: number;
}>;
}
function clamp(v: number, min: number, max: number): number {
return Math.min(max, Math.max(min, v));
}
const southKoreaExtent: Region = {
latitude: 31.43,
longitude: 122.37,
latitudeDelta: 44.35 - 31.43,
longitudeDelta: 132 - 122.37,
};
const nullRegion: Region = {
latitude: Const.NULL_NUMBER,
longitude: Const.NULL_NUMBER,
latitudeDelta: Const.NULL_NUMBER,
longitudeDelta: Const.NULL_NUMBER,
};
const nullCamera: Camera = {
latitude: Const.NULL_NUMBER,
longitude: Const.NULL_NUMBER,
zoom: Const.NULL_NUMBER,
tilt: Const.NULL_NUMBER,
bearing: Const.NULL_NUMBER,
};
export const NaverMapView = forwardRef(
(
{
camera,
initialCamera,
region,
initialRegion,
animationDuration = 0,
animationEasing = Const.DEFAULT_EASING,
mapType = 'Basic',
layerGroups = {
BUILDING: true,
BICYCLE: false,
CADASTRAL: false,
MOUNTAIN: false,
TRAFFIC: false,
TRANSIT: false,
},
isIndoorEnabled,
isNightModeEnabled,
isLiteModeEnabled,
lightness = 0,
buildingHeight = 1,
symbolScale = 1,
symbolPerspectiveRatio = 1,
mapPadding,
isShowCompass,
isShowIndoorLevelPicker,
isShowLocationButton,
isShowScaleBar,
isShowZoomControls,
minZoom,
maxZoom,
extent,
isExtentBoundedInKorea,
logoAlign,
logoMargin,
onCameraChanged: onCameraChangedProp,
onCameraIdle: onCameraIdleProp,
onTapMap: onTapMapProp,
onInitialized,
onOptionChanged: onOptionChangedProp,
customStyleId,
onCustomStyleLoaded: onCustomStyleLoadedProp,
onCustomStyleLoadFailed: onCustomStyleLoadFailedProp,
isScrollGesturesEnabled,
isZoomGesturesEnabled,
isTiltGesturesEnabled,
isRotateGesturesEnabled,
isStopGesturesEnabled,
isUseTextureViewAndroid,
locale,
clusters,
fpsLimit = 0,
locationOverlay,
onTapClusterLeaf,
...rest
}: NaverMapViewProps,
ref: ForwardedRef
) => {
const innerRef = useRef(null);
const isLeafTapCallbackExist: boolean = !!onTapClusterLeaf;
const _clusters = useMemo(() => {
if (!clusters || clusters.length === 0) {
return { key: '', clusters: [], isLeafTapCallbackExist };
}
let propKey = '';
const ret: NativeClusterProp[] = [];
for (const {
animate = true,
markers,
// eslint-disable-next-line @typescript-eslint/no-shadow
minZoom = Const.MIN_ZOOM,
// eslint-disable-next-line @typescript-eslint/no-shadow
maxZoom = Const.MAX_ZOOM,
screenDistance = Const.DEFAULT_SCREEN_DISTANCE,
width,
height,
} of clusters) {
const key = hash([
animate,
maxZoom,
minZoom,
screenDistance,
markers,
width,
height,
]);
ret.push({
key,
animate,
markers: markers.map((m) => ({
...m,
image: convertJsImagePropToNativeProp(
m.image ?? { symbol: 'green' }
),
})),
maxZoom,
minZoom,
screenDistance,
width,
height,
});
propKey += `${key}---`;
}
return {
key: hash(propKey),
clusters: ret,
isLeafTapCallbackExist,
};
}, [clusters, isLeafTapCallbackExist]);
const _locationOverlay: NativeLocationOverlayProp | undefined =
useMemo(() => {
if (!locationOverlay)
return Platform.OS === 'ios'
? { circleOutlineWidth: Const.NULL_NUMBER }
: undefined;
return {
isVisible: locationOverlay.isVisible,
position: locationOverlay.position,
bearing: locationOverlay.bearing,
image: locationOverlay.image
? convertJsImagePropToNativeProp(locationOverlay.image)
: undefined,
imageWidth: locationOverlay.imageWidth,
imageHeight: locationOverlay.imageHeight,
anchor: locationOverlay.anchor,
subImage: locationOverlay.subImage
? convertJsImagePropToNativeProp(locationOverlay.subImage)
: undefined,
subImageWidth: locationOverlay.subImageWidth,
subImageHeight: locationOverlay.subImageHeight,
subAnchor: locationOverlay.subAnchor,
circleRadius: locationOverlay.circleRadius,
circleColor: locationOverlay.circleColor
? (processColor(locationOverlay.circleColor) as number)
: undefined,
circleOutlineWidth: locationOverlay.circleOutlineWidth,
circleOutlineColor: locationOverlay.circleOutlineColor
? (processColor(locationOverlay.circleOutlineColor) as number)
: undefined,
} satisfies NativeLocationOverlayProp;
}, [locationOverlay]);
const onCameraChanged = useStableCallback(
({
nativeEvent: {
bearing,
latitude,
longitude,
reason,
tilt,
zoom,
regionLatitude,
regionLatitudeDelta,
regionLongitude,
regionLongitudeDelta,
},
}: NativeSyntheticEvent<
Camera & {
reason: number;
regionLatitude: Double;
regionLongitude: Double;
regionLatitudeDelta: Double;
regionLongitudeDelta: Double;
}
>) => {
onCameraChangedProp?.({
zoom,
tilt,
reason: cameraChangeReasonFromNumber(reason),
latitude,
longitude,
bearing,
region: {
latitude: regionLatitude,
longitude: regionLongitude,
latitudeDelta: regionLatitudeDelta,
longitudeDelta: regionLongitudeDelta,
},
});
}
);
const onCameraIdle = useStableCallback(
({
nativeEvent: {
bearing,
latitude,
longitude,
tilt,
zoom,
regionLatitude,
regionLatitudeDelta,
regionLongitude,
regionLongitudeDelta,
},
}: NativeSyntheticEvent<
Camera & {
regionLatitude: Double;
regionLongitude: Double;
regionLatitudeDelta: Double;
regionLongitudeDelta: Double;
}
>) => {
onCameraIdleProp?.({
zoom,
tilt,
latitude,
longitude,
bearing,
region: {
latitude: regionLatitude,
longitude: regionLongitude,
latitudeDelta: regionLatitudeDelta,
longitudeDelta: regionLongitudeDelta,
},
});
}
);
const onTapMap = useStableCallback(
({
nativeEvent: { longitude, latitude, x, y },
}: NativeSyntheticEvent) => {
onTapMapProp?.({
longitude,
latitude,
x,
y,
});
}
);
const screenToCoordinatePromise = useRef<{
resolve: (params: {
isValid: boolean;
latitude: number;
longitude: number;
}) => void;
reject: (e: any) => void;
}>(undefined);
const coordinateToScreenPromise = useRef<{
resolve: (params: {
isValid: boolean;
screenX: number;
screenY: number;
}) => void;
reject: (e: any) => void;
}>(undefined);
useEffect(() => {
return () => {
screenToCoordinatePromise.current?.resolve({
isValid: false,
latitude: 0,
longitude: 0,
});
screenToCoordinatePromise.current = undefined;
coordinateToScreenPromise.current?.resolve({
isValid: false,
screenX: 0,
screenY: 0,
});
coordinateToScreenPromise.current = undefined;
};
}, []);
const onScreenToCoordinate = useStableCallback(
({
nativeEvent,
}: NativeSyntheticEvent<{
isValid: boolean;
latitude: number;
longitude: number;
}>) => {
screenToCoordinatePromise.current?.resolve(nativeEvent);
screenToCoordinatePromise.current = undefined;
}
);
const onCoordinateToScreen = useStableCallback(
({
nativeEvent,
}: NativeSyntheticEvent<{
isValid: boolean;
screenX: number;
screenY: number;
}>) => {
coordinateToScreenPromise.current?.resolve(nativeEvent);
coordinateToScreenPromise.current = undefined;
}
);
const onCustomStyleLoaded = useStableCallback(() => {
onCustomStyleLoadedProp?.();
});
const onCustomStyleLoadFailed = useStableCallback(
({
nativeEvent: { message },
}: NativeSyntheticEvent<{ message: string }>) => {
onCustomStyleLoadFailedProp?.({ message });
}
);
useImperativeHandle(
ref,
() => ({
animateCameraTo: ({
duration,
easing,
latitude,
longitude,
pivot,
zoom = Const.NULL_NUMBER,
}) => {
if (innerRef.current) {
Commands.animateCameraTo(
innerRef.current,
latitude,
longitude,
duration ?? Const.DEFAULT_ANIM_DURATION,
cameraEasingToNumber(easing ?? Const.DEFAULT_EASING),
pivot?.x ?? 0.5,
pivot?.y ?? 0.5,
zoom
);
}
},
animateCameraBy: ({ duration, easing, x, y, pivot }) => {
if (innerRef.current) {
Commands.animateCameraBy(
innerRef.current,
x,
y,
duration ?? Const.DEFAULT_ANIM_DURATION,
cameraEasingToNumber(easing ?? Const.DEFAULT_EASING),
pivot?.x ?? 0.5,
pivot?.y ?? 0.5
);
}
},
animateRegionTo: ({
easing,
longitude,
latitude,
duration,
latitudeDelta,
longitudeDelta,
pivot,
}) => {
if (innerRef.current) {
Commands.animateRegionTo(
innerRef.current,
latitude,
longitude,
latitudeDelta,
longitudeDelta,
duration ?? Const.DEFAULT_ANIM_DURATION,
cameraEasingToNumber(easing ?? Const.DEFAULT_EASING),
pivot?.x ?? 0.5,
pivot?.y ?? 0.5
);
}
},
animateCameraWithTwoCoords: ({
duration,
easing,
coord1,
coord2,
pivot,
}) => {
if (innerRef.current) {
const latitude = Math.min(coord1.latitude, coord2.latitude);
const longitude = Math.min(coord1.longitude, coord2.longitude);
const latitudeDelta = Math.abs(coord1.latitude - coord2.latitude);
const longitudeDelta = Math.abs(
coord1.longitude - coord2.longitude
);
Commands.animateRegionTo(
innerRef.current,
latitude,
longitude,
latitudeDelta,
longitudeDelta,
duration ?? Const.DEFAULT_ANIM_DURATION,
cameraEasingToNumber(easing ?? Const.DEFAULT_EASING),
pivot?.x ?? 0.5,
pivot?.y ?? 0.5
);
}
},
cancelAnimation: () => {
if (innerRef.current) {
Commands.cancelAnimation(innerRef.current);
}
},
setLocationTrackingMode: (mode: LocationTrackingMode) => {
if (innerRef.current) {
Commands.setLocationTrackingMode(innerRef.current, mode);
}
},
screenToCoordinate: ({ screenX, screenY }) => {
screenToCoordinatePromise.current?.resolve({
isValid: false,
latitude: 0,
longitude: 0,
});
screenToCoordinatePromise.current = undefined;
if (innerRef.current) {
const newPromise = new Promise((resolve, reject) => {
screenToCoordinatePromise.current = { resolve, reject };
});
Commands.screenToCoordinate(innerRef.current, screenX, screenY);
return newPromise;
} else {
return new Promise((_, reject) =>
reject(new Error('ref not set yet'))
);
}
},
coordinateToScreen: ({ latitude, longitude }) => {
coordinateToScreenPromise.current?.resolve({
isValid: false,
screenX: 0,
screenY: 0,
});
coordinateToScreenPromise.current = undefined;
if (innerRef.current) {
const newPromise = new Promise((resolve, reject) => {
coordinateToScreenPromise.current = { resolve, reject };
});
Commands.coordinateToScreen(innerRef.current, latitude, longitude);
return newPromise;
} else {
return new Promise((_, reject) =>
reject(new Error('ref not set yet'))
);
}
},
}),
[]
);
return (
onOptionChangedProp({
locationTrackingMode:
locationTrackingMode as LocationTrackingMode,
})
: undefined
}
mapPadding={mapPadding}
isShowCompass={isShowCompass}
isShowIndoorLevelPicker={isShowIndoorLevelPicker}
isShowLocationButton={isShowLocationButton}
isShowScaleBar={isShowScaleBar}
isShowZoomControls={isShowZoomControls}
minZoom={minZoom}
maxZoom={maxZoom}
extent={
extent
? extent
: isExtentBoundedInKorea
? southKoreaExtent
: undefined
}
logoAlign={logoAlign}
logoMargin={logoMargin}
isScrollGesturesEnabled={isScrollGesturesEnabled}
isZoomGesturesEnabled={isZoomGesturesEnabled}
isTiltGesturesEnabled={isTiltGesturesEnabled}
isRotateGesturesEnabled={isRotateGesturesEnabled}
isStopGesturesEnabled={isStopGesturesEnabled}
isUseTextureViewAndroid={isUseTextureViewAndroid}
locale={locale}
clusters={_clusters}
onScreenToCoordinate={onScreenToCoordinate}
onCoordinateToScreen={onCoordinateToScreen}
fpsLimit={fpsLimit}
customStyleId={customStyleId}
onCustomStyleLoaded={
onCustomStyleLoadedProp ? onCustomStyleLoaded : undefined
}
onCustomStyleLoadFailed={
onCustomStyleLoadFailedProp ? onCustomStyleLoadFailed : undefined
}
locationOverlay={_locationOverlay}
onTapClusterLeaf={
onTapClusterLeaf
? ({ nativeEvent: { markerIdentifier } }) =>
onTapClusterLeaf({ markerIdentifier })
: undefined
}
{...rest}
/>
);
}
);