# Kubescape Lens Extension
This extension brings out the power of [Kubescape][kubescape] into [Lens][lens] so managing cluster was never simpler and safer.
[![License][license-img]][license]


## Prerequisites
* Lens should be [installed][lens-installation] on your workstation. Please consult the following support matrix for version compatibility:
| Lens | Kubescape Extension |
|------|---------------------|
| 5.4 | 0.1.x |
| 5.5 | 0.1.x |
| 6.0 | 0.2.x |
| 6.1 | 0.2.x |
## Installation
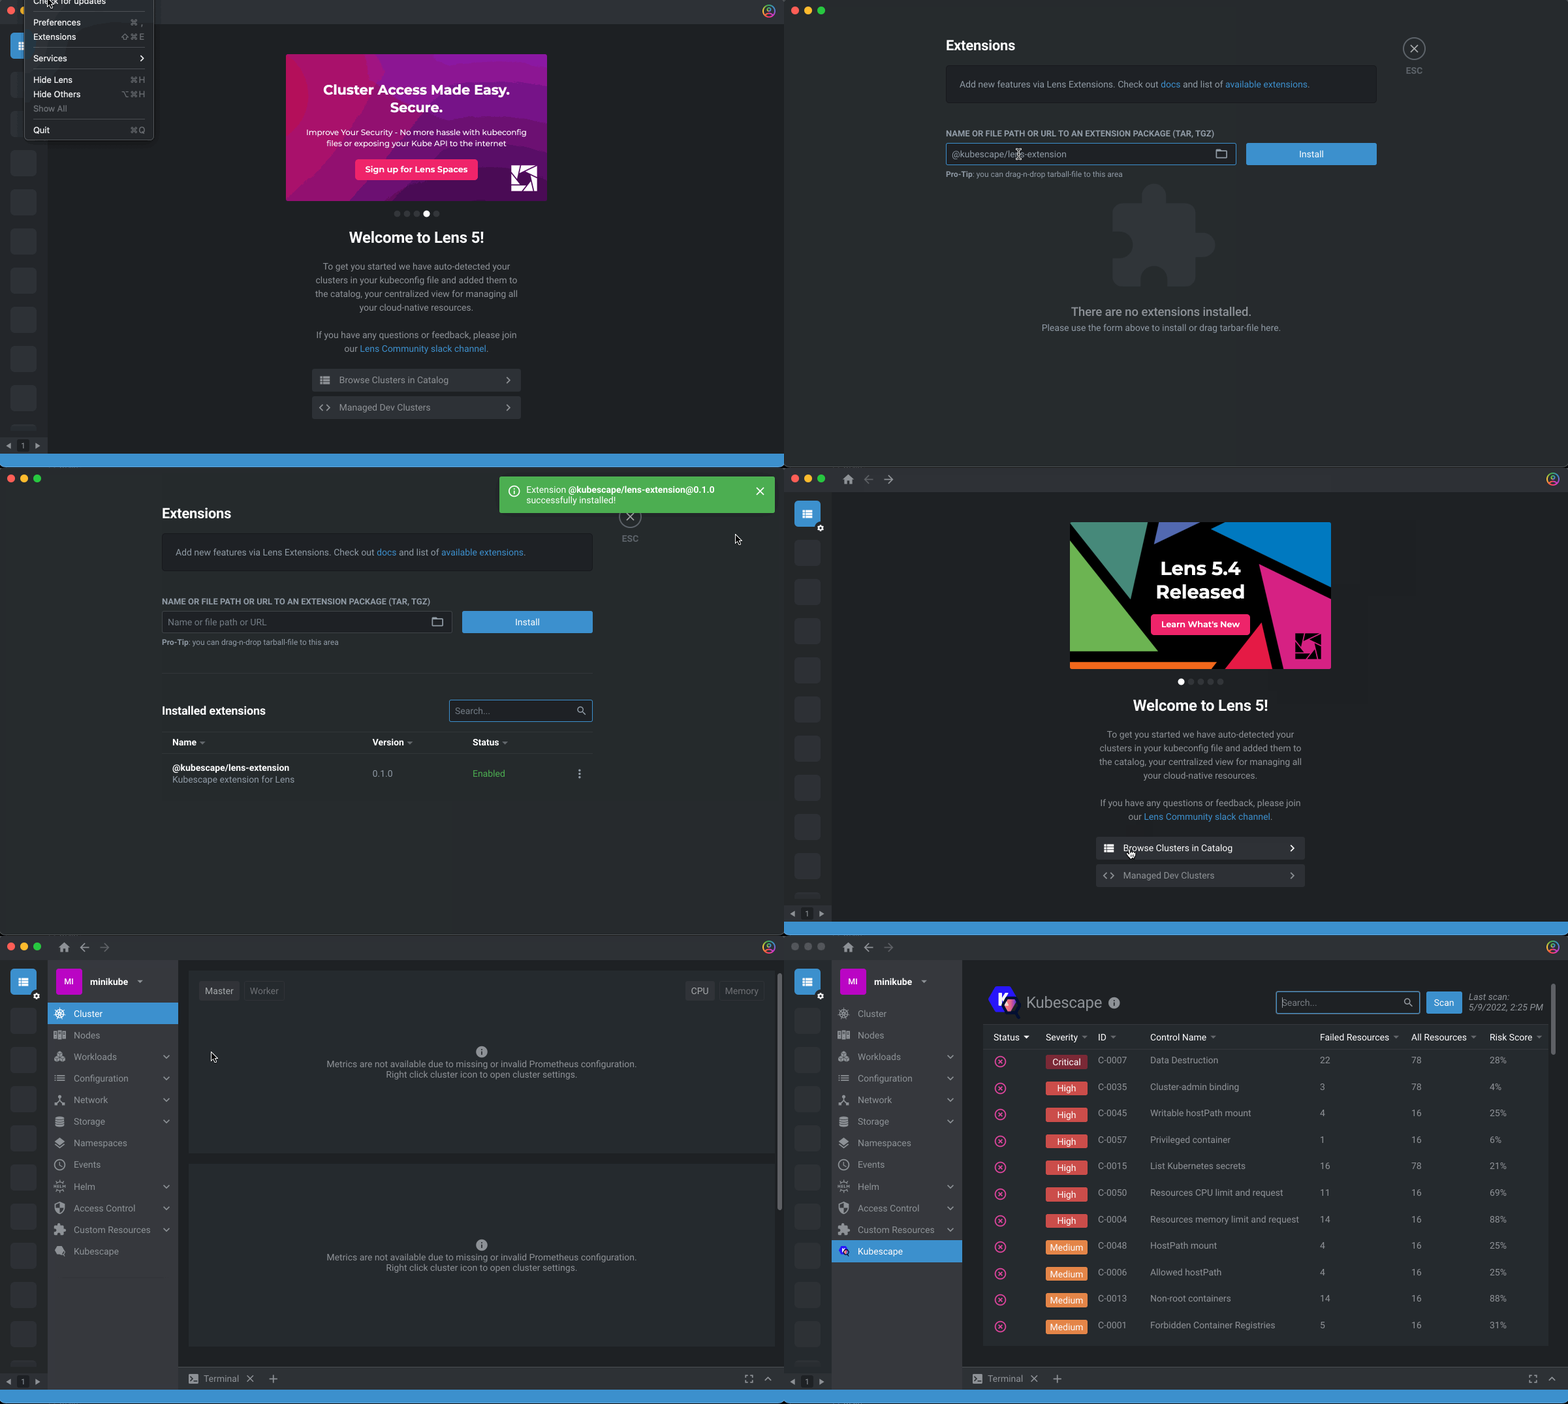
1. Open Lens and navigate to the __Extensions__ page (or press Command + Shift+E on macOS).
2. Enter ``@kubescape/lens-extension`` into the __Install Extension__ box
3. Click on the __Install__ button.
 ## Getting Started
Kubescape extension for Lens will help you to easily scan and detect misconfigurations, software vulnerabilities, and RBAC (role-based-access-control) violations in your K8S cluster.
#### Cluster-level information
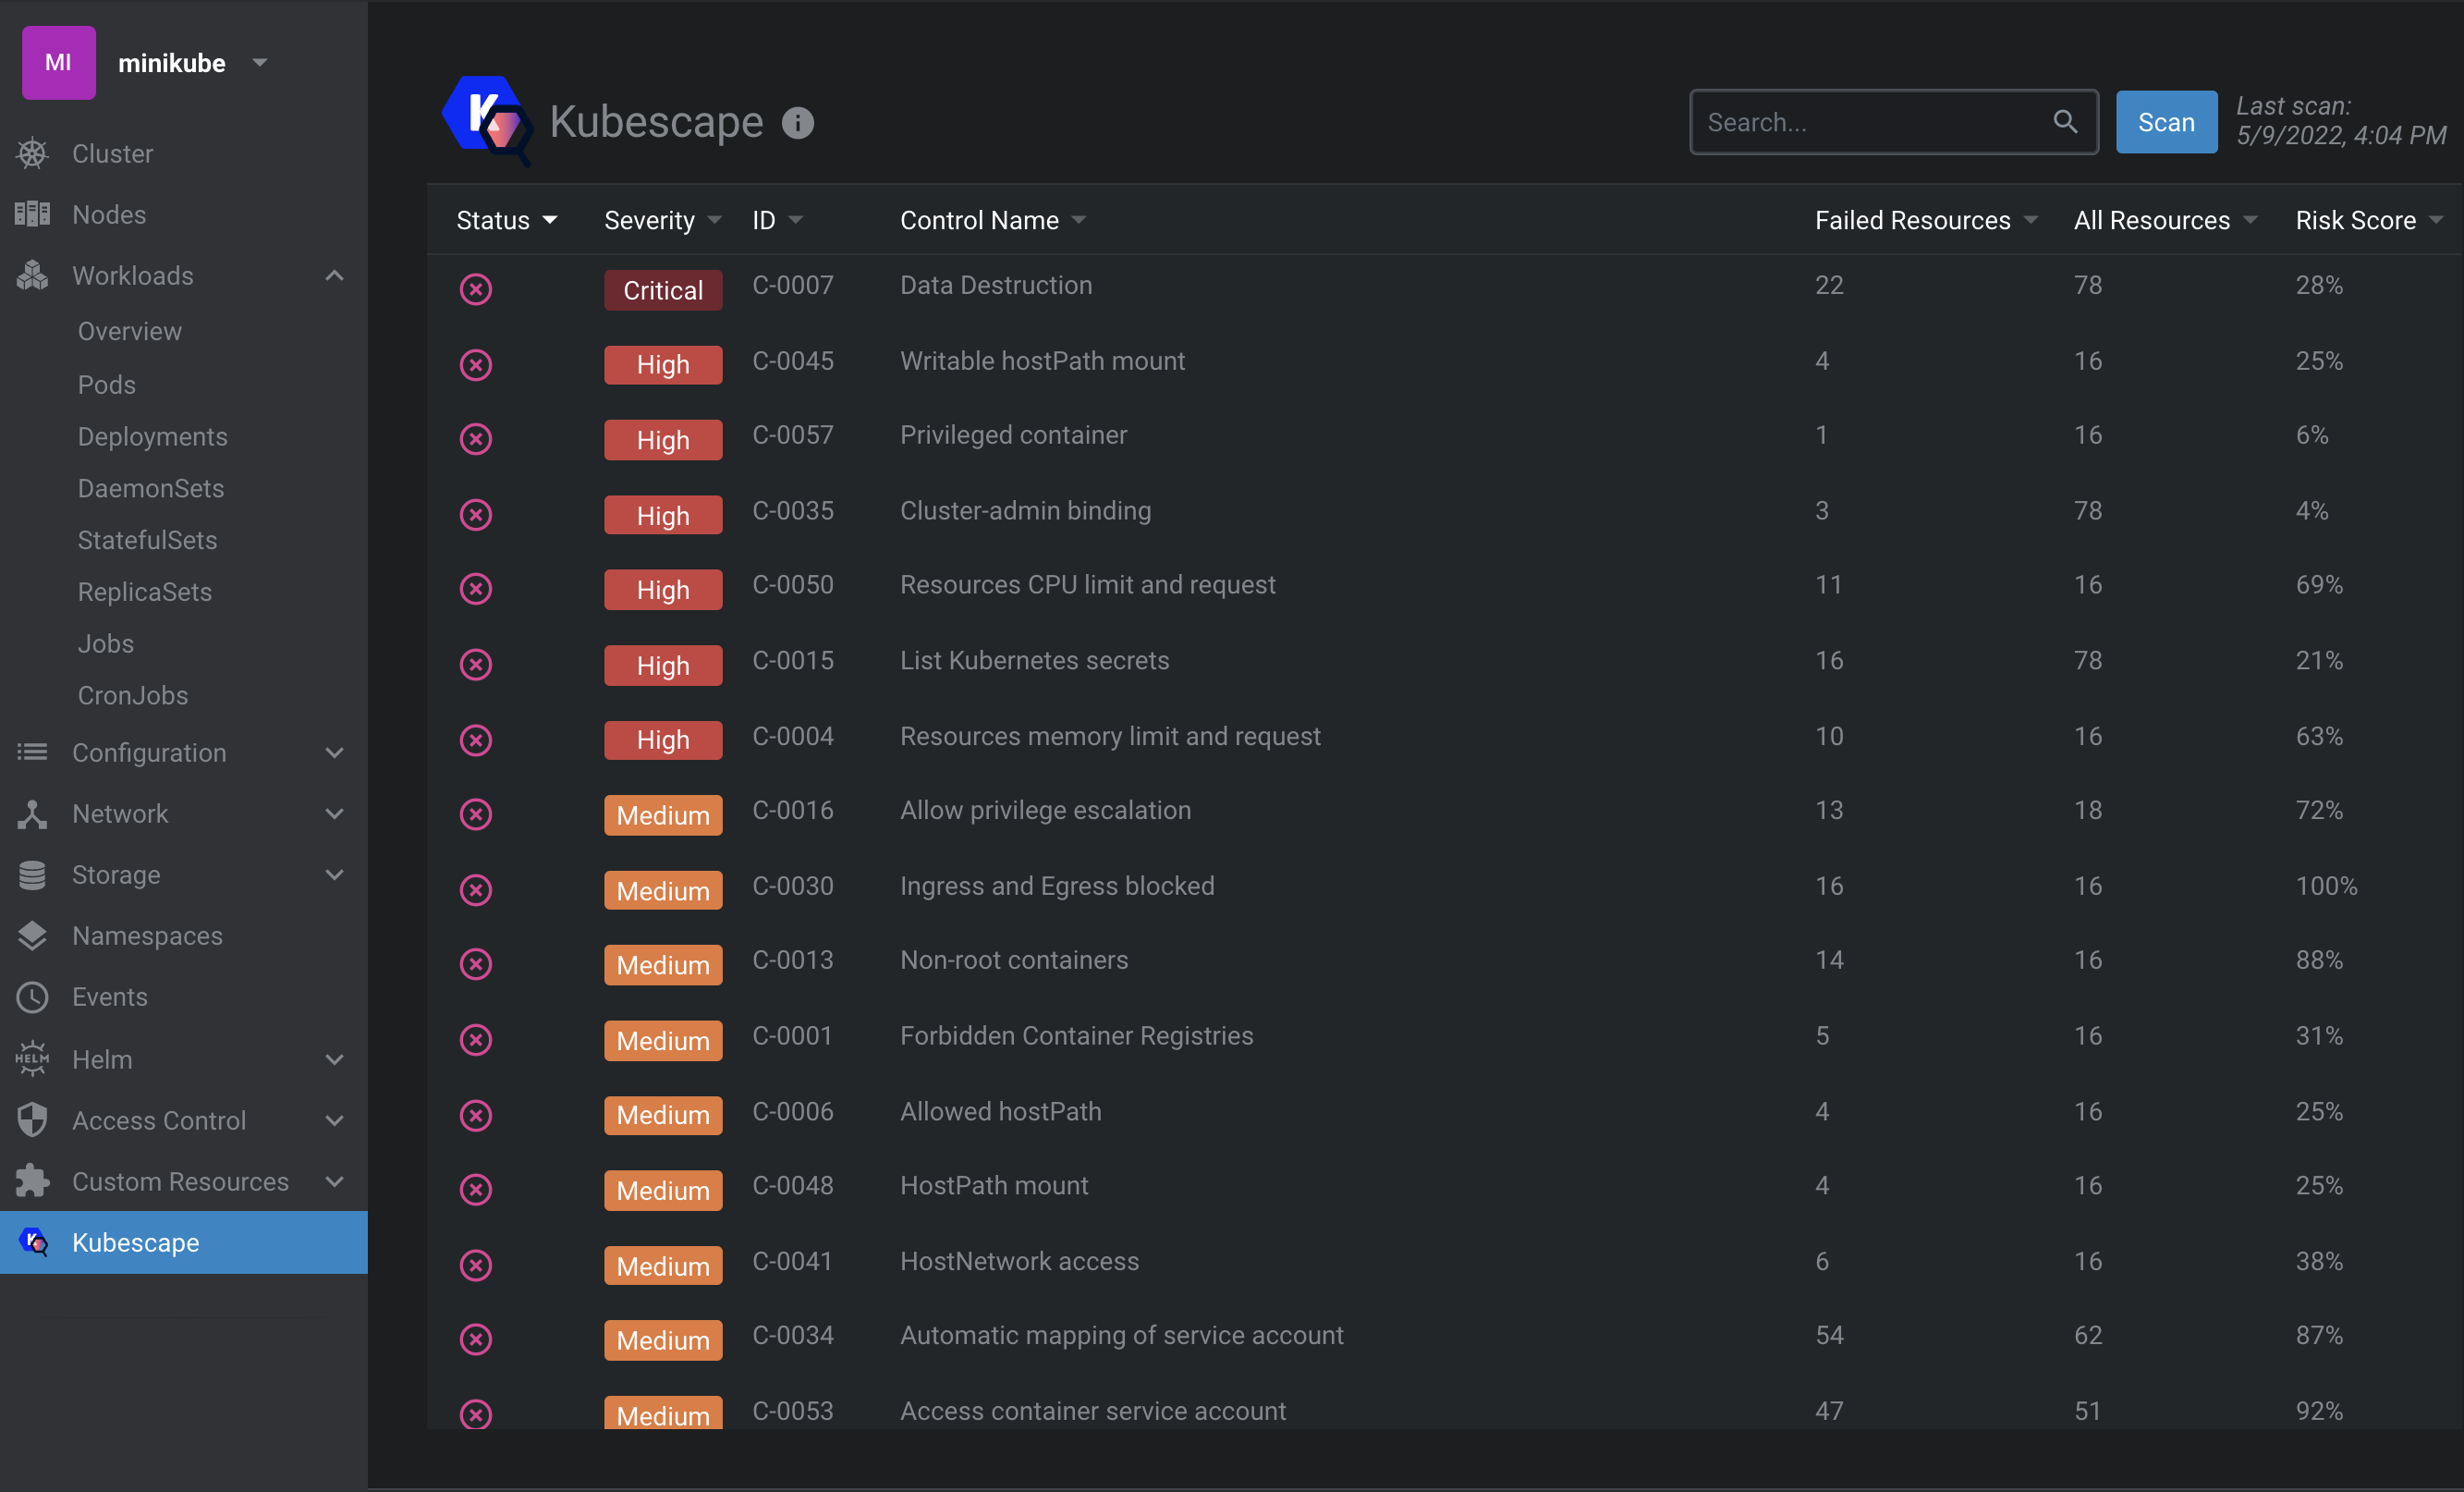
* Navigate to `Kubescape` from the side menu.
* A Kubescape scan runs automatically on your cluster for the first time. You can also run a scan on-demand by clicking the __Scan__ button.
* The table reflects a cluster-level summary of kubescape scan results.
## Getting Started
Kubescape extension for Lens will help you to easily scan and detect misconfigurations, software vulnerabilities, and RBAC (role-based-access-control) violations in your K8S cluster.
#### Cluster-level information
* Navigate to `Kubescape` from the side menu.
* A Kubescape scan runs automatically on your cluster for the first time. You can also run a scan on-demand by clicking the __Scan__ button.
* The table reflects a cluster-level summary of kubescape scan results.
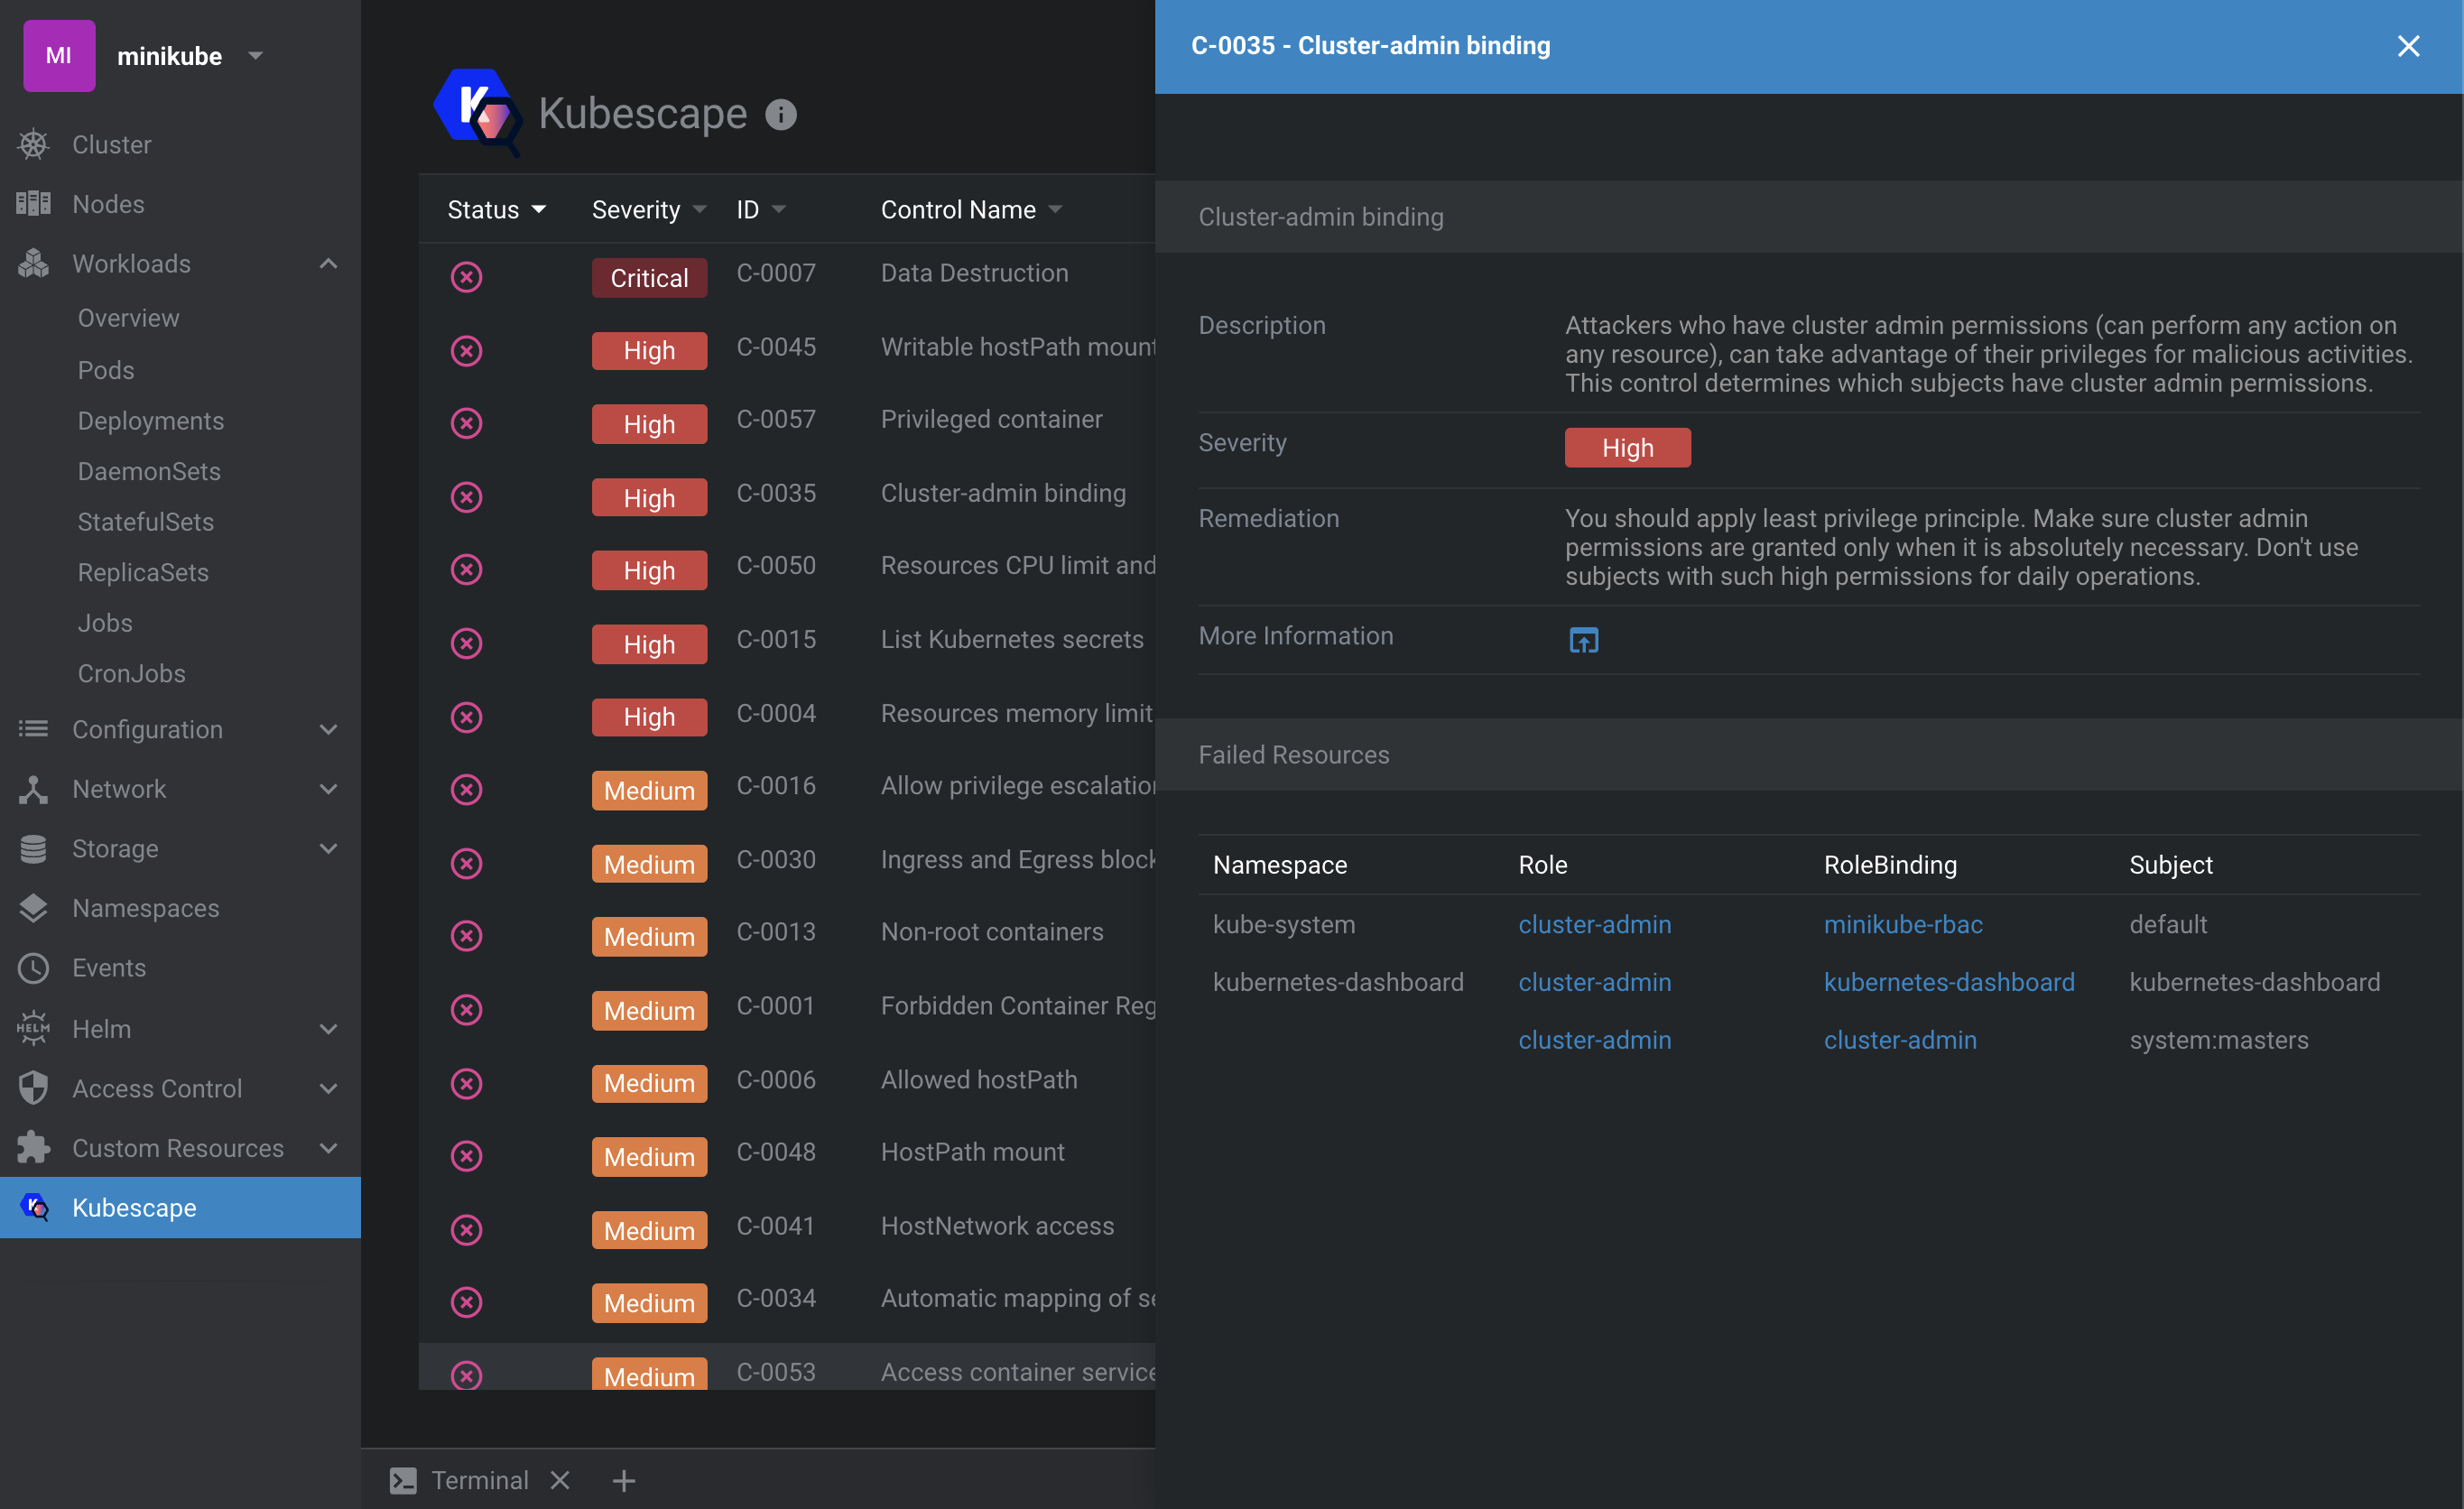
* To find out more information on a specific Kubescape control and its failed resources, click on it to open the side bar for a detailed view:
 #### Object-level information
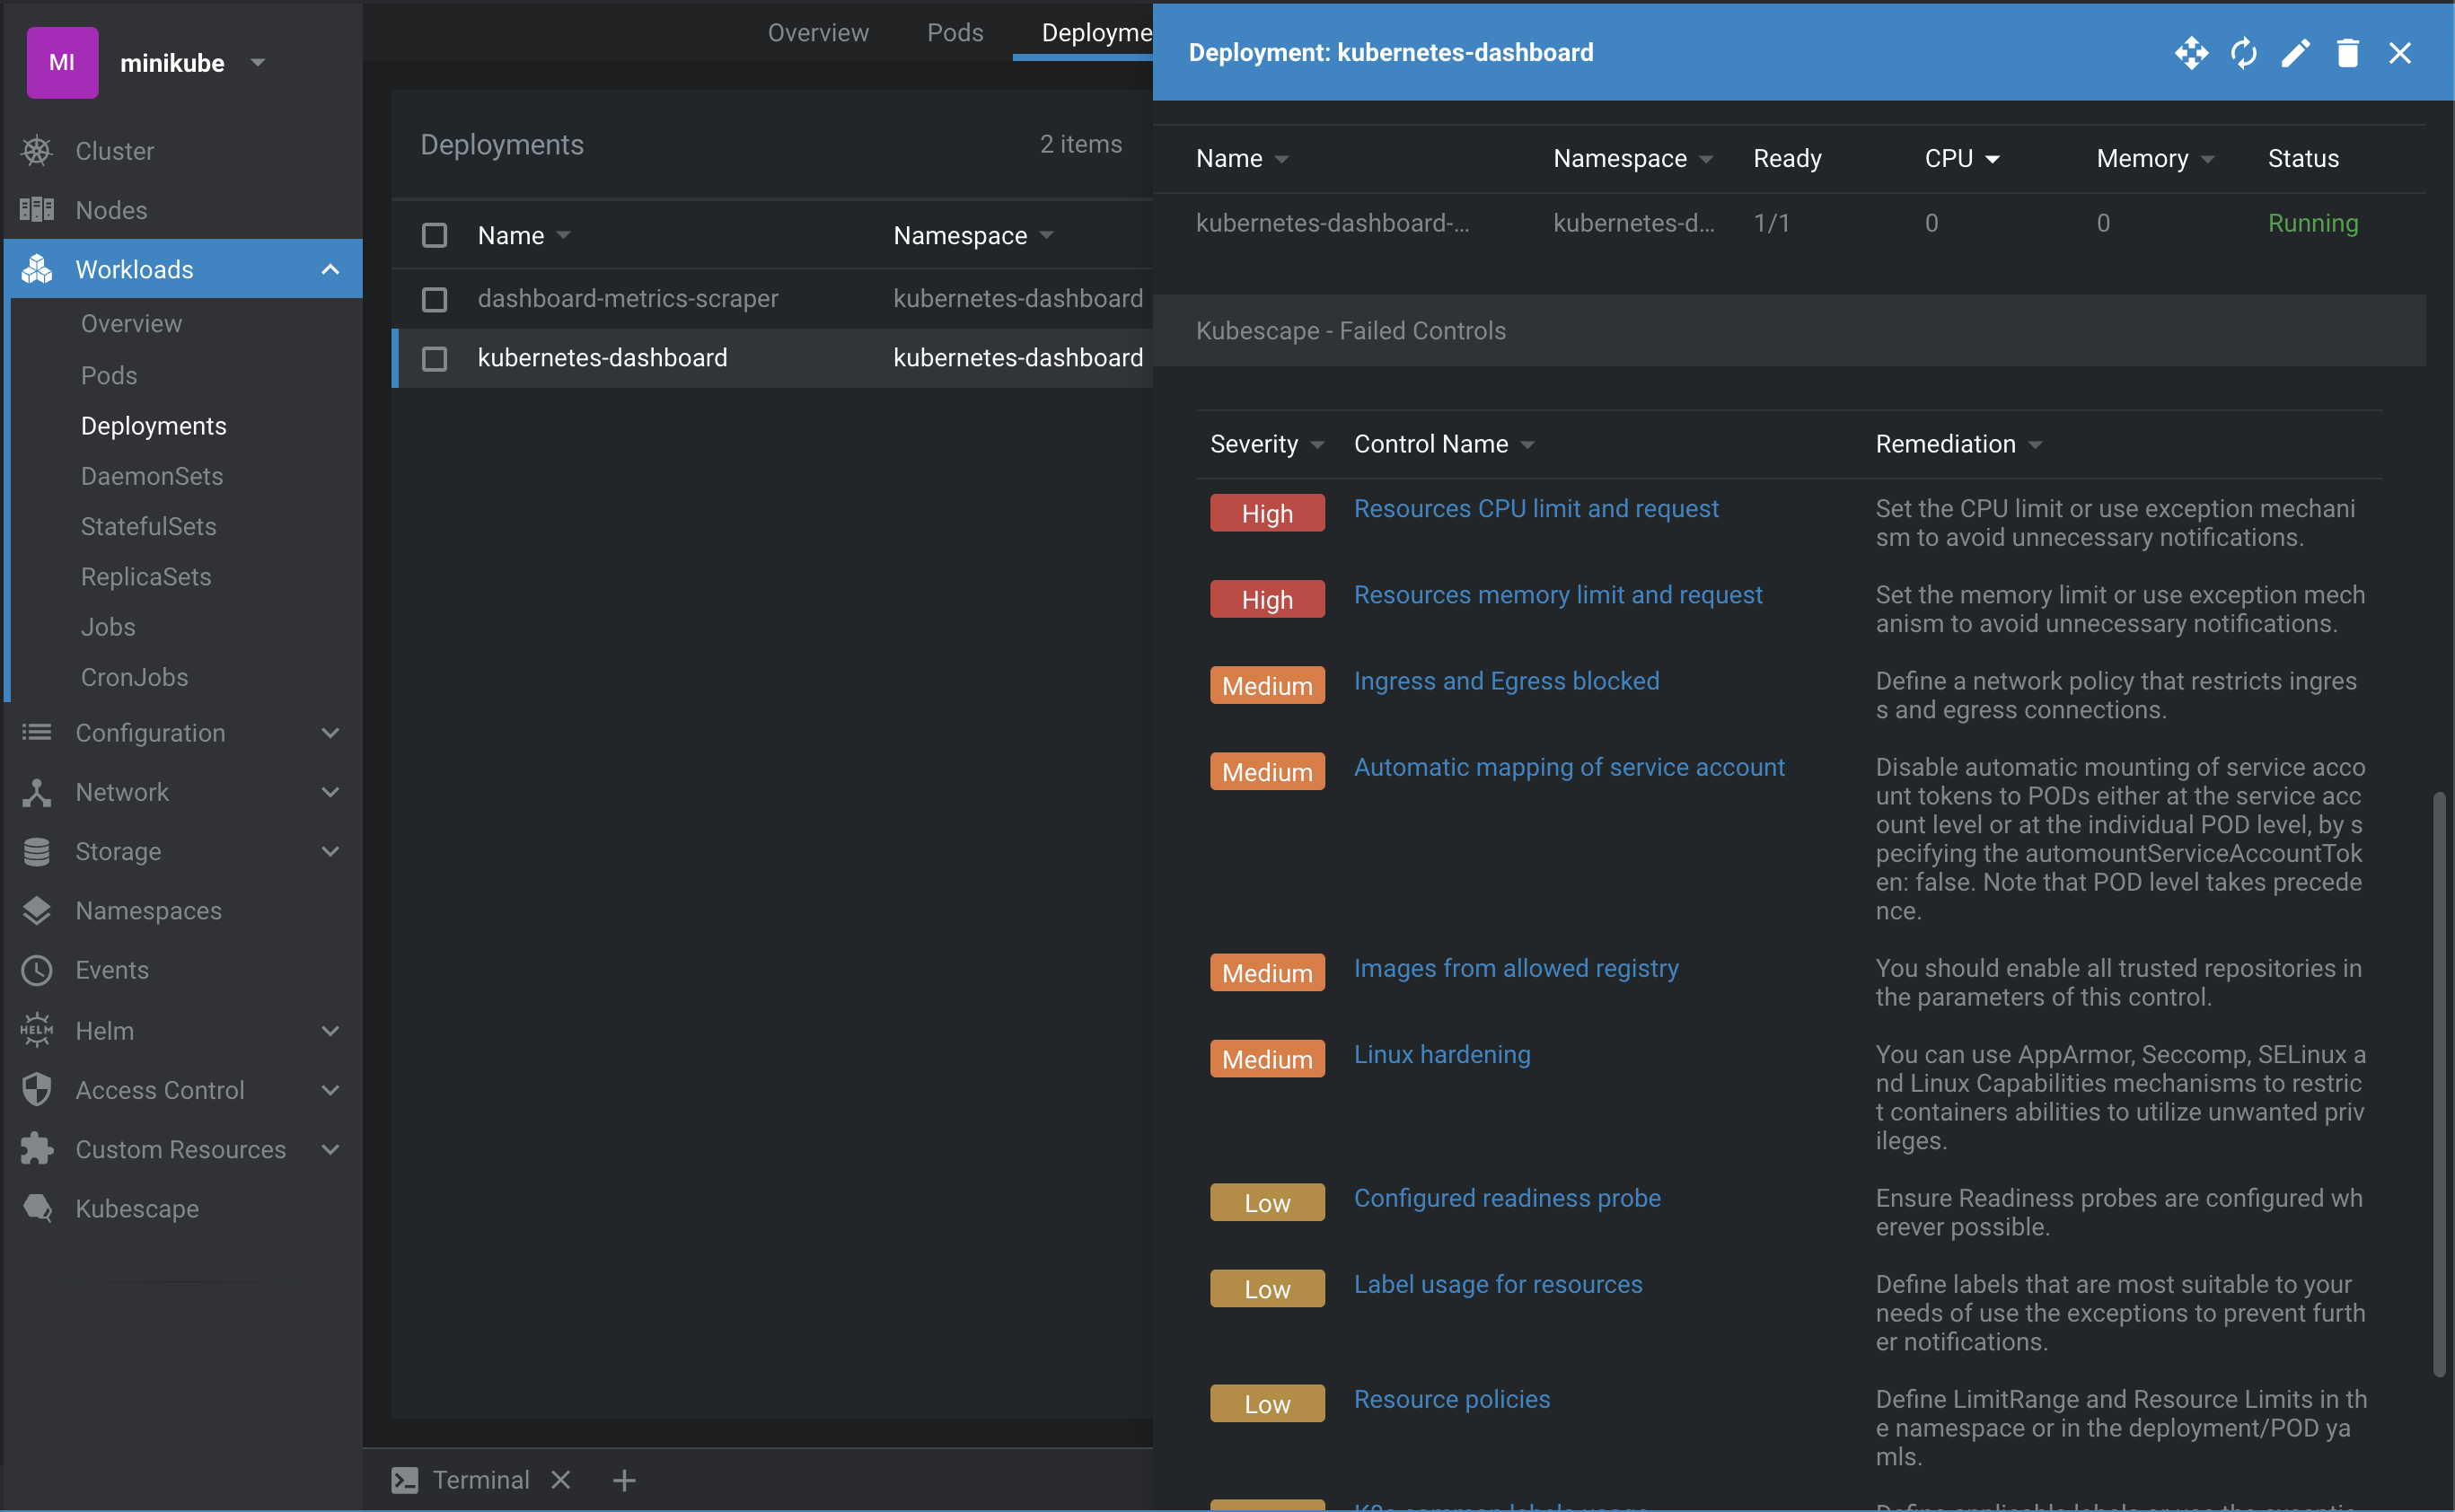
* Kubescape information is also available at the object level. Click on the desired resource to open the details side bar and scroll down for Kubescape section:
>_This view shows only failed controls. If you don't see any that's a good thing :)_
#### Object-level information
* Kubescape information is also available at the object level. Click on the desired resource to open the details side bar and scroll down for Kubescape section:
>_This view shows only failed controls. If you don't see any that's a good thing :)_
 ## Development mode
> You must have a working [Node.js][nodejs] environment.
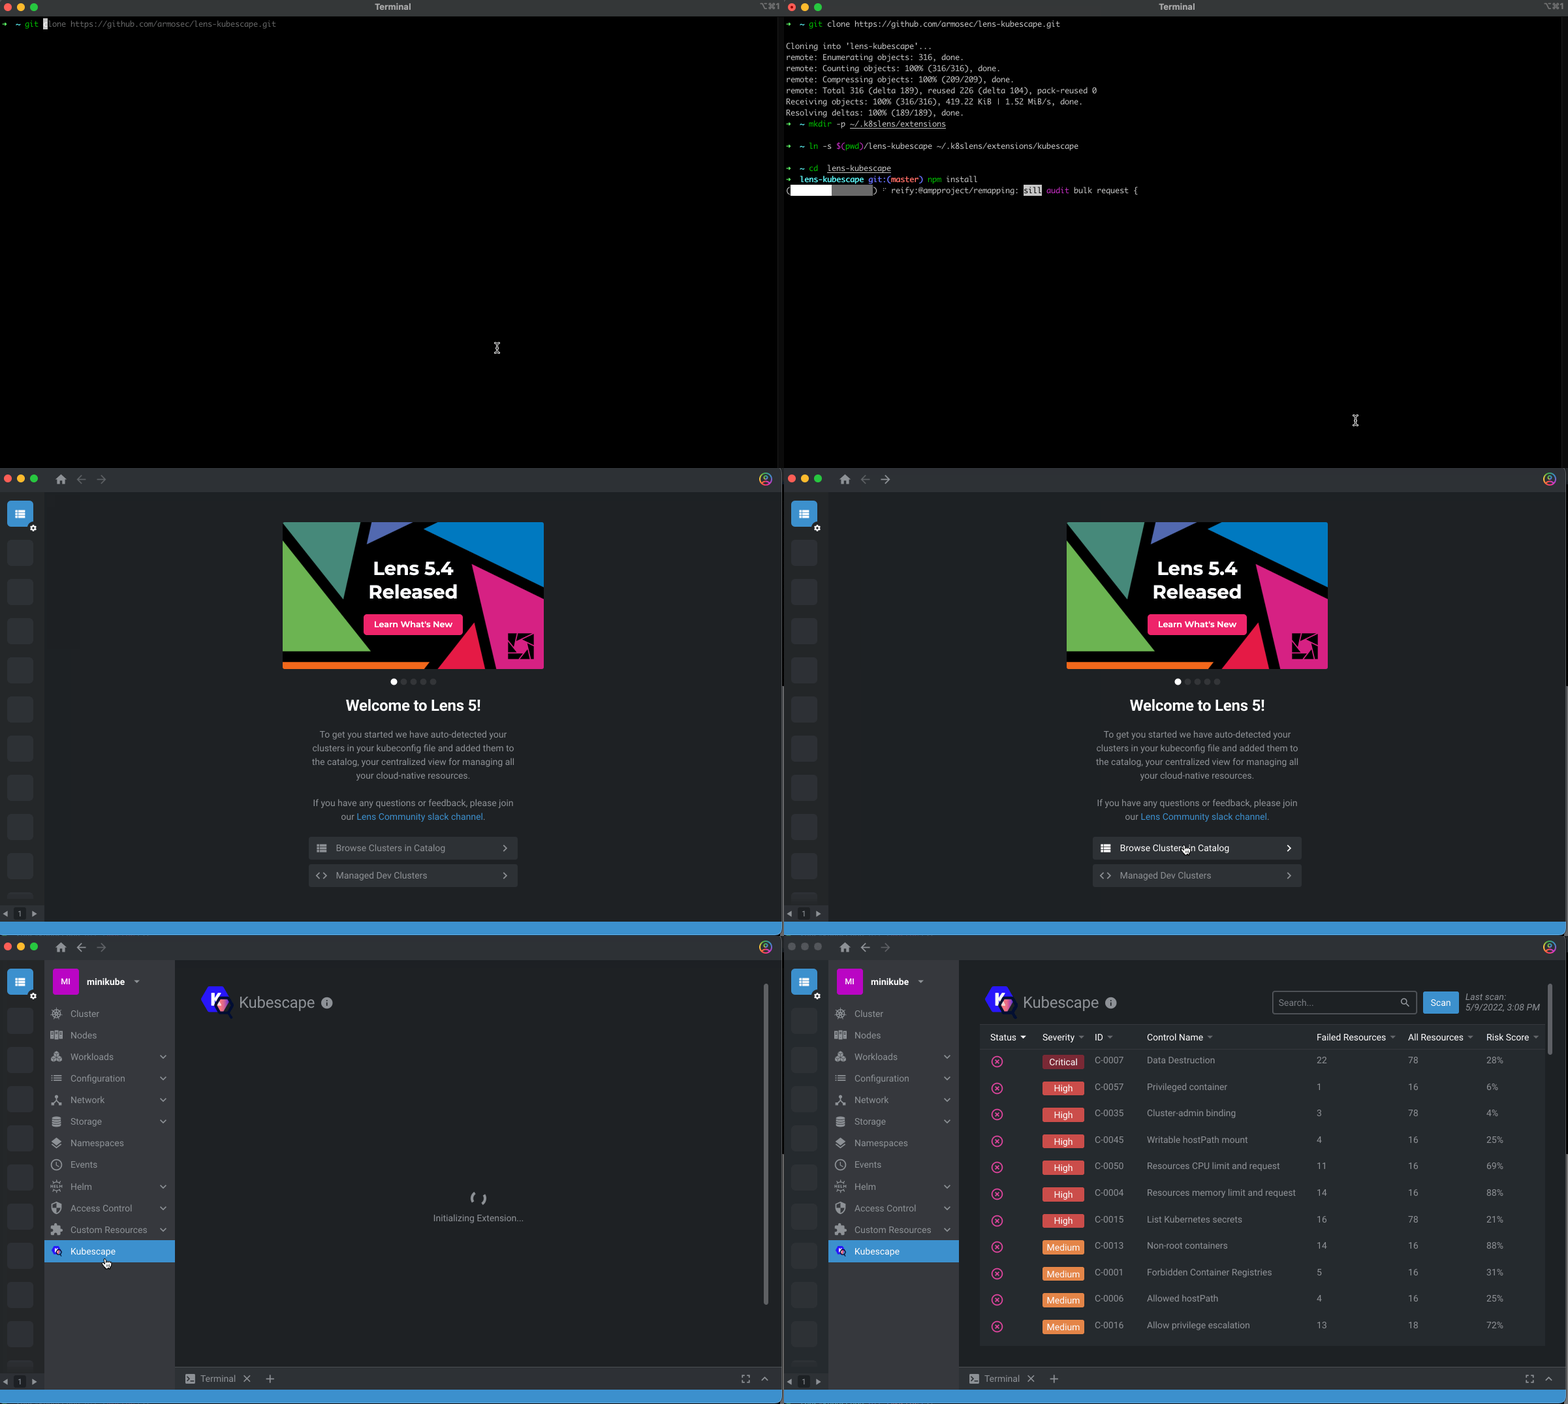
1. Clone the repository and then link to it:
```sh
git clone https://github.com/kubescape/lens-extension.git
mkdir -p ~/.k8slens/extensions
ln -s $(pwd)/lens-extension ~/.k8slens/extensions/kubescape
```
2. Install dependencies and build the extension by running `make` or `npm` commands:
```sh
cd lens-extension
make build
```
__OR__
```sh
cd lens-extension
npm install
npm run build
```
3. To put your development build into watch mode you can run:
```sh
npm start
```
4. Open Lens and navigate to the Extensions page (or press Command + Shift+E on macOS).
5. If everything is fine, you should see the ``@kubescape/lens-extension`` extension listed under __Installed Extensions__. Click __Enable__ to enable it
To reflect your source code changes, reload the Lens window by pressing Command+R (macOS). Note: Any changes which affect Len's main thread will require a restart to the Lens application.
## Development mode
> You must have a working [Node.js][nodejs] environment.
1. Clone the repository and then link to it:
```sh
git clone https://github.com/kubescape/lens-extension.git
mkdir -p ~/.k8slens/extensions
ln -s $(pwd)/lens-extension ~/.k8slens/extensions/kubescape
```
2. Install dependencies and build the extension by running `make` or `npm` commands:
```sh
cd lens-extension
make build
```
__OR__
```sh
cd lens-extension
npm install
npm run build
```
3. To put your development build into watch mode you can run:
```sh
npm start
```
4. Open Lens and navigate to the Extensions page (or press Command + Shift+E on macOS).
5. If everything is fine, you should see the ``@kubescape/lens-extension`` extension listed under __Installed Extensions__. Click __Enable__ to enable it
To reflect your source code changes, reload the Lens window by pressing Command+R (macOS). Note: Any changes which affect Len's main thread will require a restart to the Lens application.
 ### Uninstall
1. Remove the link:
```sh
rm ~/.k8slens/extensions/kubescape
```
2. Restart Lens application.
[lens]: https://github.com/lensapp/lens
[kubescape]: https://github.com/armosec/kubescape
[license]: https://github.com/kubescape/lens-extension/blob/master/LICENSE
[license-img]: https://img.shields.io/github/license/kubescape/lens-extension
[nodejs]: https://www.nodejs.org/en/
[lens-installation]: https://github.com/lensapp/lens#installation
### Uninstall
1. Remove the link:
```sh
rm ~/.k8slens/extensions/kubescape
```
2. Restart Lens application.
[lens]: https://github.com/lensapp/lens
[kubescape]: https://github.com/armosec/kubescape
[license]: https://github.com/kubescape/lens-extension/blob/master/LICENSE
[license-img]: https://img.shields.io/github/license/kubescape/lens-extension
[nodejs]: https://www.nodejs.org/en/
[lens-installation]: https://github.com/lensapp/lens#installation