
|
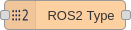
This node represents a specific ROS2 Types installed on the system. Once in the workspace, its set up dialog can be opened by double clicking over it. |
|
The dialog provides a Package drop-down control where all ROS2 msg packages are listed. Once a package is selected the Message drop-down control allows selection of a package specific message. In this example the package selected is edu_robot. From this package the RobotStatusReport message is selected. | |
Once the dialog set up is saved, the node label changes to highlight the selected type in a package/message pattern. |
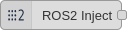 This node mimics the inject node behaviour but automatically populates the input dialog with the fields associated with
any *type node* linked to it. For example, if we wire together a **ROS2 Inject** and a **ROS2 Type** as
shown in the figure:

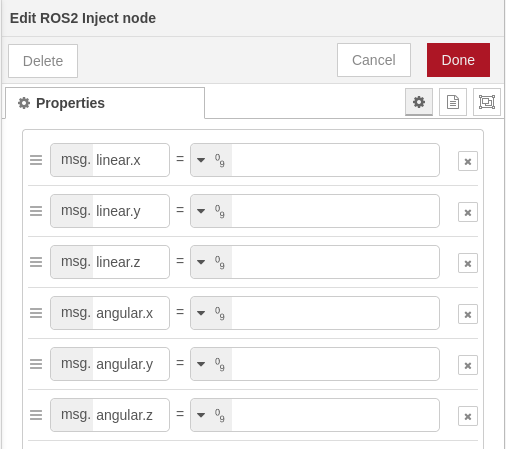
The associated dialogs are populated with the linked type fields and types. For example the twist message is populated as:
#### ROS2 nodes: General Settings
In order to interact with a ROS2 environment we must specify the same [domain id](https://docs.ros.org/en/jazzy/Concepts/Intermediate/About-Domain-ID.html)
in use for that environment.
The *domain id* is a number in the range `[0, 166]` that provides isolation for ROS2 nodes.
It defaults to 0 and its main advantage is reduce the incomming traffic for each ROS2 node, discharging them and
speeding things up.
Another key concepts in the ROS2 environment are:
- [topic](https://docs.ros.org/en/jazzy/Tutorials/Beginner-CLI-Tools/Understanding-ROS2-Topics/Understanding-ROS2-Topics.html)
one. A *topic* is a text string ROS2 nodes use to notify all other nodes in which data they are interested.
When a ROS2 node wants to send or receive data it must specify:
+ Which type is the data they want receive. For example the `edu_robot/RobotStatusReport` we introduced [above](#choosing-a-predefined-ros2-type).
+ Topic associated with the data. For example `/status_report`, but in ROS2 topics are often *decorated* using
namespaces to simplify identification, as in `/eduard/red/status_report`.
- [Quality of Service (QoS)](https://docs.ros.org/en/jazzy/Concepts/Intermediate/About-Quality-of-Service-Settings.html). Those are
policies that allow fine tunning of the communication between nodes. For example:
+ *History QoS* allows to discard messages if only the most recent one is meaningful for our purposes.
+ *Reliable QoS* enforces message reception by resending it until the receiver acknowledges it.
+ *Durability QoS* assures messages published before the receiver node creation would be delivered.
> **_Note:_** ROS2 nodes can only communicate if their respective QoS are compatible. Information on QoS compatibility
is available [here](https://docs.ros.org/en/jazzy/Concepts/Intermediate/About-Quality-of-Service-Settings.html).
#### ROS2 Subscriber
This node mimics the inject node behaviour but automatically populates the input dialog with the fields associated with
any *type node* linked to it. For example, if we wire together a **ROS2 Inject** and a **ROS2 Type** as
shown in the figure:

The associated dialogs are populated with the linked type fields and types. For example the twist message is populated as:

#### ROS2 nodes: General Settings
In order to interact with a ROS2 environment we must specify the same [domain id](https://docs.ros.org/en/jazzy/Concepts/Intermediate/About-Domain-ID.html)
in use for that environment.
The *domain id* is a number in the range `[0, 166]` that provides isolation for ROS2 nodes.
It defaults to 0 and its main advantage is reduce the incomming traffic for each ROS2 node, discharging them and
speeding things up.
Another key concepts in the ROS2 environment are:
- [topic](https://docs.ros.org/en/jazzy/Tutorials/Beginner-CLI-Tools/Understanding-ROS2-Topics/Understanding-ROS2-Topics.html)
one. A *topic* is a text string ROS2 nodes use to notify all other nodes in which data they are interested.
When a ROS2 node wants to send or receive data it must specify:
+ Which type is the data they want receive. For example the `edu_robot/RobotStatusReport` we introduced [above](#choosing-a-predefined-ros2-type).
+ Topic associated with the data. For example `/status_report`, but in ROS2 topics are often *decorated* using
namespaces to simplify identification, as in `/eduard/red/status_report`.
- [Quality of Service (QoS)](https://docs.ros.org/en/jazzy/Concepts/Intermediate/About-Quality-of-Service-Settings.html). Those are
policies that allow fine tunning of the communication between nodes. For example:
+ *History QoS* allows to discard messages if only the most recent one is meaningful for our purposes.
+ *Reliable QoS* enforces message reception by resending it until the receiver acknowledges it.
+ *Durability QoS* assures messages published before the receiver node creation would be delivered.
> **_Note:_** ROS2 nodes can only communicate if their respective QoS are compatible. Information on QoS compatibility
is available [here](https://docs.ros.org/en/jazzy/Concepts/Intermediate/About-Quality-of-Service-Settings.html).
#### ROS2 Subscriber
 |
This node represents a ROS2 subscriber. It is able to subscribe on a specific topic and receive all messages published for it. |
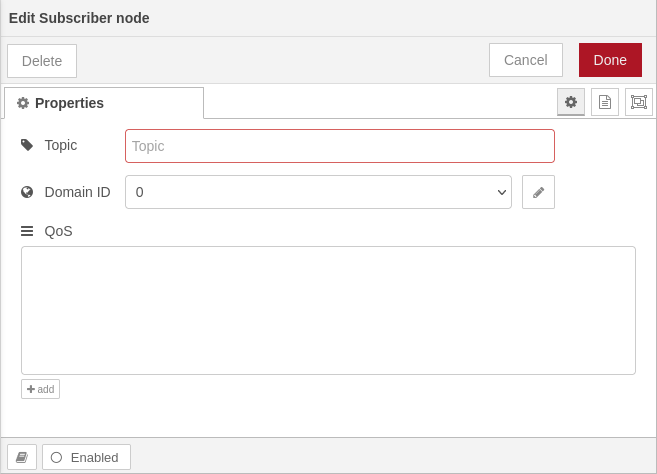 |
The dialog provides controls to configure:
|
 |
This node represents a ROS2 publisher. It is able to publish messages on a specific topic with specific QoS |
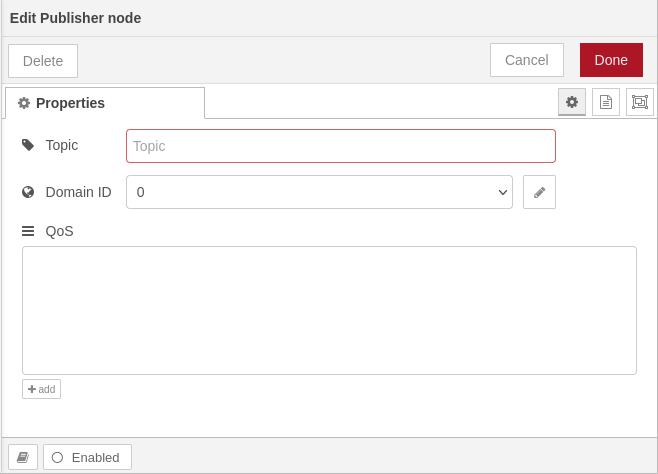 |
The dialog provides controls to configure:
|
 |
This node represents a ROS2 service client. It is able to call a specific service with specific QoS. The connected injection injects the service request only. After a successful service call the service response is output. |
|
The dialog provides controls to configure:
|
 |
This node represents a ROS2 action client. It is able to perform a specific action with specific QoS. The connected injection injects the action goal request only. After a accepted action goal the action feedback and the final result is outputted. |
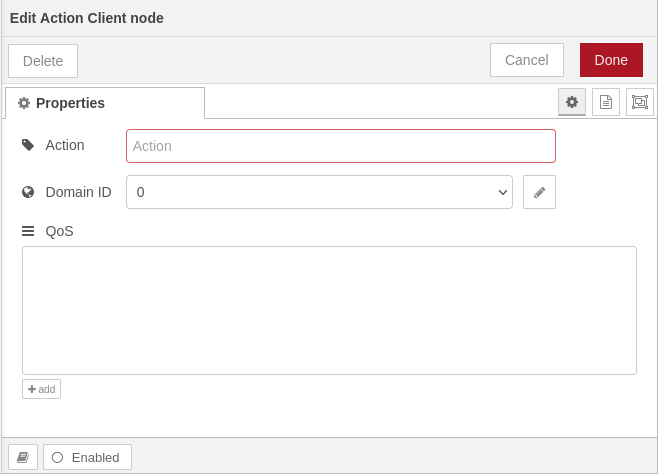 |
The dialog provides controls to configure:
|