# Hype Data Magic

The cover artwork is not hosted in this repository and ©opyrighted by Max Ziebell
This is Hype DataMagic, it allows you to easily add and handle data in your Tumult Hype documents (with live preview). It is easy to deploy and offers partial reactivity.
## Getting started guide
### Install Hype Data Magic
This step is effortless if you use the CDN version mentioned at the end of this document. Just copy and paste the following line into your Head HTML:
```html
```
You're done installing Hype Data Magic 1.
### Basic example to set data:
Open Head HTML and add a script section with the following JavaScript command between the tags:
``` javascript
```
### Bind data to your Hype document:
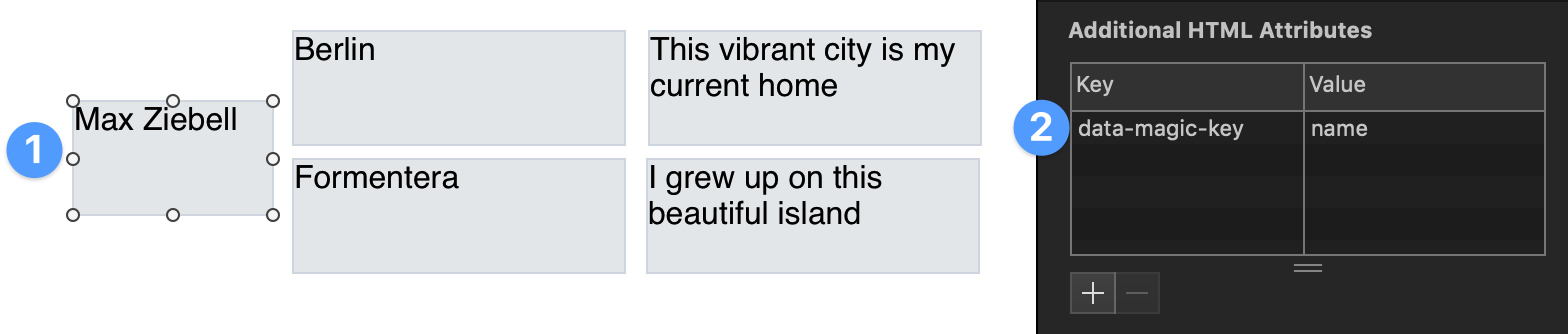
1. Select a rectangle on stage and switch to the **Identity** panel
2. Add a new key to the **Additional HTML Attributes** called `data-magic-key` and set the value to a property we used in `setData` like *name*
You should now see a preview of the data in your Hype document. From now on, when you edit the data in your Head HTML and change back to the scene editor you will see the update reflected immediately. This works across previews and publishing the Hype document and even reacts to updates when calling `HypeDataMagic.setData` in the browser console.
### Basic example to set and bind data with nested objects:
```javascript
HypeDataMagic.setData({
name: 'Max Ziebell',
hello: 'world',
items: [
{
location: 'Berlin',
relation: 'This vibrant city is my current home'
},
{
location: 'Formentera',
relation: 'I grew up on this beautiful island'
},
],
});
```
**Binding nested data** is as simple as the previous example as the data-magic-key is parsed using a simple JavaScript array/object property accessor notation.
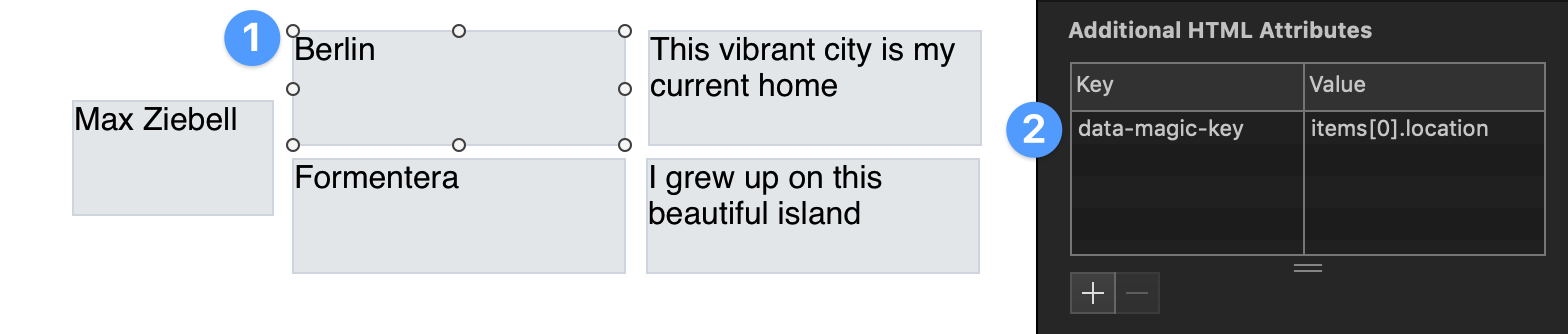
1. Select a recangle on stage and switch to the **Identity** panel
2. This time we set the key to `items[0].location` as `items` is an array we chose the first branch (indexing starts at `0`) and the property `location`
You should now see a preview of the nested data in your rectangle. To see all the data just repeat the last steps and change the property to `relation` and for the other rectangles just change the index from `0` to `1`.
### Using data handler in Hype Data Magic
What you just experienced was the default data handler. It sets the inner HTML content of your rectangle to whatever string it finds when looking up the `data-magic-key` previously set using `HypeDataMagic.setData`.
There is an aditional built in data handler called `image` and in this example we will look at how we can easily set it up and use it in our Hype document.
First we need example data with a URL pointing to an image 2.
```javascript
HypeDataMagic.setData({
image:{
src:'https://maxziebell.de/wp-content/uploads/2018/11/Max-Ziebell-Konzept-3-e1543533327368.png'
},
});
```

1. Select a recangle on stage and switch to the **Identity** panel
2. Assign the `data-magic-key` according to the previous nested example to `image.src`. This time there is no array involved, so we can choose the `image` object and directly the `src` property. The new step is to assign the `data-magic-handler` and set it to `image`.
You should now see the image inside the rectangle. The image is set to be contained in the rectangle meaning it scales with the dimensions of the rectangle if you resize or animate it 3.
### The image data handler and its options
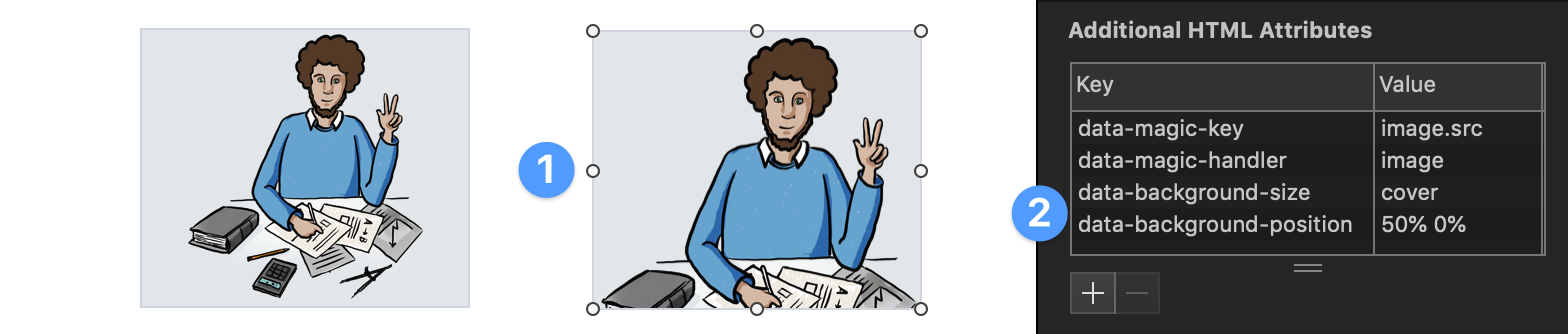
1. Select another rectangle and repeat assigning the `data-magic-key` and the `data-magic-handler`.
2. Now we can explore some options you can use when assigning the image data handler:
* `data-background-size` can be set to `cover` and defaults to `contain` if not set 4.
* `data-background-position` can be used to set the *focal point* if the size is set to `cover` 5. In this example we focus on `50%` from the left and `0%` from the top.
## Further tutorials
If you want to read more about the posibillities and all the commands please visit the [Hype Data Magic wiki](https://github.com/worldoptimizer/HypeDataMagic/wiki). Here is a list of topics that continue the previous examples nicely:
* Reading image handler properties directly from your data source
* [Using `data-magic-branch` to shorten data keys](https://github.com/worldoptimizer/HypeDataMagic/wiki/How-to-use-data-magic-branches)
* [Adding your own data handler](https://github.com/worldoptimizer/HypeDataMagic/wiki/How-to-add-your-own-data-handler)
* Using data magic tags in HTML snippets
* How to update data on the fly
* Overriding default values
… and much more.
## Documentation
There is a [JSDoc](https://en.wikipedia.org/wiki/JSDoc) based documentation of the functions at https://doxdox.org/worldoptimizer/HypeDataMagic
Content Delivery Network (CDN)
--
Latest version can be linked into your project using the following in the head section of your project:
**Version with IDE-Preview:**
```html
```
**Version without IDE-Preview (saves some kilobytes in final delivery, if necessary):**
```html
```
Optionally you can also link a SRI version or specific releases.
Read more about that on the JsDelivr (CDN) page for this extension at https://www.jsdelivr.com/package/gh/worldoptimizer/HypeDataMagic
Learn how to use the latest extension version and how to combine extensions into one file at
https://github.com/worldoptimizer/HypeCookBook/wiki/Including-external-files-and-Hype-extensions
---
**Footnotes:**
*1. If you don't want to use the CDN Version, please download the repository and add the file -`HypeDataMagic.min.js` to your resource panel. Make sure it's added to Head HTML (Hype default). Another thing to note is that make sure your not caching as Hype in combination with the CDN can sometimes produce an undesired file retention. A simple trick is to add an question mark and a chaebusting random number to the end of the script source url.
*2. We actually don't need a nested object like`image.src` and the URL could also just be directly assigned to top level property like the`image` key. This example uses nesting because there are some optional features when using the image in a nested manner. Read more about these features in the Hype Data Magic wiki*
*3. Be aware that Hype Data Magic doesn't include any preloading meaning that the image starts loading when you set the data or reach the scene when previewing.*
*4. This options mirrors the CSS property background-size. Read more about possible values at https://www.w3schools.com/cssref/css3_pr_background-size.asp .*
*5. This options mirrors the CSS property background-position. Read more about possible values at https://www.w3schools.com/cssref/pr_background-position.asp .*