# Spec Workflow MCP
[](https://www.npmjs.com/package/@pimzino/spec-workflow-mcp)
[](https://marketplace.visualstudio.com/items?itemName=Pimzino.spec-workflow-mcp)
A Model Context Protocol (MCP) server for structured spec-driven development with real-time dashboard and VSCode extension.
## ☕ Support This Project
## 📺 Showcase
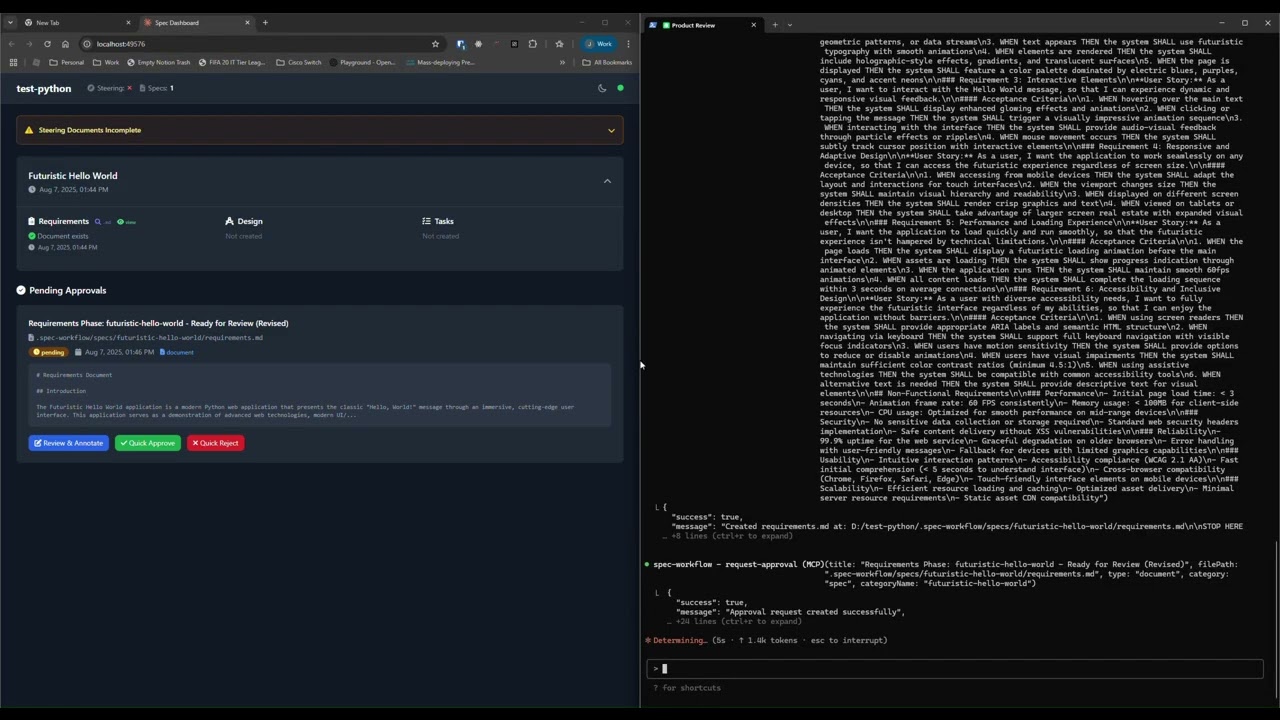
### 🔄 Approval System in Action
*See how the approval system works: create documents, request approval through the dashboard, provide feedback, and track revisions.*
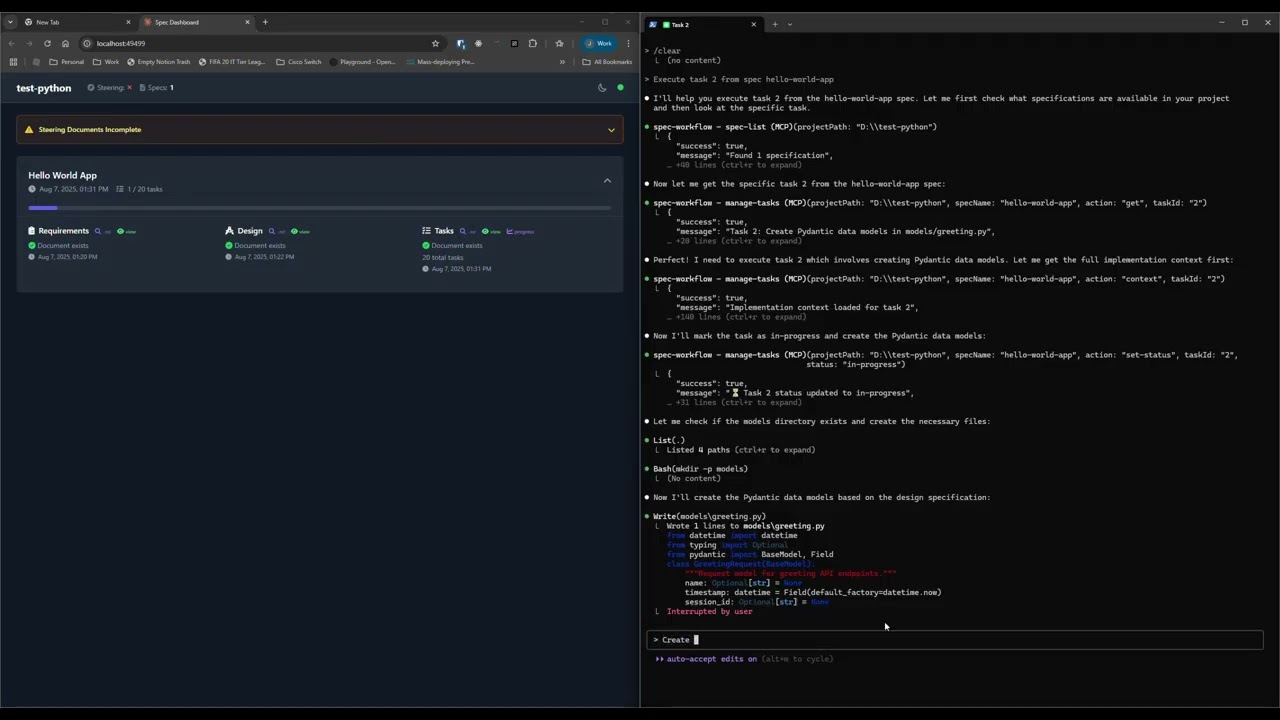
### 📊 Dashboard & Spec Management
*Explore the real-time dashboard: view specs, track progress, navigate documents, and monitor your development workflow.*
## ✨ Key Features
- **Structured Development Workflow** - Sequential spec creation (Requirements → Design → Tasks)
- **Real-Time Web Dashboard** - Monitor specs, tasks, and progress with live updates
- **VSCode Extension** - Integrated sidebar dashboard for VSCode users
- **Approval Workflow** - Complete approval process with revisions
- **Task Progress Tracking** - Visual progress bars and detailed status
- **Implementation Logs** - Searchable logs of all task implementations with code statistics
- **Multi-Language Support** - Available in 11 languages
## 🌍 Supported Languages
🇺🇸 English • 🇯🇵 日本語 • 🇨🇳 中文 • 🇪🇸 Español • 🇧🇷 Português • 🇩🇪 Deutsch • 🇫🇷 Français • 🇷🇺 Русский • 🇮🇹 Italiano • 🇰🇷 한국어 • 🇸🇦 العربية
**📖 Documentation in your language:**
[English](README.md) | [日本語](README.ja.md) | [中文](README.zh.md) | [Español](README.es.md) | [Português](README.pt.md) | [Deutsch](README.de.md) | [Français](README.fr.md) | [Русский](README.ru.md) | [Italiano](README.it.md) | [한국어](README.ko.md) | [العربية](README.ar.md)
## 🚀 Quick Start
### Step 1: Add to your AI tool
Add to your MCP configuration (see client-specific setup below):
```json
{
"mcpServers": {
"spec-workflow": {
"command": "npx",
"args": ["-y", "@pimzino/spec-workflow-mcp@latest", "/path/to/your/project"]
}
}
}
```
### Step 2: Choose your interface
**Option A: Web Dashboard** (Required for CLI users)
Start the dashboard (runs on port 5000 by default):
```bash
npx -y @pimzino/spec-workflow-mcp@latest --dashboard
```
The dashboard will be accessible at: http://localhost:5000
> **Note:** Only one dashboard instance is needed. All your projects will connect to the same dashboard.
**Option B: VSCode Extension** (Recommended for VSCode users)
Install [Spec Workflow MCP Extension](https://marketplace.visualstudio.com/items?itemName=Pimzino.spec-workflow-mcp) from the VSCode marketplace.
## 📝 How to Use
Simply mention spec-workflow in your conversation:
- **"Create a spec for user authentication"** - Creates complete spec workflow
- **"List my specs"** - Shows all specs and their status
- **"Execute task 1.2 in spec user-auth"** - Runs a specific task
[See more examples →](docs/PROMPTING-GUIDE.md)
## 🔧 MCP Client Setup
Augment Code
Configure in your Augment settings:
```json
{
"mcpServers": {
"spec-workflow": {
"command": "npx",
"args": ["-y", "@pimzino/spec-workflow-mcp@latest", "/path/to/your/project"]
}
}
}
```
Claude Code CLI
Add to your MCP configuration:
```bash
claude mcp add spec-workflow npx @pimzino/spec-workflow-mcp@latest -- /path/to/your/project
```
**Important Notes:**
- The `-y` flag bypasses npm prompts for smoother installation
- The `--` separator ensures the path is passed to the spec-workflow script, not to npx
- Replace `/path/to/your/project` with your actual project directory path
**Alternative for Windows (if the above doesn't work):**
```bash
claude mcp add spec-workflow cmd.exe /c "npx @pimzino/spec-workflow-mcp@latest /path/to/your/project"
```
Claude Desktop
Add to `claude_desktop_config.json`:
```json
{
"mcpServers": {
"spec-workflow": {
"command": "npx",
"args": ["-y", "@pimzino/spec-workflow-mcp@latest", "/path/to/your/project"]
}
}
}
```
> **Important:** Run the dashboard separately with `--dashboard` before starting the MCP server.
Cline/Claude Dev
Add to your MCP server configuration:
```json
{
"mcpServers": {
"spec-workflow": {
"command": "npx",
"args": ["-y", "@pimzino/spec-workflow-mcp@latest", "/path/to/your/project"]
}
}
}
```
Continue IDE Extension
Add to your Continue configuration:
```json
{
"mcpServers": {
"spec-workflow": {
"command": "npx",
"args": ["-y", "@pimzino/spec-workflow-mcp@latest", "/path/to/your/project"]
}
}
}
```
Cursor IDE
Add to your Cursor settings (`settings.json`):
```json
{
"mcpServers": {
"spec-workflow": {
"command": "npx",
"args": ["-y", "@pimzino/spec-workflow-mcp@latest", "/path/to/your/project"]
}
}
}
```
OpenCode
Add to your `opencode.json` configuration file:
```json
{
"$schema": "https://opencode.ai/config.json",
"mcp": {
"spec-workflow": {
"type": "local",
"command": ["npx", "-y", "@pimzino/spec-workflow-mcp@latest", "/path/to/your/project"],
"enabled": true
}
}
}
```
Windsurf
Add to your `~/.codeium/windsurf/mcp_config.json` configuration file:
```json
{
"mcpServers": {
"spec-workflow": {
"command": "npx",
"args": ["-y", "@pimzino/spec-workflow-mcp@latest", "/path/to/your/project"]
}
}
}
```
Codex
Add to your `~/.codex/config.toml` configuration file:
```toml
[mcp_servers.spec-workflow]
command = "npx"
args = ["-y", "@pimzino/spec-workflow-mcp@latest", "/path/to/your/project"]
```
## 🐳 Docker Deployment
Run the dashboard in a Docker container for isolated deployment:
```bash
# Using Docker Compose (recommended)
cd containers
docker-compose up --build
# Or using Docker CLI
docker build -f containers/Dockerfile -t spec-workflow-mcp .
docker run -p 5000:5000 -v "./workspace/.spec-workflow:/workspace/.spec-workflow:rw" spec-workflow-mcp
```
The dashboard will be available at: http://localhost:5000
[See Docker setup guide →](containers/README.md)
## 🔒 Security
Spec-Workflow MCP includes enterprise-grade security features suitable for corporate environments:
### ✅ Implemented Security Controls
| Feature | Description |
|---------|-------------|
| **Localhost Binding** | Binds to `127.0.0.1` by default, preventing network exposure |
| **Rate Limiting** | 120 requests/minute per client with automatic cleanup |
| **Audit Logging** | Structured JSON logs with timestamp, actor, action, and result |
| **Security Headers** | X-Content-Type-Options, X-Frame-Options, X-XSS-Protection, CSP, Referrer-Policy |
| **CORS Protection** | Restricted to localhost origins by default |
| **Docker Hardening** | Non-root user, read-only filesystem, dropped capabilities, resource limits |
### ⚠️ Not Yet Implemented
| Feature | Workaround |
|---------|------------|
| **HTTPS/TLS** | Use a reverse proxy (nginx, Apache) with TLS certificates |
| **User Authentication** | Use a reverse proxy with Basic Auth or OAuth2 Proxy for SSO |
### For External/Network Access
If you need to expose the dashboard beyond localhost, we recommend:
1. **Keep dashboard on localhost** (`127.0.0.1`)
2. **Use nginx or Apache** as a reverse proxy with:
- TLS/HTTPS termination
- Basic authentication or OAuth2
3. **Configure firewall rules** to restrict access
```nginx
# Example nginx reverse proxy with auth
server {
listen 443 ssl;
server_name dashboard.example.com;
ssl_certificate /path/to/cert.pem;
ssl_certificate_key /path/to/key.pem;
auth_basic "Dashboard Access";
auth_basic_user_file /etc/nginx/.htpasswd;
location / {
proxy_pass http://127.0.0.1:5000;
proxy_http_version 1.1;
proxy_set_header Upgrade $http_upgrade;
proxy_set_header Connection "upgrade";
}
}
```
[See Docker security guide →](containers/README.md#security-configuration)
## 🔒 Sandboxed Environments
For sandboxed environments (e.g., Codex CLI with `sandbox_mode=workspace-write`) where `$HOME` is read-only, use the `SPEC_WORKFLOW_HOME` environment variable to redirect global state files to a writable location:
```bash
SPEC_WORKFLOW_HOME=/workspace/.spec-workflow-mcp npx -y @pimzino/spec-workflow-mcp@latest /workspace
```
[See Configuration Guide →](docs/CONFIGURATION.md#environment-variables)
## 📚 Documentation
- [Configuration Guide](docs/CONFIGURATION.md) - Command-line options, config files
- [User Guide](docs/USER-GUIDE.md) - Comprehensive usage examples
- [Workflow Process](docs/WORKFLOW.md) - Development workflow and best practices
- [Interfaces Guide](docs/INTERFACES.md) - Dashboard and VSCode extension details
- [Prompting Guide](docs/PROMPTING-GUIDE.md) - Advanced prompting examples
- [Tools Reference](docs/TOOLS-REFERENCE.md) - Complete tools documentation
- [Development](docs/DEVELOPMENT.md) - Contributing and development setup
- [Troubleshooting](docs/TROUBLESHOOTING.md) - Common issues and solutions
## 📁 Project Structure
```
your-project/
.spec-workflow/
approvals/
archive/
specs/
steering/
templates/
user-templates/
config.example.toml
```
## 🛠️ Development
```bash
# Install dependencies
npm install
# Build the project
npm run build
# Run in development mode
npm run dev
```
[See development guide →](docs/DEVELOPMENT.md)
## 📄 License
GPL-3.0
## ⭐ Star History

 *See how the approval system works: create documents, request approval through the dashboard, provide feedback, and track revisions.*
### 📊 Dashboard & Spec Management
*See how the approval system works: create documents, request approval through the dashboard, provide feedback, and track revisions.*
### 📊 Dashboard & Spec Management
 *Explore the real-time dashboard: view specs, track progress, navigate documents, and monitor your development workflow.*
## ✨ Key Features
- **Structured Development Workflow** - Sequential spec creation (Requirements → Design → Tasks)
- **Real-Time Web Dashboard** - Monitor specs, tasks, and progress with live updates
- **VSCode Extension** - Integrated sidebar dashboard for VSCode users
- **Approval Workflow** - Complete approval process with revisions
- **Task Progress Tracking** - Visual progress bars and detailed status
- **Implementation Logs** - Searchable logs of all task implementations with code statistics
- **Multi-Language Support** - Available in 11 languages
## 🌍 Supported Languages
🇺🇸 English • 🇯🇵 日本語 • 🇨🇳 中文 • 🇪🇸 Español • 🇧🇷 Português • 🇩🇪 Deutsch • 🇫🇷 Français • 🇷🇺 Русский • 🇮🇹 Italiano • 🇰🇷 한국어 • 🇸🇦 العربية
**📖 Documentation in your language:**
[English](README.md) | [日本語](README.ja.md) | [中文](README.zh.md) | [Español](README.es.md) | [Português](README.pt.md) | [Deutsch](README.de.md) | [Français](README.fr.md) | [Русский](README.ru.md) | [Italiano](README.it.md) | [한국어](README.ko.md) | [العربية](README.ar.md)
## 🚀 Quick Start
### Step 1: Add to your AI tool
Add to your MCP configuration (see client-specific setup below):
```json
{
"mcpServers": {
"spec-workflow": {
"command": "npx",
"args": ["-y", "@pimzino/spec-workflow-mcp@latest", "/path/to/your/project"]
}
}
}
```
### Step 2: Choose your interface
**Option A: Web Dashboard** (Required for CLI users)
Start the dashboard (runs on port 5000 by default):
```bash
npx -y @pimzino/spec-workflow-mcp@latest --dashboard
```
The dashboard will be accessible at: http://localhost:5000
> **Note:** Only one dashboard instance is needed. All your projects will connect to the same dashboard.
**Option B: VSCode Extension** (Recommended for VSCode users)
Install [Spec Workflow MCP Extension](https://marketplace.visualstudio.com/items?itemName=Pimzino.spec-workflow-mcp) from the VSCode marketplace.
## 📝 How to Use
Simply mention spec-workflow in your conversation:
- **"Create a spec for user authentication"** - Creates complete spec workflow
- **"List my specs"** - Shows all specs and their status
- **"Execute task 1.2 in spec user-auth"** - Runs a specific task
[See more examples →](docs/PROMPTING-GUIDE.md)
## 🔧 MCP Client Setup
*Explore the real-time dashboard: view specs, track progress, navigate documents, and monitor your development workflow.*
## ✨ Key Features
- **Structured Development Workflow** - Sequential spec creation (Requirements → Design → Tasks)
- **Real-Time Web Dashboard** - Monitor specs, tasks, and progress with live updates
- **VSCode Extension** - Integrated sidebar dashboard for VSCode users
- **Approval Workflow** - Complete approval process with revisions
- **Task Progress Tracking** - Visual progress bars and detailed status
- **Implementation Logs** - Searchable logs of all task implementations with code statistics
- **Multi-Language Support** - Available in 11 languages
## 🌍 Supported Languages
🇺🇸 English • 🇯🇵 日本語 • 🇨🇳 中文 • 🇪🇸 Español • 🇧🇷 Português • 🇩🇪 Deutsch • 🇫🇷 Français • 🇷🇺 Русский • 🇮🇹 Italiano • 🇰🇷 한국어 • 🇸🇦 العربية
**📖 Documentation in your language:**
[English](README.md) | [日本語](README.ja.md) | [中文](README.zh.md) | [Español](README.es.md) | [Português](README.pt.md) | [Deutsch](README.de.md) | [Français](README.fr.md) | [Русский](README.ru.md) | [Italiano](README.it.md) | [한국어](README.ko.md) | [العربية](README.ar.md)
## 🚀 Quick Start
### Step 1: Add to your AI tool
Add to your MCP configuration (see client-specific setup below):
```json
{
"mcpServers": {
"spec-workflow": {
"command": "npx",
"args": ["-y", "@pimzino/spec-workflow-mcp@latest", "/path/to/your/project"]
}
}
}
```
### Step 2: Choose your interface
**Option A: Web Dashboard** (Required for CLI users)
Start the dashboard (runs on port 5000 by default):
```bash
npx -y @pimzino/spec-workflow-mcp@latest --dashboard
```
The dashboard will be accessible at: http://localhost:5000
> **Note:** Only one dashboard instance is needed. All your projects will connect to the same dashboard.
**Option B: VSCode Extension** (Recommended for VSCode users)
Install [Spec Workflow MCP Extension](https://marketplace.visualstudio.com/items?itemName=Pimzino.spec-workflow-mcp) from the VSCode marketplace.
## 📝 How to Use
Simply mention spec-workflow in your conversation:
- **"Create a spec for user authentication"** - Creates complete spec workflow
- **"List my specs"** - Shows all specs and their status
- **"Execute task 1.2 in spec user-auth"** - Runs a specific task
[See more examples →](docs/PROMPTING-GUIDE.md)
## 🔧 MCP Client Setup