
[](https://github.com/iterative/setup-cml)
[](https://www.npmjs.com/package/@dvcorg/cml)
**What is CML?** Continuous Machine Learning (CML) is an open-source CLI tool
for implementing continuous integration & delivery (CI/CD) with a focus on
MLOps. Use it to automate development workflows — including machine
provisioning, model training and evaluation, comparing ML experiments across
project history, and monitoring changing datasets.
CML can help train and evaluate models — and then generate a visual report with
results and metrics — automatically on every pull request.
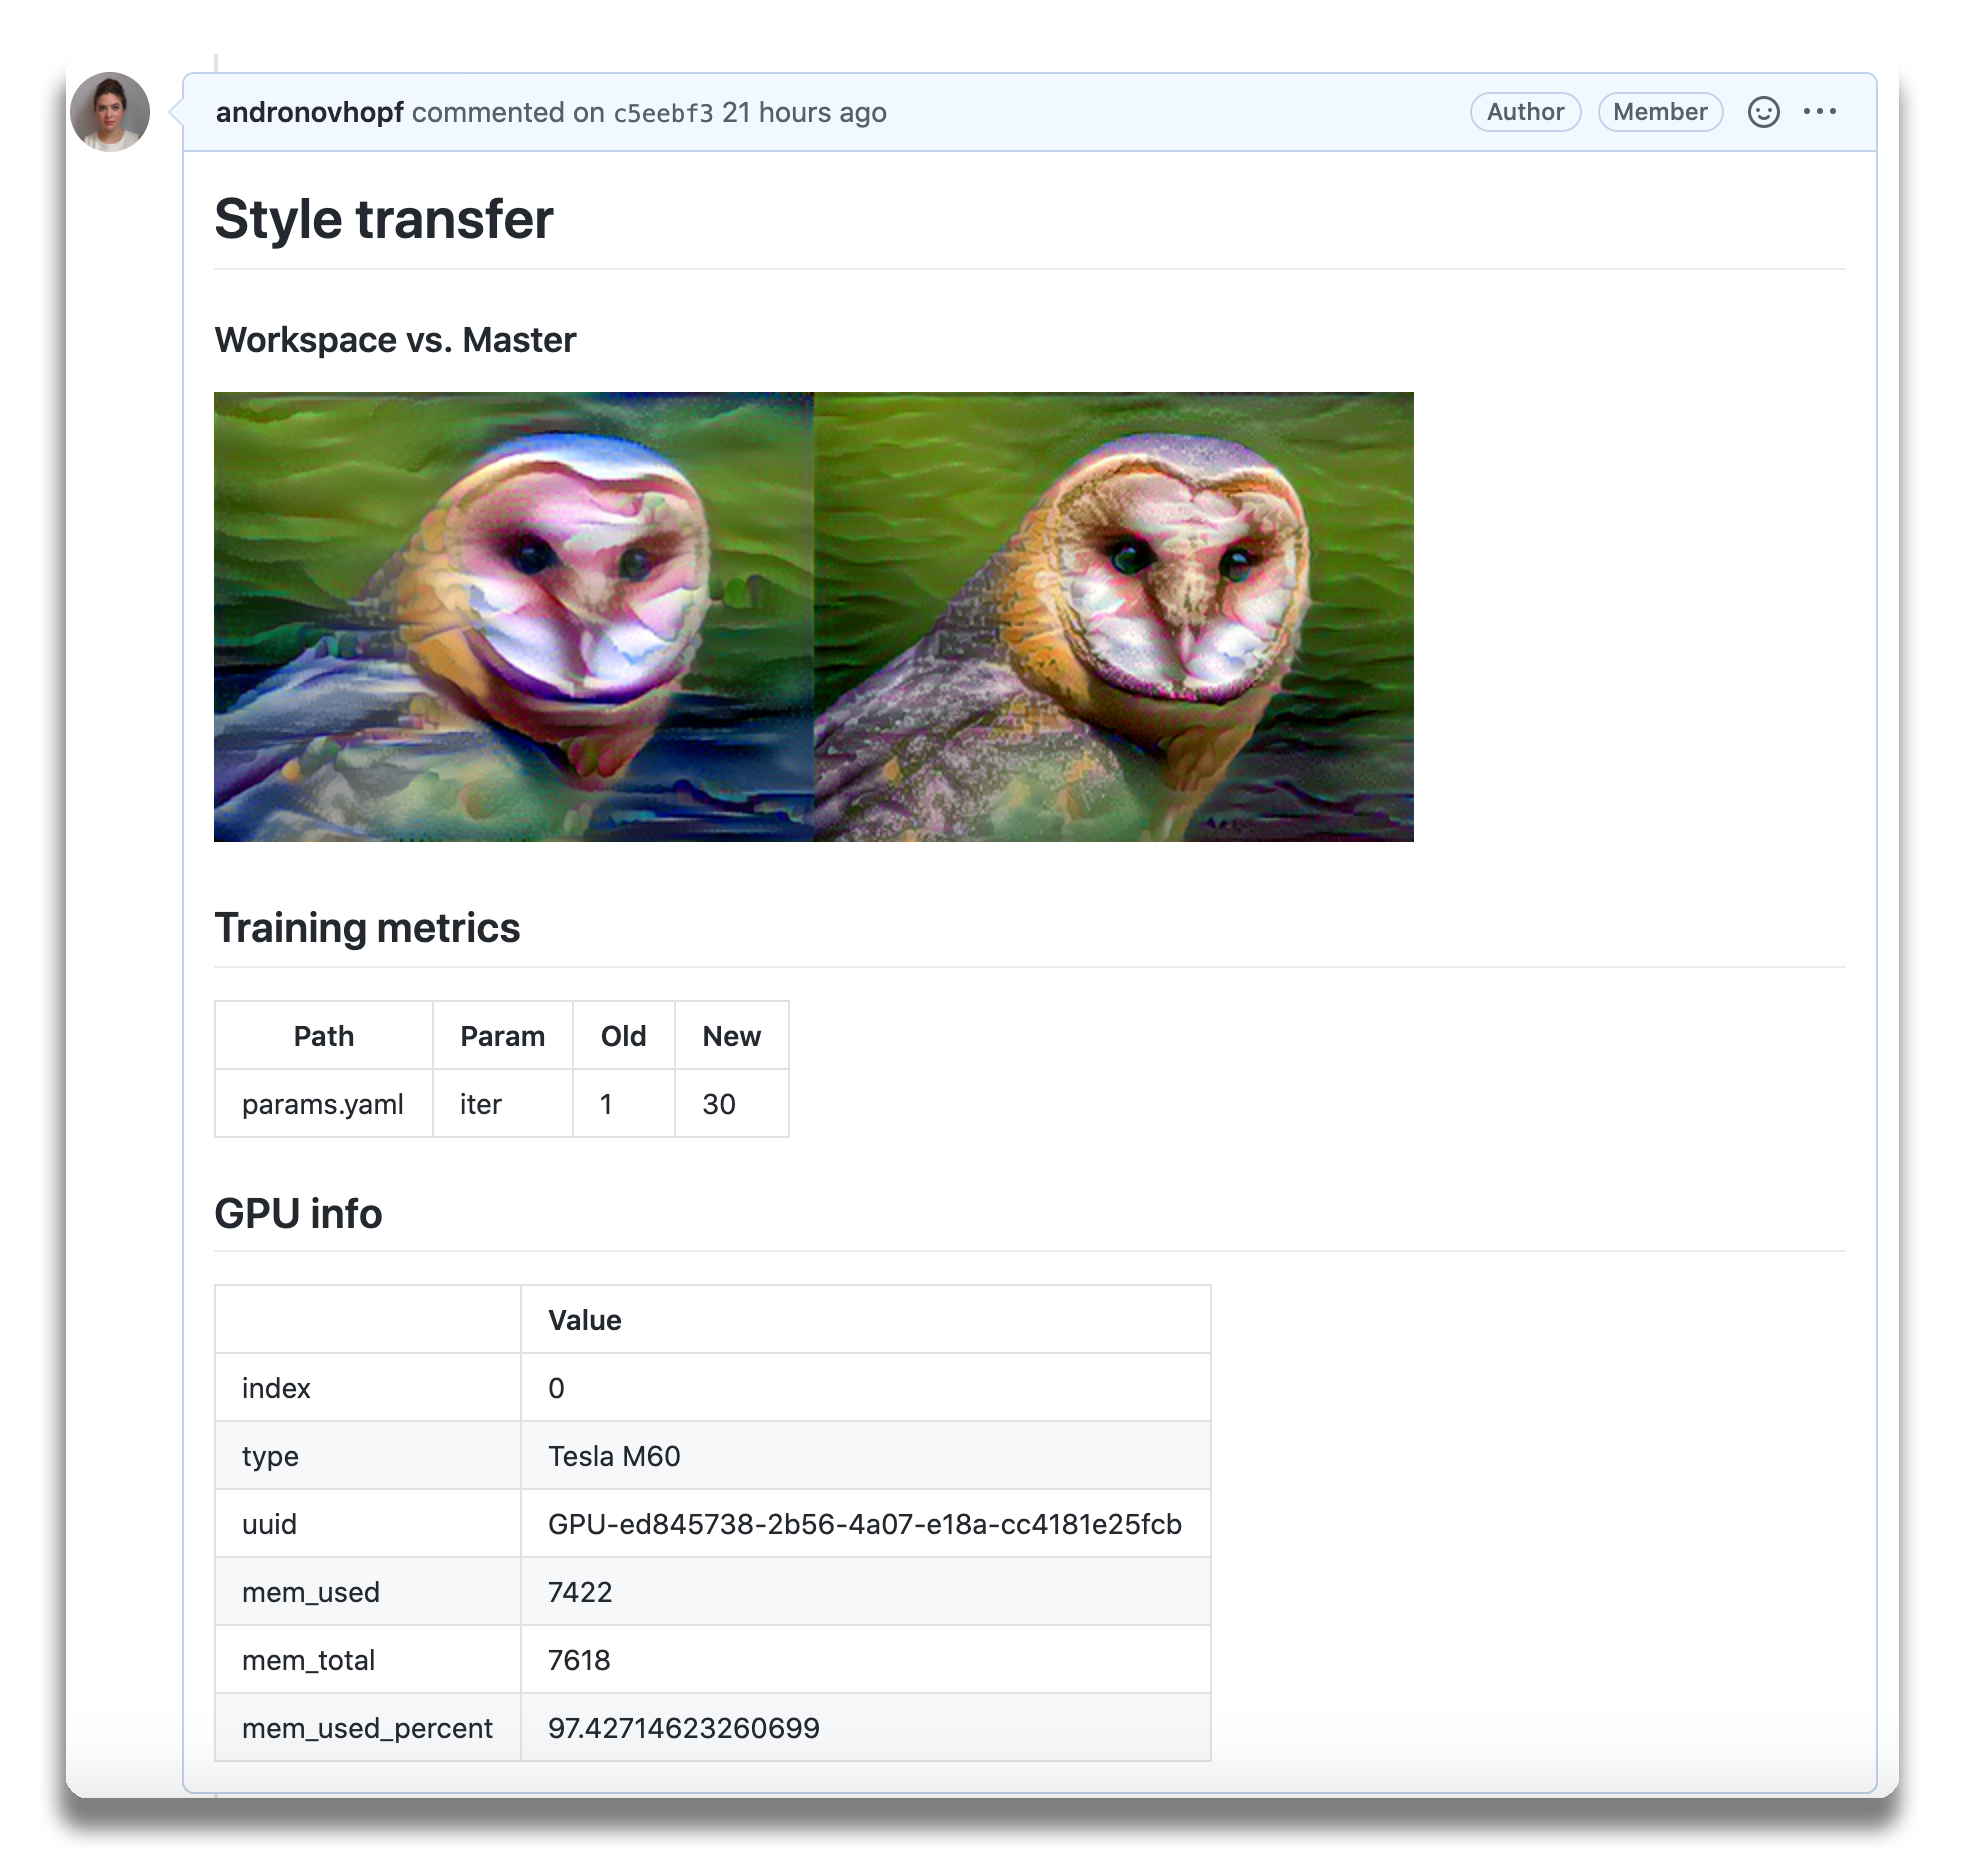 _An
example report for a
[neural style transfer model](https://github.com/iterative/cml_cloud_case)._
CML principles:
- **[GitFlow](https://nvie.com/posts/a-successful-git-branching-model) for data
science.** Use GitLab or GitHub to manage ML experiments, track who trained ML
models or modified data and when. Codify data and models with
[DVC](#using-cml-with-dvc) instead of pushing to a Git repo.
- **Auto reports for ML experiments.** Auto-generate reports with metrics and
plots in each Git pull request. Rigorous engineering practices help your team
make informed, data-driven decisions.
- **No additional services.** Build your own ML platform using GitLab,
Bitbucket, or GitHub. Optionally, use
[cloud storage](#configuring-cloud-storage-providers) as well as either
self-hosted or cloud runners (such as AWS EC2 or Azure). No databases,
services or complex setup needed.
:question: Need help? Just want to chat about continuous integration for ML?
[Visit our Discord channel!](https://discord.gg/bzA6uY7)
:play_or_pause_button: Check out our
[YouTube video series](https://www.youtube.com/playlist?list=PL7WG7YrwYcnDBDuCkFbcyjnZQrdskFsBz)
for hands-on MLOps tutorials using CML!
## Table of Contents
1. [Setup (GitLab, GitHub, Bitbucket)](#setup)
2. [Usage](#usage)
3. [Getting started (tutorial)](#getting-started)
4. [Using CML with DVC](#using-cml-with-dvc)
5. [Advanced Setup (Self-hosted, local package)](#advanced-setup)
6. [Example projects](#see-also)
## Setup
You'll need a GitLab, GitHub, or Bitbucket account to begin. Users may wish to
familiarize themselves with [Github Actions](https://help.github.com/en/actions)
or
[GitLab CI/CD](https://about.gitlab.com/stages-devops-lifecycle/continuous-integration).
Here, will discuss the GitHub use case.
### GitLab
Please see our docs on
[CML with GitLab CI/CD](https://github.com/iterative/cml/wiki/CML-with-GitLab)
and in particular the
[personal access token](https://github.com/iterative/cml/wiki/CML-with-GitLab#variables)
requirement.
### Bitbucket
Please see our docs on
[CML with Bitbucket Cloud](https://cml.dev/doc/usage?tab=Bitbucket).
### GitHub
The key file in any CML project is `.github/workflows/cml.yaml`:
```yaml
name: your-workflow-name
on: [push]
jobs:
run:
runs-on: ubuntu-latest
# optionally use a convenient Ubuntu LTS + DVC + CML image
# container: ghcr.io/iterative/cml:0-dvc2-base1
steps:
- uses: actions/checkout@v3
# may need to setup NodeJS & Python3 on e.g. self-hosted
# - uses: actions/setup-node@v3
# with:
# node-version: '16'
# - uses: actions/setup-python@v4
# with:
# python-version: '3.x'
- uses: iterative/setup-cml@v1
- name: Train model
run: |
# Your ML workflow goes here
pip install -r requirements.txt
python train.py
- name: Write CML report
env:
REPO_TOKEN: ${{ secrets.GITHUB_TOKEN }}
run: |
# Post reports as comments in GitHub PRs
cat results.txt >> report.md
cml comment create report.md
```
## Usage
We helpfully provide CML and other useful libraries pre-installed on our
[custom Docker images](https://github.com/iterative/cml/blob/mains/Dockerfile).
In the above example, uncommenting the field
`container: ghcr.io/iterative/cml:0-dvc2-base1`) will make the runner pull the
CML Docker image. The image already has NodeJS, Python 3, DVC and CML set up on
an Ubuntu LTS base for convenience.
### CML Functions
CML provides a number of functions to help package the outputs of ML workflows
(including numeric data and visualizations about model performance) into a CML
report.
Below is a table of CML functions for writing markdown reports and delivering
those reports to your CI system.
| Function | Description | Example Inputs |
| ------------------------- | ---------------------------------------------------------------- | ----------------------------------------------------------- |
| `cml runner launch` | Launch a runner locally or hosted by a cloud provider | See [Arguments](https://github.com/iterative/cml#arguments) |
| `cml comment create` | Return CML report as a comment in your GitLab/GitHub workflow | ` --head-sha ` |
| `cml check create` | Return CML report as a check in GitHub | ` --head-sha ` |
| `cml pr create` | Commit the given files to a new branch and create a pull request | `...` |
| `cml tensorboard connect` | Return a link to a Tensorboard.dev page | `--logdir --title --md` |
#### CML Reports
The `cml comment create` command can be used to post reports. CML reports are
written in markdown ([GitHub](https://github.github.com/gfm),
[GitLab](https://docs.gitlab.com/ee/user/markdown.html), or
[Bitbucket](https://confluence.atlassian.com/bitbucketserver/markdown-syntax-guide-776639995.html)
flavors). That means they can contain images, tables, formatted text, HTML
blocks, code snippets and more — really, what you put in a CML report is up to
you. Some examples:
:spiral_notepad: **Text** Write to your report using whatever method you prefer.
For example, copy the contents of a text file containing the results of ML model
training:
```bash
cat results.txt >> report.md
```
:framed_picture: **Images** Display images using the markdown or HTML. Note that
if an image is an output of your ML workflow (i.e., it is produced by your
workflow), it can be uploaded and included automaticlly to your CML report. For
example, if `graph.png` is output by `python train.py`, run:
```bash
echo "" >> report.md
cml comment create report.md
```
### Getting Started
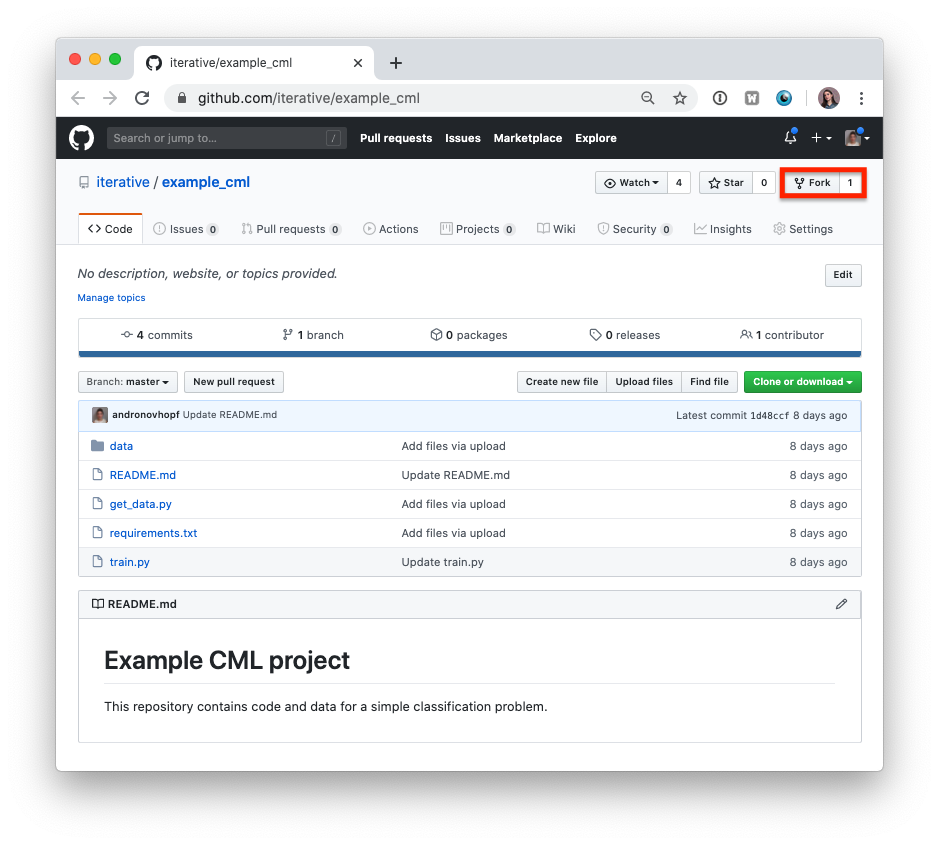
1. Fork our
[example project repository](https://github.com/iterative-test/cml-example-base).
> :warning: Note that if you are using GitLab,
> [you will need to create a Personal Access Token](https://github.com/iterative/cml/wiki/CML-with-GitLab#variables)
> for this example to work.
> :warning: The following steps can all be done in the GitHub browser interface.
> However, to follow along with the commands, we recommend cloning your fork to
> your local workstation:
```bash
git clone https://github.com//example_cml
```
2. To create a CML workflow, copy the following into a new file,
`.github/workflows/cml.yaml`:
```yaml
name: model-training
on: [push]
jobs:
run:
runs-on: ubuntu-latest
steps:
- uses: actions/checkout@v3
- uses: actions/setup-python@v4
- uses: iterative/setup-cml@v1
- name: Train model
env:
REPO_TOKEN: ${{ secrets.GITHUB_TOKEN }}
run: |
pip install -r requirements.txt
python train.py
cat metrics.txt >> report.md
echo "" >> report.md
cml comment create report.md
```
3. In your text editor of choice, edit line 16 of `train.py` to `depth = 5`.
4. Commit and push the changes:
```bash
git checkout -b experiment
git add . && git commit -m "modify forest depth"
git push origin experiment
```
5. In GitHub, open up a pull request to compare the `experiment` branch to
`main`.
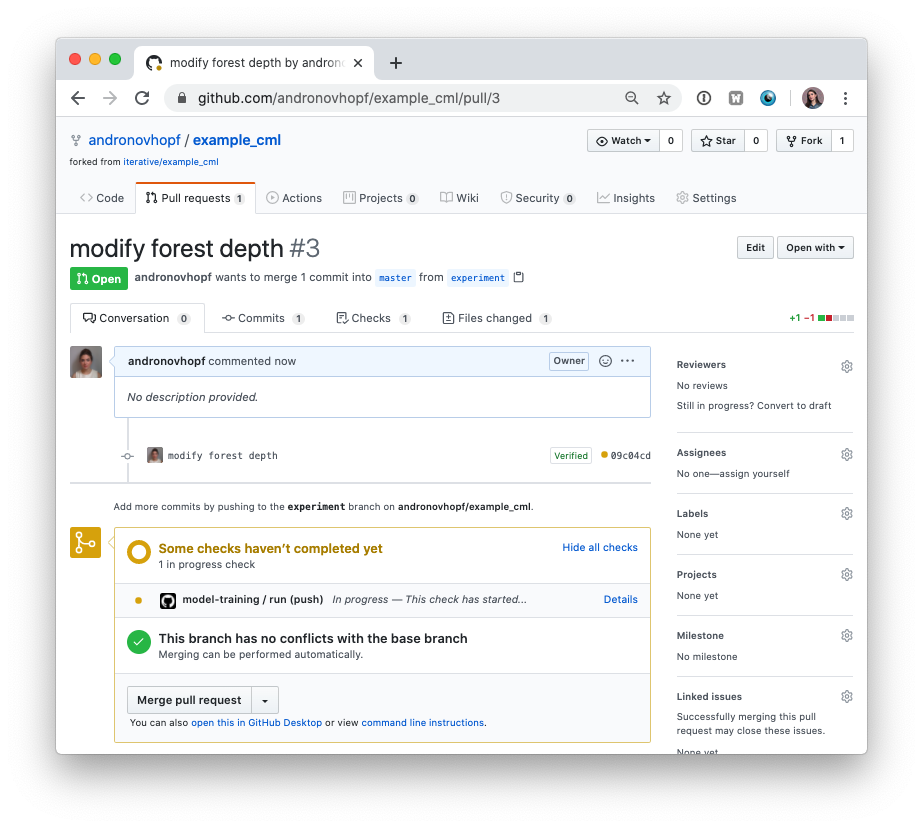
Shortly, you should see a comment from `github-actions` appear in the pull
request with your CML report. This is a result of the `cml send-comment`
function in your workflow.
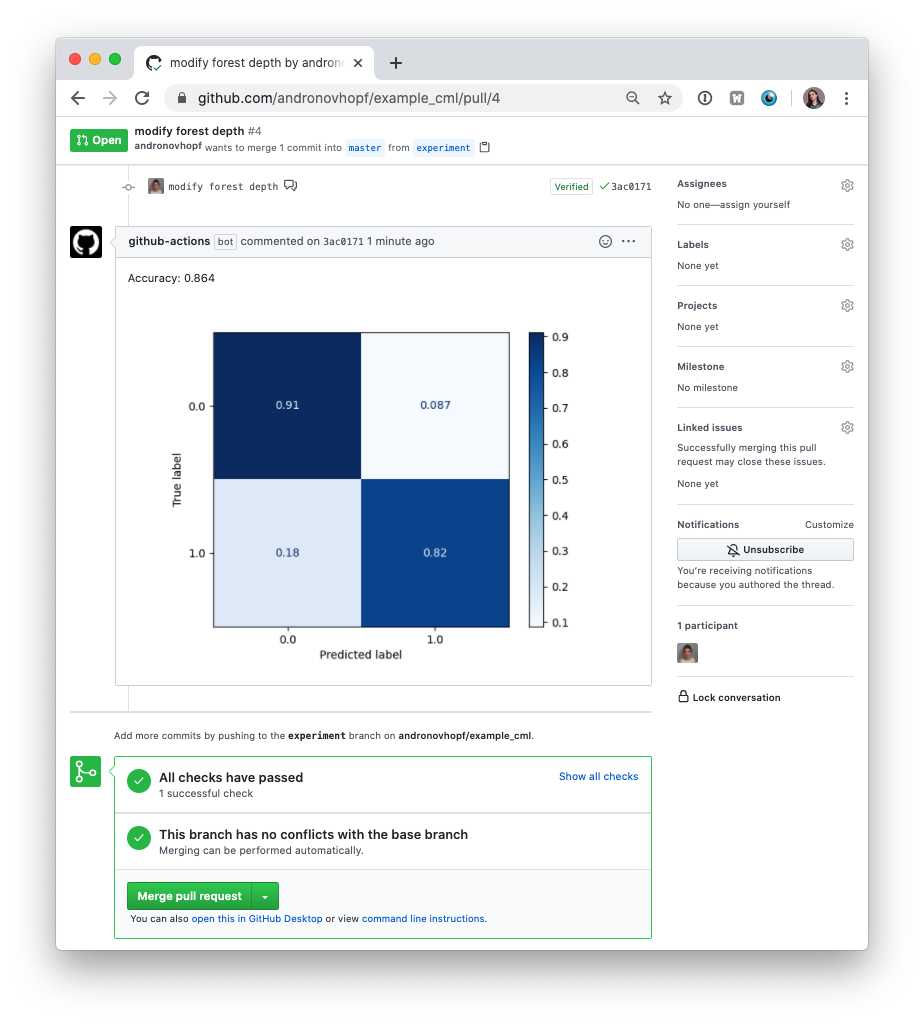
This is the outline of the CML workflow:
- you push changes to your GitHub repository,
- the workflow in your `.github/workflows/cml.yaml` file gets run, and
- a report is generated and posted to GitHub.
CML functions let you display relevant results from the workflow — such as model
performance metrics and visualizations — in GitHub checks and comments. What
kind of workflow you want to run, and want to put in your CML report, is up to
you.
### Using CML with DVC
In many ML projects, data isn't stored in a Git repository, but needs to be
downloaded from external sources. [DVC](https://dvc.org) is a common way to
bring data to your CML runner. DVC also lets you visualize how metrics differ
between commits to make reports like this:
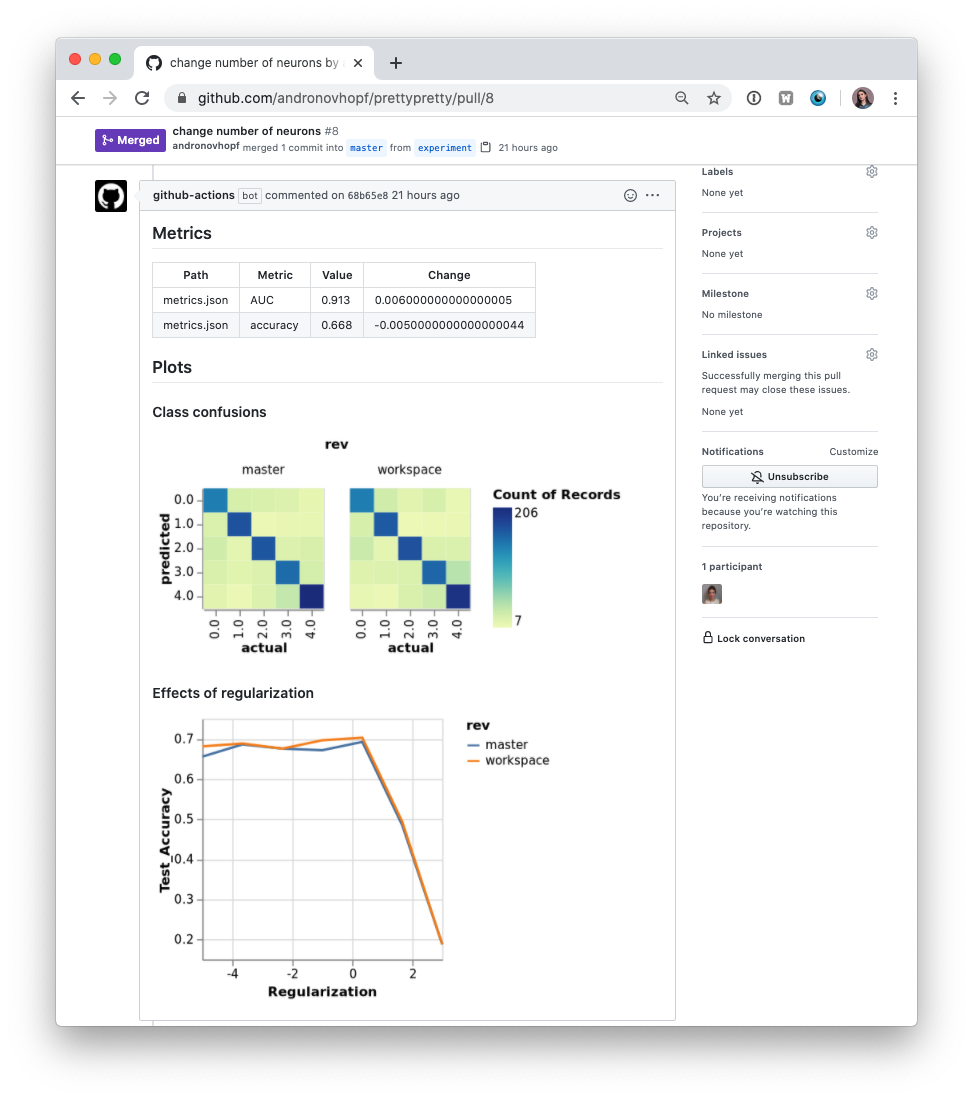
The `.github/workflows/cml.yaml` file used to create this report is:
```yaml
name: model-training
on: [push]
jobs:
run:
runs-on: ubuntu-latest
container: ghcr.io/iterative/cml:0-dvc2-base1
steps:
- uses: actions/checkout@v3
- name: Train model
env:
REPO_TOKEN: ${{ secrets.GITHUB_TOKEN }}
AWS_ACCESS_KEY_ID: ${{ secrets.AWS_ACCESS_KEY_ID }}
AWS_SECRET_ACCESS_KEY: ${{ secrets.AWS_SECRET_ACCESS_KEY }}
run: |
# Install requirements
pip install -r requirements.txt
# Pull data & run-cache from S3 and reproduce pipeline
dvc pull data --run-cache
dvc repro
# Report metrics
echo "## Metrics" >> report.md
git fetch --prune
dvc metrics diff main --show-md >> report.md
# Publish confusion matrix diff
echo "## Plots" >> report.md
echo "### Class confusions" >> report.md
dvc plots diff --target classes.csv --template confusion -x actual -y predicted --show-vega main > vega.json
vl2png vega.json -s 1.5 > confusion_plot.png
echo "" >> report.md
# Publish regularization function diff
echo "### Effects of regularization" >> report.md
dvc plots diff --target estimators.csv -x Regularization --show-vega main > vega.json
vl2png vega.json -s 1.5 > plot.png
echo "" >> report.md
cml comment create report.md
```
> :warning: If you're using DVC with cloud storage, take note of environment
> variables for your storage format.
#### Configuring Cloud Storage Providers
There are many
[supported could storage providers](https://dvc.org/doc/command-reference/remote/modify#available-parameters-per-storage-type).
Here are a few examples for some of the most frequently used providers:
S3 and S3-compatible storage (Minio, DigitalOcean Spaces, IBM Cloud Object Storage...)
```yaml
# Github
env:
AWS_ACCESS_KEY_ID: ${{ secrets.AWS_ACCESS_KEY_ID }}
AWS_SECRET_ACCESS_KEY: ${{ secrets.AWS_SECRET_ACCESS_KEY }}
AWS_SESSION_TOKEN: ${{ secrets.AWS_SESSION_TOKEN }}
```
> :point_right: `AWS_SESSION_TOKEN` is optional.
> :point_right: `AWS_ACCESS_KEY_ID` and `AWS_SECRET_ACCESS_KEY` can also be used
> by `cml runner` to launch EC2 instances. See [Environment Variables].
Azure
```yaml
env:
AZURE_STORAGE_CONNECTION_STRING:
${{ secrets.AZURE_STORAGE_CONNECTION_STRING }}
AZURE_STORAGE_CONTAINER_NAME: ${{ secrets.AZURE_STORAGE_CONTAINER_NAME }}
```
Aliyun
```yaml
env:
OSS_BUCKET: ${{ secrets.OSS_BUCKET }}
OSS_ACCESS_KEY_ID: ${{ secrets.OSS_ACCESS_KEY_ID }}
OSS_ACCESS_KEY_SECRET: ${{ secrets.OSS_ACCESS_KEY_SECRET }}
OSS_ENDPOINT: ${{ secrets.OSS_ENDPOINT }}
```
Google Storage
> :warning: Normally, `GOOGLE_APPLICATION_CREDENTIALS` is the **path** of the
> `json` file containing the credentials. However in the action this secret
> variable is the **contents** of the file. Copy the `json` contents and add it
> as a secret.
```yaml
env:
GOOGLE_APPLICATION_CREDENTIALS: ${{ secrets.GOOGLE_APPLICATION_CREDENTIALS }}
```
Google Drive
> :warning: After configuring your
> [Google Drive credentials](https://dvc.org/doc/command-reference/remote/add)
> you will find a `json` file at
> `your_project_path/.dvc/tmp/gdrive-user-credentials.json`. Copy its contents
> and add it as a secret variable.
```yaml
env:
GDRIVE_CREDENTIALS_DATA: ${{ secrets.GDRIVE_CREDENTIALS_DATA }}
```
## Advanced Setup
### Self-hosted (On-premise or Cloud) Runners
GitHub Actions are run on GitHub-hosted runners by default. However, there are
many great reasons to use your own runners: to take advantage of GPUs,
orchestrate your team's shared computing resources, or train in the cloud.
> :point_up: **Tip!** Check out the
> [official GitHub documentation](https://help.github.com/en/actions/hosting-your-own-runners/about-self-hosted-runners)
> to get started setting up your own self-hosted runner.
#### Allocating Cloud Compute Resources with CML
When a workflow requires computational resources (such as GPUs), CML can
automatically allocate cloud instances using `cml runner`. You can spin up
instances on AWS, Azure, GCP, or Kubernetes.
For example, the following workflow deploys a `g4dn.xlarge` instance on AWS EC2
and trains a model on the instance. After the job runs, the instance
automatically shuts down.
You might notice that this workflow is quite similar to the
[basic use case](#usage) above. The only addition is `cml runner` and a few
environment variables for passing your cloud service credentials to the
workflow.
Note that `cml runner` will also automatically restart your jobs (whether from a
[GitHub Actions 35-day workflow timeout](https://docs.github.com/en/actions/reference/usage-limits-billing-and-administration#usage-limits)
or a
[AWS EC2 spot instance interruption](https://docs.aws.amazon.com/AWSEC2/latest/UserGuide/spot-interruptions.html)).
```yaml
name: Train-in-the-cloud
on: [push]
jobs:
deploy-runner:
runs-on: ubuntu-latest
steps:
- uses: iterative/setup-cml@v1
- uses: actions/checkout@v3
- name: Deploy runner on EC2
env:
REPO_TOKEN: ${{ secrets.PERSONAL_ACCESS_TOKEN }}
AWS_ACCESS_KEY_ID: ${{ secrets.AWS_ACCESS_KEY_ID }}
AWS_SECRET_ACCESS_KEY: ${{ secrets.AWS_SECRET_ACCESS_KEY }}
run: |
cml runner launch \
--cloud=aws \
--cloud-region=us-west \
--cloud-type=g4dn.xlarge \
--labels=cml-gpu
train-model:
needs: deploy-runner
runs-on: [self-hosted, cml-gpu]
timeout-minutes: 50400 # 35 days
container:
image: ghcr.io/iterative/cml:0-dvc2-base1-gpu
options: --gpus all
steps:
- uses: actions/checkout@v3
- name: Train model
env:
REPO_TOKEN: ${{ secrets.PERSONAL_ACCESS_TOKEN }}
run: |
pip install -r requirements.txt
python train.py
cat metrics.txt > report.md
cml comment create report.md
```
In the workflow above, the `deploy-runner` step launches an EC2 `g4dn.xlarge`
instance in the `us-west` region. The `model-training` step then runs on the
newly-launched instance. See [Environment Variables] below for details on the
`secrets` required.
> :tada: **Note that jobs can use any Docker container!** To use functions such
> as `cml send-comment` from a job, the only requirement is to
> [have CML installed](#local-package).
#### Docker Images
The CML Docker image (`ghcr.io/iterative/cml` or `iterativeai/cml`) comes loaded
with Python, CUDA, `git`, `node` and other essentials for full-stack data
science. Different versions of these essentials are available from different
image tags. The tag convention is `{CML_VER}-dvc{DVC_VER}-base{BASE_VER}{-gpu}`:
| `{BASE_VER}` | Software included (`-gpu`) |
| ------------ | --------------------------------------------- |
| 0 | Ubuntu 18.04, Python 2.7 (CUDA 10.1, CuDNN 7) |
| 1 | Ubuntu 20.04, Python 3.8 (CUDA 11.2, CuDNN 8) |
For example, `iterativeai/cml:0-dvc2-base1-gpu`, or
`ghcr.io/iterative/cml:0-dvc2-base1`.
#### Arguments
The `cml runner launch` function accepts the following arguments:
```
--labels One or more user-defined labels for
this runner (delimited with commas)
[string] [default: "cml"]
--idle-timeout Time to wait for jobs before
shutting down (e.g. "5min"). Use
"never" to disable
[string] [default: "5 minutes"]
--name Name displayed in the repository
once registered
[string] [default: cml-{ID}]
--no-retry Do not restart workflow terminated
due to instance disposal or GitHub
Actions timeout [boolean]
--single Exit after running a single job
[boolean]
--reuse Don't launch a new runner if an
existing one has the same name or
overlapping labels [boolean]
--reuse-idle Creates a new runner only if the
matching labels don't exist or are
already busy [boolean]
--docker-volumes Docker volumes, only supported in
GitLab [array] [default: []]
--cloud Cloud to deploy the runner
[string] [choices: "aws", "azure", "gcp", "kubernetes"]
--cloud-region Region where the instance is
deployed. Choices: [us-east,
us-west, eu-west, eu-north]. Also
accepts native cloud regions
[string] [default: "us-west"]
--cloud-type Instance type. Choices: [m, l, xl].
Also supports native types like i.e.
t2.micro [string]
--cloud-permission-set Specifies the instance profile in
AWS or instance service account in
GCP [string] [default: ""]
--cloud-metadata Key Value pairs to associate
cml-runner instance on the provider
i.e. tags/labels "key=value"
[array] [default: []]
--cloud-gpu GPU type. Choices: k80, v100, or
native types e.g. nvidia-tesla-t4
[string]
--cloud-hdd-size HDD size in GB [number]
--cloud-ssh-private Custom private RSA SSH key. If not
provided an automatically generated
throwaway key will be used [string]
--cloud-spot Request a spot instance [boolean]
--cloud-spot-price Maximum spot instance bidding price
in USD. Defaults to the current spot
bidding price [number] [default: -1]
--cloud-startup-script Run the provided Base64-encoded
Linux shell script during the
instance initialization [string]
--cloud-aws-security-group Specifies the security group in AWS
[string] [default: ""]
--cloud-aws-subnet, Specifies the subnet to use within
--cloud-aws-subnet-id AWS [string] [default: ""]
```
#### Environment Variables
> :warning: You will need to
> [create a personal access token (PAT)](https://help.github.com/en/github/authenticating-to-github/creating-a-personal-access-token-for-the-command-line)
> with repository read/write access and workflow privileges. In the example
> workflow, this token is stored as `PERSONAL_ACCESS_TOKEN`.
:information_source: If using the `--cloud` option, you will also need to
provide access credentials of your cloud compute resources as secrets. In the
above example, `AWS_ACCESS_KEY_ID` and `AWS_SECRET_ACCESS_KEY` (with privileges
to create & destroy EC2 instances) are required.
For AWS, the same credentials can also be used for
[configuring cloud storage](#configuring-cloud-storage-providers).
#### Proxy support
CML support proxy via known environment variables `http_proxy` and
`https_proxy`.
#### On-premise (Local) Runners
This means using on-premise machines as self-hosted runners. The
`cml runner launch` function is used to set up a local self-hosted runner. On a
local machine or on-premise GPU cluster,
[install CML as a package](#local-package) and then run:
```bash
cml runner launch \
--repo=$your_project_repository_url \
--token=$PERSONAL_ACCESS_TOKEN \
--labels="local,runner" \
--idle-timeout=180
```
The machine will listen for workflows from your project repository.
### Local Package
In the examples above, CML is installed by the `setup-cml` action, or comes
pre-installed in a custom Docker image pulled by a CI runner. You can also
install CML as a package:
```bash
npm install --location=global @dvcorg/cml
```
You can use `cml` without node by downloading the correct standalone binary for
your system from the asset section of the
[releases](https://github.com/iterative/cml/releases).
You may need to install additional dependencies to use DVC plots and Vega-Lite
CLI commands:
```bash
sudo apt-get install -y libcairo2-dev libpango1.0-dev libjpeg-dev libgif-dev \
librsvg2-dev libfontconfig-dev
npm install -g vega-cli vega-lite
```
CML and Vega-Lite package installation require the NodeJS package manager
(`npm`) which ships with NodeJS. Installation instructions are below.
#### Install NodeJS
- **GitHub**: This is probably not necessary when using GitHub's default
containers or one of CML's Docker containers. Self-hosted runners may need to
use a set up action to install NodeJS:
```bash
uses: actions/setup-node@v3
with:
node-version: '16'
```
- **GitLab**: Requires direct installation.
```bash
curl -sL https://deb.nodesource.com/setup_16.x | bash
apt-get update
apt-get install -y nodejs
```
## See Also
These are some example projects using CML.
- [Basic CML project](https://github.com/iterative-test/cml-example-minimal)
- [CML with DVC to pull data](https://github.com/iterative-test/cml-example-dvc)
- [CML with Tensorboard](https://github.com/iterative-test/cml-example-tensorboard)
- [CML with a small EC2 instance](https://github.com/iterative-test/cml-example-cloud)
:key:
- [CML with EC2 GPU](https://github.com/iterative-test/cml-example-cloud-gpu)
:key:
:key: needs a [PAT](#environment-variables).
# :warning: Maintenance :warning:
- ~2023-07 Nvidia has dropped container CUDA images with
[10.x](https://hub.docker.com/r/nvidia/cuda/tags?page=1&name=10)/[cudnn7](https://hub.docker.com/r/nvidia/cuda/tags?page=1&name=cudnn7)
and [11.2.1](https://hub.docker.com/r/nvidia/cuda/tags?page=1&name=11.2.1),
CML images will be updated accrodingly