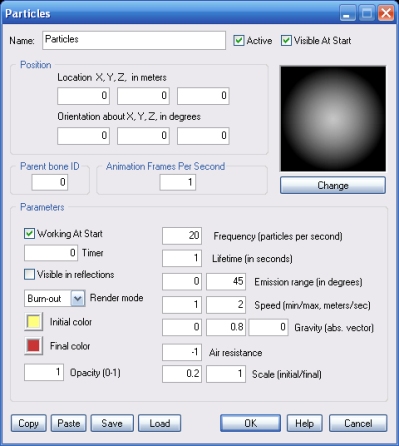
Particles
This powerful object allows you to easily add to your 3d productions particle-based effects like explosions, fire, smoke, dust, plasma, rain, snow, confetti, etc.
The particle emitter is an object you can place and orient visually in the Virtual Editor.
If the Particles object is linked to another object in the Object List, this will become the particle emitter's parent. Runtime, when the parent moves and rotates, the particle emitter will follow it.
Click this button to select the particle aspect. Several shapes are available for the particles. The default shape is usually the best choice for fire and plasma-like effects. You can make your own particle shapes as follows:
C:\3D Rad\3DRad_res\objects\Particles\Data\
folder.
C:\3D Rad\3DRad_res\objects\Particles\Data\Index\
folder. This image will be used to display your new shape in the Particles object's dialogs and make it selectable among the other shapes available.
The Particles object supports frame-based animation as a sequence of images rendered one after the other.
If a sequence of images is defined for the Particles, as described in the Using image sequences as animated particles section, below, then this value is the initial animation speed.
When this value is non-zero, and the Particles object is linked to a SkinMesh which is bone-animated, the particle emitter will be attached to the SkinMesh's bone defined by the specified bone ID.
This feature can be used, for example, to make the fire follow the mouth of an animated dragon. See the example project called SkinMeshBoneParticlesDemo.3dr.
The bone ID must be a positive, non-zero integer. The first bone in the model is 1, the second 2 and so on. What bone corresponds to a certain ID depends on how the animated model was originally designed.
Note: the position of the attached particle emitter is relative to the bone position when the animated model is in its initial pose. This may not be the default pose you see in the Virtual Editor. To see the initial pose of all animated SkinMesh objects in the scene, hold the [F] key pressed.
For information about the remaining controls, please click here.
ANIMATED PARTICLES
The first image of the sequence must be saved to the data folder as described above (Change section).
The remaining images must be saved into a sub-folder of the data folder.
The name of the sub-folder must be the same as the initial image file (omitting the extension).
The images in the sub-folder must be named by using 4-digit numbers (for example 0001.dds, 0002.dds, etc).
The extension of the images in the sub-folder must be the same as the initial image (the one saved outside the subfolder).
For an example, please see 'animation.dds' and 'animation' subfolder, in the C:\3D Rad\3DRad_res\objects\Particles\Data\ folder.
To see this animation in action please see the demo project called ParticleAnimation.3dr.
The following internal parameters can be set by using objects like Script:
Particle source location on a fast moving/spinning parent object is calculated by a special prediction algorithm.
When the parent moves on a curved path, the exact position of the source in 3d space can be very complex to calculate accurately.
This may cause the particle source to appear slightly displaced at times.