[](https://datalayer.io)
[](https://github.com/sponsors/datalayer)
# 🪐🔧 Jupyter MCP Server
**An [MCP](https://modelcontextprotocol.io) server developed for AI to connect and manage [Jupyter](https://jupyter.org) Notebooks in real-time**
*Developed by [Datalayer](https://github.com/datalayer) - Join our [Discord](https://github.com/datalayer)*
[](https://pypi.org/project/jupyter-mcp-server)
[](https://pepy.tech/project/jupyter-mcp-server)
[](https://hub.docker.com/r/datalayer/jupyter-mcp-server)
[](https://opensource.org/licenses/BSD-3-Clause)
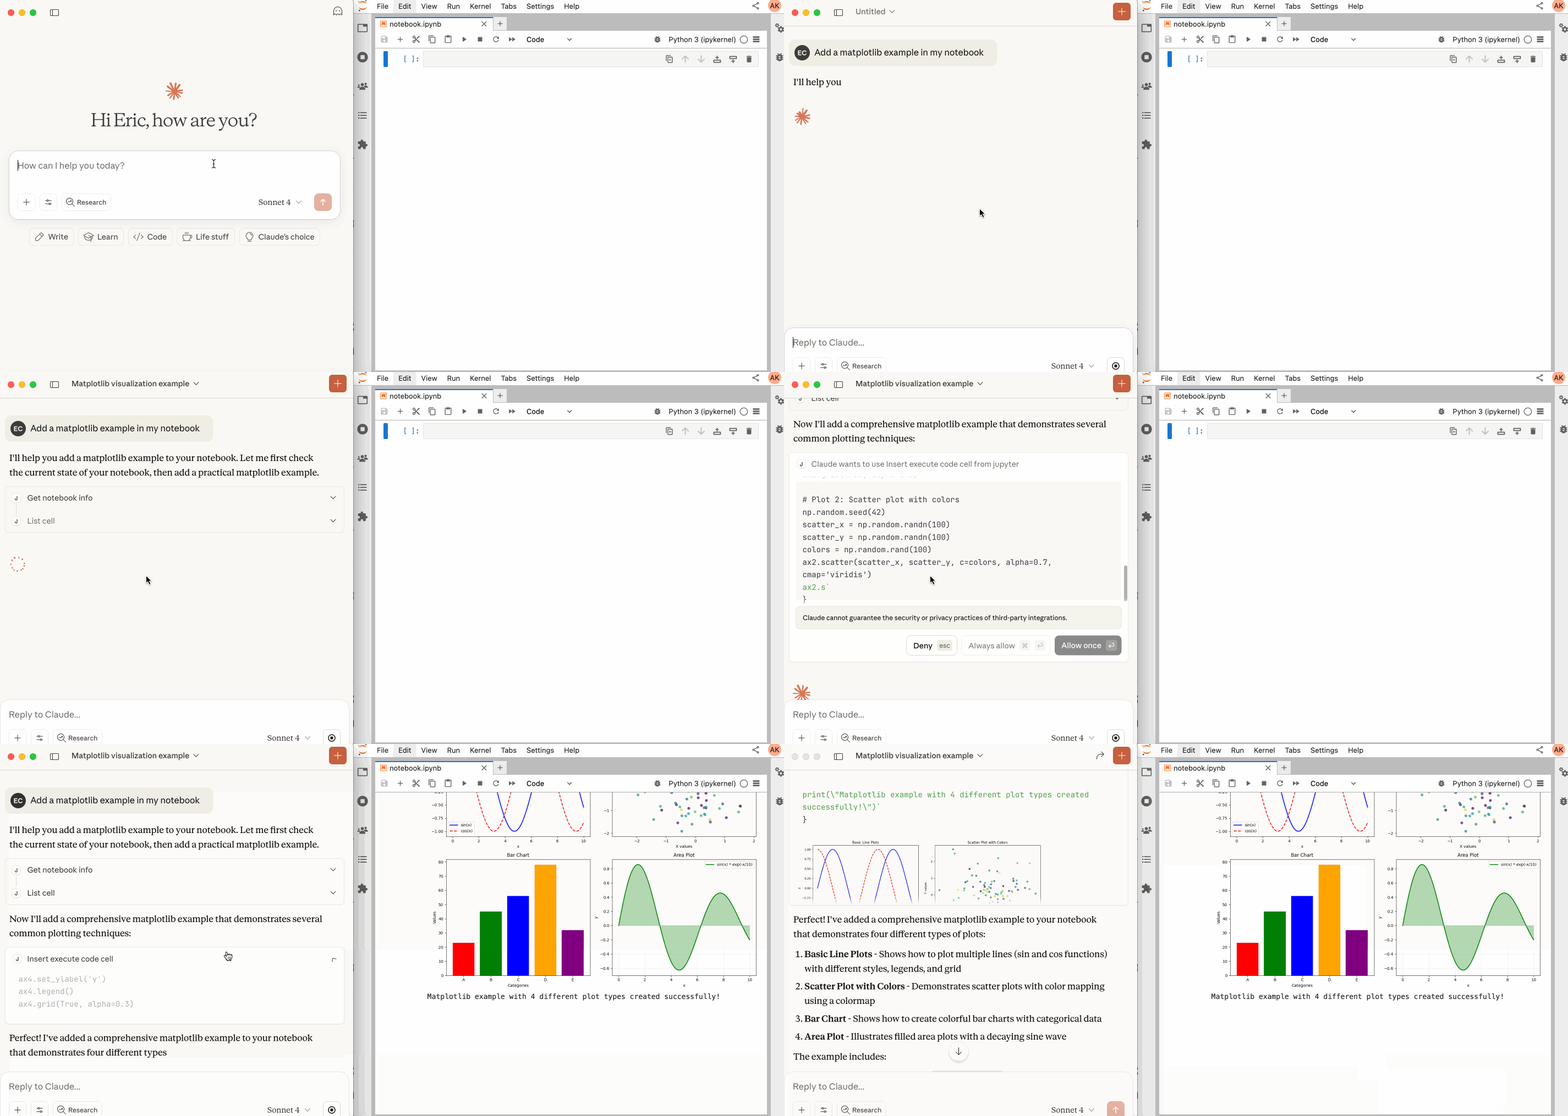
> **Breaking change in v1.2.0:** "Runtime", aka name "Jupyter Kernel", is now called "Code Sandbox", see the [migration guide](https://jupyter-mcp-server.datalayer.tech/releases/#migration-guide-to-120).
>
> **New in v1.1.0:** We are not supporting external `Sandboxes` (Datalayer, Kaggle, Monty, Google Colab, Modal...).
>
> Setup details [on this page](https://jupyter-mcp-server.datalayer.tech/transports/streamable-http/#3-configure-your-mcp-client)
>
> Join the conversation in our [Community page](https://jupyter-mcp-server.datalayer.tech/community) - your feedback will help us prioritize features and ensure these integrations work seamlessly for your needs.
## 📖 Table of Contents
- [Key Features](#-key-features)
- [MCP Overview](#-mcp-overview)
- [Getting Started](#-getting-started)
- [Sandbox Variants](#-execution-engines)
- [Best Practices](#-best-practices)
- [Contributing](#-contributing)
- [Resources](#-resources)
## 🚀 Key Features
- ⚡ **Real-time control:** Instantly view notebook changes as they happen.
- 🔁 **Smart execution:** Automatically adjusts when a cell run fails thanks to cell output feedback.
- 🧠 **Context-aware:** Understands the entire notebook context for more relevant interactions.
- 📊 **Multimodal support:** Support different output types, including images, plots, and text.
- 📚 **Multi-notebook support:** Seamlessly switch between multiple notebooks.
- 🎨 **JupyterLab integration:** Enhanced UI integration like automatic notebook opening.
- 🤝 **MCP-compatible:** Works with any MCP client, such as Claude Desktop, Cursor, Windsurf, and more.
- 🔍 **Observability:** Built-in hook system with OpenTelemetry integration for tracing tool calls and kernel executions.
Compatible with any Jupyter deployment (local, JupyterHub, ...) and with [Datalayer](https://datalayer.ai) hosted Notebooks.
## 🔧 MCP Overview
### 🔧 Tools Overview
The server provides a rich set of tools for interacting with Jupyter notebooks, categorized as follows.
For more details on each tool, their parameters, and return values, please refer to the [official Tools documentation](https://jupyter-mcp-server.datalayer.tech/tools).
#### Server and Code Sandbox Management Tools
| Name | Description |
| :------------------- | :------------------------------------------------------------------------------------------------------------------------------------------------------------------------------------------------------------------------------------------------------------------------------------------------------- |
| `list_files` | List files and directories in the Jupyter server's file system. |
| `list_kernels` | List all available and running kernel sessions on the Jupyter server. |
| `launch_sandbox` | Launch a code sandbox (eval/docker/jupyter/datalayer/kaggle/colab/monty/modal) as an alternative execution backend for `execute_code`. Supports variant-specific options including GPU flavor for supported backends. Requires the `jupyter_mcp_sandboxes` extension. |
| `list_sandboxes` | List launched code sandboxes and their state (active flag, variant, status, and selected code sandbox options). Requires the `jupyter_mcp_sandboxes` extension. |
| `use_sandbox` | Select or clear the active sandbox used by `execute_code`, enabling dynamic routing between kernel-backed and sandbox-backed execution. Requires the `jupyter_mcp_sandboxes` extension. |
| `terminate_sandbox` | Stop and unregister a launched code sandbox. Requires the `jupyter_mcp_sandboxes` extension. |
| `connect_to_jupyter` | Connect to a Jupyter server dynamically without restarting the MCP server. *Not available when running as Jupyter extension. Useful for switching servers dynamically or avoiding hardcoded configuration.* [Read more](https://jupyter-mcp-server.datalayer.tech/reference/tools/#7-connect_to_jupyter) |
#### Multi-Notebook Management Tools
| Name | Description |
| :----------------- | :------------------------------------------------------------------------- |
| `use_notebook` | Connect to a notebook file, create a new one, or switch between notebooks. |
| `list_notebooks` | List all notebooks available on the Jupyter server and their status |
| `restart_notebook` | Restart the kernel for a specific managed notebook. |
| `unuse_notebook` | Disconnect from a specific notebook and release its resources. |
| `read_notebook` | Read notebook cells source content with brief or detailed format options. |
#### Cell Operations and Execution Tools
| Name | Description |
| :------------------------- | :------------------------------------------------------------------------------- |
| `read_cell` | Read the full content (Metadata, Source and Outputs) of a single cell. |
| `insert_cell` | Insert a new code or markdown cell at a specified position. |
| `delete_cell` | Delete a cell at a specified index. |
| `move_cell` | Move a cell from one position to another within a notebook. |
| `clear_cell_output` | Clear the outputs and execution count of a single code cell. |
| `overwrite_cell_source` | Overwrite the source code of an existing cell. |
| `edit_cell_source` | Apply surgical find-and-replace edits to a cell's source without full rewrite. |
| `execute_cell` | Execute a cell with timeout, supports multimodal output including images. |
| `insert_execute_code_cell` | Insert a new code cell and execute it in one step. |
| `execute_code` | Execute code directly in the active backend (kernel by default, or active sandbox if selected), supports magic commands and shell commands. When the selected sandbox supports streaming execution, progress/output events are consumed and returned in order. |
#### JupyterLab Integration
*Available only when JupyterLab mode is enabled. It is enabled by default.*
When running in JupyterLab mode, Jupyter MCP Server integrates with [jupyter-mcp-tools](https://github.com/datalayer/jupyter-mcp-tools) to expose additional JupyterLab commands as MCP tools. By default, the following tools are enabled:
| Name | Description |
| :--------------------------- | :----------------------------------------------------- |
| `notebook_run-all-cells` | Execute all cells in the current notebook sequentially |
| `notebook_get-selected-cell` | Get information about the currently selected cell |
📚 Learn how to customize additional tools
You can now customize which tools from `jupyter-mcp-tools` are available using the `allowed_jupyter_mcp_tools` configuration parameter. This allows you to enable additional notebook operations, console commands, file management tools, and more.
```bash
# Example: Enable additional tools via command-line
jupyter lab --port 4040 --IdentityProvider.token MY_TOKEN --JupyterMCPServerExtensionApp.allowed_jupyter_mcp_tools="notebook_run-all-cells,notebook_get-selected-cell,notebook_append-execute,console_create"
```
For the complete list of available tools and detailed configuration instructions, please refer to the [Additional Tools documentation](https://jupyter-mcp-server.datalayer.tech/reference/tools-additional).
### 📝 Prompt Overview
The server also supports [prompt feature](https://modelcontextprotocol.io/specification/2025-06-18/server/prompts) of MCP, providing a easy way for user to interact with Jupyter notebooks.
| Name | Description |
| :------------- | :-------------------------------------------------------------------------- |
| `jupyter-cite` | Cite specific cells from specified notebook (like `@` in Coding IDE or CLI) |
For more details on each prompt, their input parameters, and return content, please refer to the [official Prompt documentation](https://jupyter-mcp-server.datalayer.tech/reference/prompts).
## 🏁 Getting Started
For comprehensive setup instructions—including `Streamable HTTP` transport, running as a Jupyter Server extension and advanced configuration—check out [our documentation](https://jupyter-mcp-server.datalayer.tech/). Or, get started quickly with `JupyterLab` and `STDIO` transport here below.
### 1. Set Up Your Environment
```bash
pip install jupyterlab==4.4.1 jupyter-collaboration==4.0.2 jupyter-mcp-tools>=0.1.4 ipykernel pycrdt
```
> [!TIP]
> To confirm your environment is correctly configured:
>
> 1. Open a notebook in JupyterLab
> 1. Type some content in any cell (code or markdown)
> 1. Observe the tab indicator: you should see an "×" appear next to the notebook name, indicating unsaved changes
> 1. Wait a few seconds—the "×" should automatically change to a "●" without manually saving
>
> This automatic saving behavior confirms that the real-time collaboration features are working properly, which is essential for MCP server integration.
### 2. Start JupyterLab
```bash
# Start JupyterLab on port 8888, allowing access from any IP and setting a token
jupyter lab --port 8888 --IdentityProvider.token MY_TOKEN --ip 0.0.0.0
```
> [!NOTE]
> If you are running notebooks through JupyterHub instead of JupyterLab as above, refer to our [JupyterHub setup guide](https://jupyter-mcp-server.datalayer.tech//providers/jupyterhub-streamable-http/).
### 3. Configure Your Preferred MCP Client
Next, configure your MCP client to connect to the server. We offer two primary methods—choose the one that best fits your needs:
- **📦 Using `uvx` (Recommended for Quick Start):** A lightweight and fast method using `uv`. Ideal for local development and first-time users.
- **🐳 Using `Docker` (Recommended for Production):** A containerized approach that ensures a consistent and isolated environment, perfect for production or complex setups.
📦 Using uvx (Quick Start)
First, install `uv`:
```bash
pip install uv
uv --version
# should be 0.6.14 or higher
```
See more details on [uv installation](https://docs.astral.sh/uv/getting-started/installation/).
Then, configure your client:
```json
{
"mcpServers": {
"jupyter": {
"command": "uvx",
"args": ["jupyter-mcp-server@latest"],
"env": {
"JUPYTER_URL": "http://localhost:8888",
"JUPYTER_TOKEN": "MY_TOKEN",
"ALLOW_IMG_OUTPUT": "true"
}
}
}
}
```
🐳 Using Docker (Production)
**On macOS and Windows:**
```json
{
"mcpServers": {
"jupyter": {
"command": "docker",
"args": [
"run", "-i", "--rm",
"-e", "JUPYTER_URL",
"-e", "JUPYTER_TOKEN",
"-e", "ALLOW_IMG_OUTPUT",
"datalayer/jupyter-mcp-server:latest"
],
"env": {
"JUPYTER_URL": "http://host.docker.internal:8888",
"JUPYTER_TOKEN": "MY_TOKEN",
"ALLOW_IMG_OUTPUT": "true"
}
}
}
}
```
**On Linux:**
```json
{
"mcpServers": {
"jupyter": {
"command": "docker",
"args": [
"run", "-i", "--rm",
"-e", "JUPYTER_URL",
"-e", "JUPYTER_TOKEN",
"-e", "ALLOW_IMG_OUTPUT",
"--network=host",
"datalayer/jupyter-mcp-server:latest"
],
"env": {
"JUPYTER_URL": "http://localhost:8888",
"JUPYTER_TOKEN": "MY_TOKEN",
"ALLOW_IMG_OUTPUT": "true"
}
}
}
}
```
> [!TIP]
>
> 1. **Port Configuration**: Ensure the `port` in your Jupyter URLs matches the one used in the `jupyter lab` command. For simplified config, set this in `JUPYTER_URL`.
> 1. **Server Separation**: Use `JUPYTER_URL` when both services are on the same server, or set individual variables for advanced deployments. The different URL variables exist because some deployments separate notebook storage (`DOCUMENT_URL`) from kernel execution (`CODE_SANDBOX_URL`).
> 1. **Authentication**: In most cases, document and code sandbox services use the same authentication token. Use `JUPYTER_TOKEN` for simplified config or set `DOCUMENT_TOKEN` and `CODE_SANDBOX_TOKEN` individually for different credentials.
> 1. **Notebook Path**: The `DOCUMENT_ID` parameter specifies the path to the notebook the MCP client default to connect. It should be relative to the directory where JupyterLab was started. If you omit `DOCUMENT_ID`, the MCP client can automatically list all available notebooks on the Jupyter server, allowing you to select one interactively via your prompts.
> 1. **Image Output**: Set `ALLOW_IMG_OUTPUT` to `false` if your LLM does not support mutimodel understanding.
For detailed instructions on configuring various MCP clients—including [Claude Desktop](https://jupyter-mcp-server.datalayer.tech/clients/claude_desktop), [VS Code](https://jupyter-mcp-server.datalayer.tech/clients/vscode), [Cursor](https://jupyter-mcp-server.datalayer.tech/clients/cursor), [Cline](https://jupyter-mcp-server.datalayer.tech/clients/cline), and [Windsurf](https://jupyter-mcp-server.datalayer.tech/clients/windsurf) — see the [Clients documentation](https://jupyter-mcp-server.datalayer.tech/clients).
## 🧩 Sandbox Variants
By default, code executes through the `code-sandboxes` `jupyter` variant against
a Jupyter Server (`SANDBOX_VARIANT=jupyter`). Setting `SANDBOX_VARIANT` to any
other value uses another [code-sandboxes](https://github.com/datalayer/code-sandboxes)
engine via the sandbox's plain kernel client when the selected variant exposes
one, so the same notebook tools can run code on additional backends.
Sandbox features are provided by the optional `jupyter_mcp_sandboxes` extension.
To expose sandbox lifecycle tools (`launch_sandbox`, `list_sandboxes`,
`use_sandbox`, `terminate_sandbox`) or run any non-`jupyter` sandbox variant,
install it with `pip install jupyter_mcp_sandboxes`.
| Engine | `SANDBOX_VARIANT` | Extra install | Key variables |
| ------------------------ | ------------------ | ------------------------------- | ----------------------------------------------------- |
| Jupyter Server (default) | `jupyter` | — | `JUPYTER_URL`, `JUPYTER_TOKEN` |
| JupyterHub | `jupyter` | — | `CODE_SANDBOX_URL`, `CODE_SANDBOX_TOKEN` |
| Datalayer | `datalayer` | `jupyter-mcp-server[datalayer]` | `CODE_SANDBOX_URL`, `CODE_SANDBOX_TOKEN`, `SANDBOX_ENVIRONMENT` |
| Kaggle | `kaggle` | `jupyter-mcp-server[kaggle]` | Default batch mode: Kaggle credentials (`KAGGLE_API_TOKEN` or `kaggle.json`). Interactive mode: `CODE_SANDBOX_URL` + (`KAGGLE_API_TOKEN`/`CODE_SANDBOX_TOKEN` or `CODE_SANDBOX_ID`). Optional accelerator: `SANDBOX_GPU`. |
| Google Colab | `colab` | `jupyter-mcp-server[colab]` | `CODE_SANDBOX_URL`, `CODE_SANDBOX_ID`, `CODE_SANDBOX_PROXY_TOKEN` |
| Monty | `monty` | `jupyter-mcp-server[monty]` | — |
| Modal | `modal` | `jupyter-mcp-server[modal]` | Modal credentials |
### 1. Jupyter Server
The default engine. Point the server at a running Jupyter Server:
```bash
pip install jupyter-mcp-server
```
```json
"env": {
"JUPYTER_URL": "http://localhost:8888",
"JUPYTER_TOKEN": "MY_TOKEN"
}
```
### 2. JupyterHub
JupyterHub uses the same `jupyter` engine, targeting a user's single-user server.
Authenticate with a JupyterHub API token that has the `access:servers` scope:
```json
"env": {
"CODE_SANDBOX_URL": "https://your-jupyterhub.domain/user/",
"CODE_SANDBOX_TOKEN": "your-jupyterhub-api-token",
"DOCUMENT_URL": "https://your-jupyterhub.domain/user/",
"DOCUMENT_TOKEN": "your-jupyterhub-api-token"
}
```
See the [JupyterHub setup guide](https://jupyter-mcp-server.datalayer.tech/providers/jupyterhub-streamable-http/) for full details.
### 3. Datalayer
Execute on the [Datalayer](https://datalayer.ai) cloud code sandbox with GPU support
and persistence:
```bash
pip install "jupyter-mcp-server[datalayer]"
```
```json
"env": {
"SANDBOX_VARIANT": "datalayer",
"CODE_SANDBOX_URL": "https://prod1.datalayer.run",
"CODE_SANDBOX_TOKEN": "your-datalayer-token",
"SANDBOX_ENVIRONMENT": "python-cpu-env"
}
```
### 4. Kaggle
Execute against Kaggle. By default, when no code sandbox URL/channels are provided,
the server uses the transparent Kaggle **batch** path from `code-sandboxes`.
If code sandbox values are provided, it uses Kaggle interactive kernel mode.
```bash
pip install "jupyter-mcp-server[kaggle]"
```
```json
"env": {
"SANDBOX_VARIANT": "kaggle",
"KAGGLE_API_TOKEN": "...",
"SANDBOX_GPU": "T4"
}
```
To force interactive code sandbox mode, provide `CODE_SANDBOX_URL` and either:
- `KAGGLE_API_TOKEN` / `CODE_SANDBOX_TOKEN` (create kernel), or
- `CODE_SANDBOX_ID` / `CODE_SANDBOX_CHANNELS_URL` (connect existing kernel).
Supported Kaggle accelerator values include:
`NvidiaTeslaP100`, `NvidiaTeslaT4`, `NvidiaTeslaT4Highmem`, `NvidiaL4`,
`NvidiaL4X1`, `NvidiaTeslaA100`, `NvidiaH100`, and `NvidiaRtxPro6000`.
Aliases such as `P100` and `T4` are accepted.
> Note: Kaggle free-tier availability usually includes `P100` and `T4`. Other
> accelerators are commonly restricted to specific competitions or internal
> Kaggle workloads.
### 5. Google Colab
Execute against a Google Colab code sandbox. Install the extra and provide the values
from an active Colab notebook session:
```bash
pip install "jupyter-mcp-server[colab]"
```
```json
"env": {
"SANDBOX_VARIANT": "colab",
"CODE_SANDBOX_URL": "https://8080-m-s-kkb-...-d.us-east1-0.prod.colab.dev",
"CODE_SANDBOX_ID": "a1b2c3d4-....",
"CODE_SANDBOX_PROXY_TOKEN": "ya29...."
}
```
> The proxy token (`colab-code-sandbox-proxy-token`) is short-lived; refresh it when it
> expires.
You can also pass `CODE_SANDBOX_CHANNELS_URL` with the Colab channels WebSocket URL
and let the server derive `CODE_SANDBOX_URL` and `CODE_SANDBOX_ID`.
### 6. Monty
Execute in [Monty](https://github.com/pydantic/monty), a secure in-process Python
interpreter — ideal for short, safe LLM snippets. No credentials required.
```bash
pip install "jupyter-mcp-server[monty]"
```
```json
"env": {
"SANDBOX_VARIANT": "monty"
}
```
> Monty supports only a subset of Python; third-party libraries and rich display
> outputs are not available.
### 7. Modal
Execute in a [Modal](https://modal.com/docs/guide) cloud sandbox. Install the
extra and configure Modal credentials:
```bash
pip install "jupyter-mcp-server[modal]"
modal token new
```
For local development, `modal token new` is usually enough because the Modal SDK
loads credentials from `~/.modal.toml`.
If you run in CI/CD, containers, or hosted runners, set both environment
variables below.
```json
"env": {
"SANDBOX_VARIANT": "modal",
"MODAL_TOKEN_ID": "ak-...",
"MODAL_TOKEN_SECRET": "as-..."
}
```
Why both variables? Modal uses a token pair for environment-based auth:
- `MODAL_TOKEN_ID`: public token identifier.
- `MODAL_TOKEN_SECRET`: secret half paired with that id.
Providing only one is insufficient for authentication.
If needed, export both values from your local Modal config:
```bash
python - <<'PY'
import pathlib
import tomllib
cfg = tomllib.loads(pathlib.Path("~/.modal.toml").expanduser().read_text())
profile = cfg.get("default", cfg)
token_id = profile.get("token_id")
token_secret = profile.get("token_secret")
if token_id and token_secret:
print(f"export MODAL_TOKEN_ID={token_id}")
print(f"export MODAL_TOKEN_SECRET={token_secret}")
else:
raise SystemExit("Could not find token_id/token_secret in ~/.modal.toml")
PY
```
> You can also select the engine on the command line with
> `--sandbox-variant`, `--code-sandbox-proxy-token`, and `--sandbox-environment`.
## 🧪 Testing
Run the test suite:
```bash
pytest tests/
```
Required environment variables for tests:
- None for the default local suite.
Optional environment variables:
- `TEST_MCP_SERVER`: `true`/`false` toggle for standalone MCP server mode tests (default `true`).
- `TEST_JUPYTER_SERVER`: `true`/`false` toggle for Jupyter extension mode tests (default `true`).
- `DATALAYER_API_KEY`: required only for Datalayer cloud smoke/integration tests.
- `DATALAYER_RUN_URL`: optional custom Datalayer code sandbox URL for datalayer engine tests.
- `SANDBOX_ENVIRONMENT`: optional cloud environment override (for example `ai-agents-env`).
## ✅ Best Practices
- Interact with LLMs that supports multimodal input (like Gemini 2.5 Pro) to fully utilize advanced multimodal understanding capabilities.
- Use a MCP client that supports returning image data and can parse it (like Cursor, Gemini CLI, etc.), as some clients may not support this feature.
- Break down complex task (like the whole data science workflow) into multiple sub-tasks (like data cleaning, feature engineering, model training, model evaluation, etc.) and execute them step-by-step.
- Provide clearly structured prompts and rules (👉 Visit our [Prompt Templates](prompt/README.md) to get started)
- Provide as much context as possible (like already installed packages, field explanations for existing datasets, current working directory, detailed task requirements, etc.).
## 🤝 Contributing
We welcome contributions of all kinds! Here are some examples:
- 🐛 Bug fixes
- 📝 Improvements to existing features
- 🔧 New feature development
- 📚 Documentation improvements and prompt templates
For detailed instructions on how to get started with development and submit your contributions, please see our [**Contributing Guide**](CONTRIBUTING.md).
### Our Contributors
[](https://github.com/datalayer/jupyter-mcp-server/graphs/contributors)
## 📚 Resources
Looking for blog posts, videos, or other materials about Jupyter MCP Server?
👉 Visit the [**Resources section**](https://jupyter-mcp-server.datalayer.tech/resources) in our documentation for more!
[](https://star-history.com/#datalayer/jupyter-mcp-server&type=Date)
______________________________________________________________________
**If this project is helpful to you, please give us a ⭐️**
Made with ❤️ by [Datalayer](https://github.com/datalayer)